Garmin GC 100 Installation Instructions - Page 1
Garmin GC 100 Manual
 |
View all Garmin GC 100 manuals
Add to My Manuals
Save this manual to your list of manuals |
Page 1 highlights
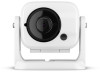
GC™ 100 INSTALLATION INSTRUCTIONS Getting Started WARNING See the Important Safety and Product Information guide in the product box for product warnings and other important information. Mounting Considerations • You must mount the camera in a location where it is not submerged. • You should mount the camera within 76 m (250 ft.) of a chartplotter. The range depends on your installation location and obstacles between the camera and the chartplotter. If the camera is out of range of the chartplotter due to obstacles or distance, you must reposition the camera. • You should test the camera in your desired location before you permanently mount the camera. • You should mount the camera so that the cable can be connected easily. • You should mount the camera in a location where it cannot be damaged by docks, pilings, or other pieces of equipment. • You should mount the camera so it does not present a hazard in doorways or walkways. • You should mount the camera in a location where you can remove the camera. Mounting the Camera 1 Using a 3.2 mm (1/8 in.) drill bit, drill a pilot hole. NOTE: If you are mounting the camera onto fiberglass, it is recommended to use a countersink bit to drill a clearance counterbore through the top gelcoat layer only, but no deeper. This will help to avoid cracking the gelcoat layer when the screws are tightened. 2 Using the included screw, fasten the camera mount to the mounting surface. 3 Insert the camera into the housing . 5 Tighten the tamper-proof side screws using the included tool. 6 Connect the power cable. Connecting to Power WARNING When connecting the power cable, do not remove the in-line fuse holder. To prevent the possibility of injury or product damage caused by fire or overheating, the appropriate fuse must be in place as indicated in the product specifications. In addition, connecting the power cable without the appropriate fuse in place voids the product warranty. 1 Route the power cable to the power source and to the device. 2 Connect the red wire to the positive (+) battery terminal, and connect the black wire to the negative (-) battery terminal. Pairing the GC 100 Camera with a Garmin® Chartplotter Before you can connect a wireless device to the chartplotter wireless network, you must configure the chartplotter wireless network. See your chartplotter manual for information on configuring the wireless network. 1 With the camera within an unobstructed 76 m (250 ft.) of the chartplotter, quickly press three times. 2 On the chartplotter, select Settings > Communications > Wireless Devices > Garmin Camera > Start. 3 Follow the on-screen instructions. Turning the Camera Off Hold for 3 seconds. NOTE: If you hold for more than 10 seconds, the camera resets. Specifications Water rating Operating temperature range Charging temperature range Storage temperature range IEC 60529 IPX6/IPX71 From -20 to 60°C (from -4 to 140°F) From 0 to 45°C (from 32 to 113°F) From -40 to 85°C (from -40 to 185°F) Input voltage From 10 to 30 Vdc, 1.5 A max. Compass-safe distance 10 cm (4 in.) Wireless frequency and protocol 2.4 GHz @ 17 dBm nominal GC 100 Blink Codes After the camera is installed and paired with the chartplotter, the camera turns on when the chartplotter is turned on. The color and blink sequence of the status LED on the camera indicates its operational status. LED Color LED State Status Green Three blinks The camera is turning on. Red Three blinks The camera is turning off. 4 Close the front of the housing. February 2020 TRA REGISTERED No: ER62993/18 DEALER No: DA0015955/08 1 The device withstands incidental exposure to water of up to 1 m for up to 30 min. For more information, go to www.garmin.com/waterrating. TA-2018/1686 GUID-954A35F6-710F-4D78-93CD-48DD69D26558 v4
-
 1
1 -
 2
2
 |
 |
