Garmin GFS 10 Sensor Configuration - Page 2
Using Fuel-Flow Information With a Garmin Chartplotter - o reading
 |
UPC - 753759076337
View all Garmin GFS 10 manuals
Add to My Manuals
Save this manual to your list of manuals |
Page 2 highlights
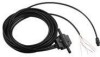
Using Fuel-Flow Information With a Garmin Chartplotter or Marine Instrument Caution: The Garmin chartplotter or marine instrument must be powered on to calculate remaining fuel based on the fuel-flow rate. Important: When using the GFS 10 to calculate remaining fuel based on the fuel-flow rate, you must specify the amount of fuel each time you add fuel to the tank. To specify the amount of fuel added: 1. While viewing the fuel page or fuel instrument screen on your NMEA 2000 or CANet device, select Menu. 2. Choose from the following options: • Fill Up Tank-set fuel level to the maximum capacity. • Add Fuel to Boat-specify the amount of fuel added. • Set Total Fuel Onboard-specify the amount of fuel currently available in the fuel tank or tanks. Changing the Fuel Economy Source The Garmin chartplotter or marine instrument requires a speed sensor in addition to the GFS 10 to calculate fuel economy. To change the fuel economy source: 1. While viewing the fuel page or fuel instrument screen on your NMEA 2000 or CANet device, select Menu > Fuel Economy Source. 2. Select either GPS Speed or Water Speed to specify which speed sensor is used to calculate fuel economy. Using Fuel-Level Information With a Garmin Chartplotter or Marine Instrument To receive fuel-level information, connect the wiring harness on the GFS 10 to the fuel gauge or fuel-level sensor of your boat according to the GFS 10 Installation Instructions. To calibrate fuel-level information from the GFS 10: 1. While in still water, on the NMEA 2000 or CANet device configuration menu, select the GFS 10 device that is connected to the fuel tank you want to configure. Tip: The serial number of each GFS 10 is shown on he NMEA 2000 or CANet device configuration screen to help differentiate between multiple GFS 10 devices. 2. Select Config > Level Calibration > Add Calibration Point and enter a calibration point that corresponds to the current fuel level in that fuel tank. Entering more calibration points will provide a more-accurate reading. For example, entering five calibration points (empty tank, 1/4 tank, 1/2 tank, 3/4 tank, and full tank) will provide a more-accurate reading than entering two calibration points (empty tank and full tank). Tip: For a quick calibration, start with an empty tank, and enter calibration points as you fill up the tank. To reset the fuel-level calibration: 1. While viewing the NMEA 2000 or the CANet device configuration menu, select the GFS 10 device that is connected to the fuel tank you want to configure. 2. Select Config > Level Calibration > Reset Calibration. Configuring Engine and Tank Information If you have a multi-engine or a multi-tank setup on your boat, specify which engine or tank is associated with each GFS 10. Tip: The serial number of each GFS 10 is shown on the NMEA 2000 or the CANet device configuration menu to help differentiate between multiple GFS 10 devices. To configure tank and engine information for the GFS 10: 1. While viewing the NMEA 2000 or the CANet device configuration menu, select the GFS 10 device you want to configure, and select Config. 2. Select from the following options: • Engine Number-for a multi-engine installation, assign the selected GFS 10 to a specific engine. • Tank Number-for a multi-tank installation, assign the selected GFS 10 to a specific tank. • Tank Capacity-define the fuel capacity of the fuel tank that the selected GFS 10 is connected to. © 2008 Garmin Ltd. or its subsidiaries
-
 1
1 -
 2
2
 |
 |
