Garmin GMR 626 xHD2 Open Array Radar and Pedestal Installation Instructions - Page 5
Specifications
 |
View all Garmin GMR 626 xHD2 Open Array Radar and Pedestal manuals
Add to My Manuals
Save this manual to your list of manuals |
Page 5 highlights
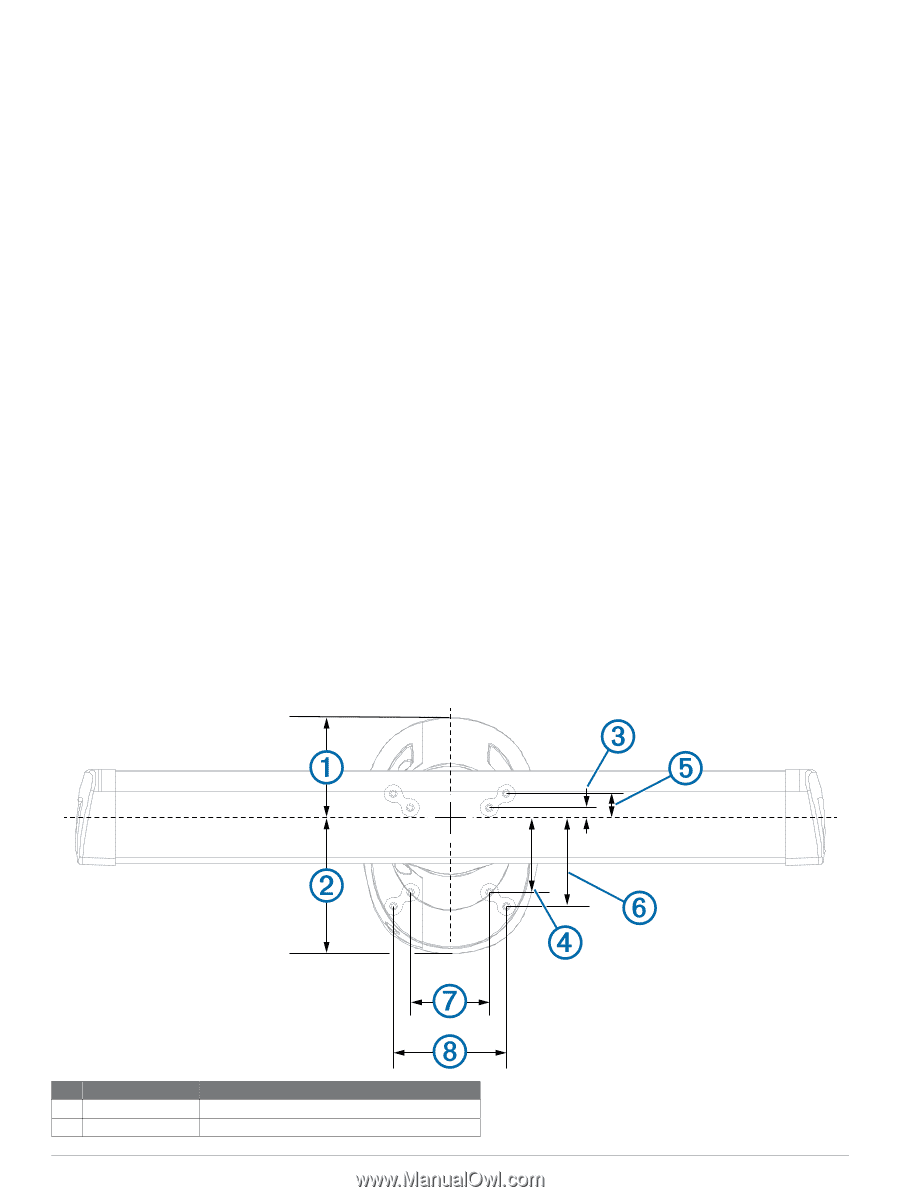
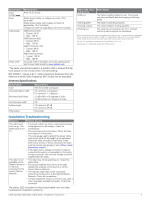
NOTE: In order for the software update instructions to appear, the device must be fully booted before the card is inserted. 3 Follow the on-screen instructions. 4 Wait several minutes while the software update process completes. The device returns to normal operation after the software update process is complete. 5 Remove the memory card. NOTE: If the memory card is removed before the device restarts fully, the software update is not complete. Specifying the Antenna Size Before you can use the radar on your system, you must specify the antenna size. You must mount the radar, connect it to power, and connect it to the Garmin Marine Network before you can specify the antenna size. 1 Turn on the radar and all devices connected to the Garmin Marine Network. An antenna-selection prompt appears on the connected chartplotters. NOTE: If the entire system is being powered on for the first time, the antenna-selection screen is part of the initial setup process. 2 Select the installed antenna size for each open-array radar installed on the boat. TIP: If you need to specify a different antenna size, while viewing the radar screen for the radar you want to change , select Menu > Radar Setup > Antenna Configuration > Antenna Size and select the antenna size. Front-of-Boat Offset The front-of-boat offset compensates for the physical location of the radar scanner on a boat, if the radar scanner does not align with the bow-stern axis. Specifications Dimensions Measuring the Potential Front-of-Boat Offset The front-of-boat offset compensates for the physical location of the radar scanner on a boat, if the radar scanner does not align with the bow-stern axis. 1 Using a magnetic compass, take an optical bearing of a stationary target located within viewable range. 2 Measure the target bearing on the radar. 3 If the bearing deviation is more than +/- 1°, set the front-of- boat offset. Setting the Front-of-Boat Offset Before you can set the front-of-boat offset, you must measure the potential front-of-boat offset. The front-of-boat offset setting configured for use in one radar mode is applied to every other radar mode and to the Radar overlay. 1 From a Radar screen or the Radar overlay, select Menu > Radar Setup > Front of Boat. 2 Select Up or Down to adjust the offset. Setting a Custom Park Position If you have more than one radar on your boat, you must be viewing the radar screen for the radar you want to adjust. By default, the antenna is stopped perpendicular to the pedestal when it is not spinning. You can adjust this position (optional). 1 From the radar screen, select Menu > Radar Setup > Antenna Configuration > Park Position. 2 Use the slider bar to adjust the position of the antenna when stopped, and select Back. Item Measurement Description 181.8 mm (7 3/16 in.) Center of rotation to the rear of the pedestal. À Á 236.2 mm (9 5/16 in.) Center of rotation to the front of the pedestal. GMR 420/620/1220/2520 xHD2 Series Installation Instructions 5
-
 1
1 -
 2
2 -
 3
3 -
 4
4 -
 5
5 -
 6
6 -
 7
7 -
 8
8
 |
 |