Garmin GNX Wired Sail Pack 52 Owners Manual - Page 6
Changing the Layout of Instrument s
 |
View all Garmin GNX Wired Sail Pack 52 manuals
Add to My Manuals
Save this manual to your list of manuals |
Page 6 highlights
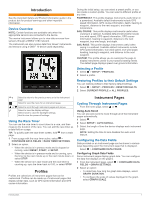
Changing the Layout of Instrument Pages NOTE: You can change the layout of an instrument page to display up to three fields of data from connected instruments. 1 From the instrument page you need to change, select > EDIT CURRENT PAGE > CHANGE LAYOUT. 2 Select the number of fields to show on the instrument page. 3 Select the field to change. 4 Select a category. 5 Select the data to show in the field. 6 Repeat steps 3 through 5 for each additional field you need to change. 7 Select DONE. Adding an Instrument Page You can create a custom page. You can add up to three instruments from instrument collections to display on a custom page. 1 Select > ADD/REMOVE PAGE > ADD PAGE. 2 Select ONE FUNCTION, TWO FUNCTION, or THREE FUNCTION. 3 Select an instrument page collection. 4 Select a number. 5 If necessary, select an empty function. 6 Select or to scroll through the instrument pages. 7 Select an instrument page to add. Removing an Instrument Page 1 Select the instrument page to remove. 2 Select > ADD/REMOVE PAGE > REMOVE PAGE. 3 Select YES. Device Configuration Resolving a Combined Network When the device is turned on, it can detect when it has been synchronized with instruments on another network. This can happen if the device has previously been installed on another vessel and synchronized with instruments on the other vessel's network. If the settings are not restored to the factory default values (Restoring Profiles to their Default Settings, page 1), the device detects a conflict that must be resolved. 1 Select > SETUP > COMBINED NETWORKS DETECTED. 2 Select an option: • To synchronize existing instruments on the network to the device, select NO. • To synchronize the device to existing instruments on the network, select YES. System Settings Select > SETUP > SYSTEM. UNITS: Sets the units of measure. HEADING: Sets the reference and the variance used in calculating heading information. BEEPER: Sets when audible sounds are used. GPS POSITION: Sets the position format and the map datum. The map datum is dependent on the position format. AUTO POWER: Enables the device to turn on automatically when the NMEA network turns on. LANGUAGE: Sets the on-screen language. TIME: Sets the time format, time zone, and daylight saving time for your location. SYSTEM INFORMATION: Displays software information. FACTORY DEFAULT: Resets the device settings to factory default values. Selecting the Heading Type 1 Select > SETUP > SYSTEM > HEADING. 2 Select NORTH REFERENCE. 3 Select an option: • To automatically set the magnetic declination for your GPS position, select MAGNETIC. • To set true north as the heading reference, select TRUE. • To set grid north as the heading reference (000°), select GRID. Configuring the Beeper You can configure the beeper to sound when the keys are pressed. Select > SETUP > SYSTEM > BEEPER. Configuring the Position Format NOTE: Do not change the position format or the map datum unless you are using a map or chart that specifies a different position format. 1 Select > SETUP > SYSTEM > GPS POSITION. 2 Select an option: • To change the position format in which a reading appears, select POSITION FORMAT. • To change the coordinate system on which the map is structured, select MAP DATUM. Configuring Data Sources Instruments that are connected to your device and provide data, such as wind sensors or speed sensors, can be configured through your device. Refer to your instruments' owner's manuals for more information. 1 Select > SETUP > DATA SOURCES. 2 Select a data source and configure it. 3 Select your instrument. 4 Select a source and configure. Display Settings Select > SETUP > DISPLAY. BACKLIGHT: Sets the backlight brightness. COLOR: Sets the screen color. NETWORK SHARING: Shares color and backlight settings with devices across the NMEA 2000® or NMEA 0183 networks. Viewing and Editing NMEA Settings You can view information about NMEA or NMEA 2000 device and change device-specific options. 1 Select . 2 Select SETUP. 3 Select NMEA 0183 or NMEA 2000 DEVICES. 4 If necessary, select an option: • To view information about the device, such as the software version and the serial number, select DEVICE LIST. • To change the label of a device, select LABEL DEVICES. 2 Device Configuration
-
 1
1 -
 2
2 -
 3
3 -
 4
4 -
 5
5 -
 6
6 -
 7
7 -
 8
8 -
 9
9 -
 10
10
 |
 |
