Garmin GPS III Plus 'Plus' Features Addendum - Page 3
Exits, Nearest Exits and Nearest Cities, Other New City Features, MapSource Info
 |
UPC - 753759015817
View all Garmin GPS III Plus manuals
Add to My Manuals
Save this manual to your list of manuals |
Page 3 highlights
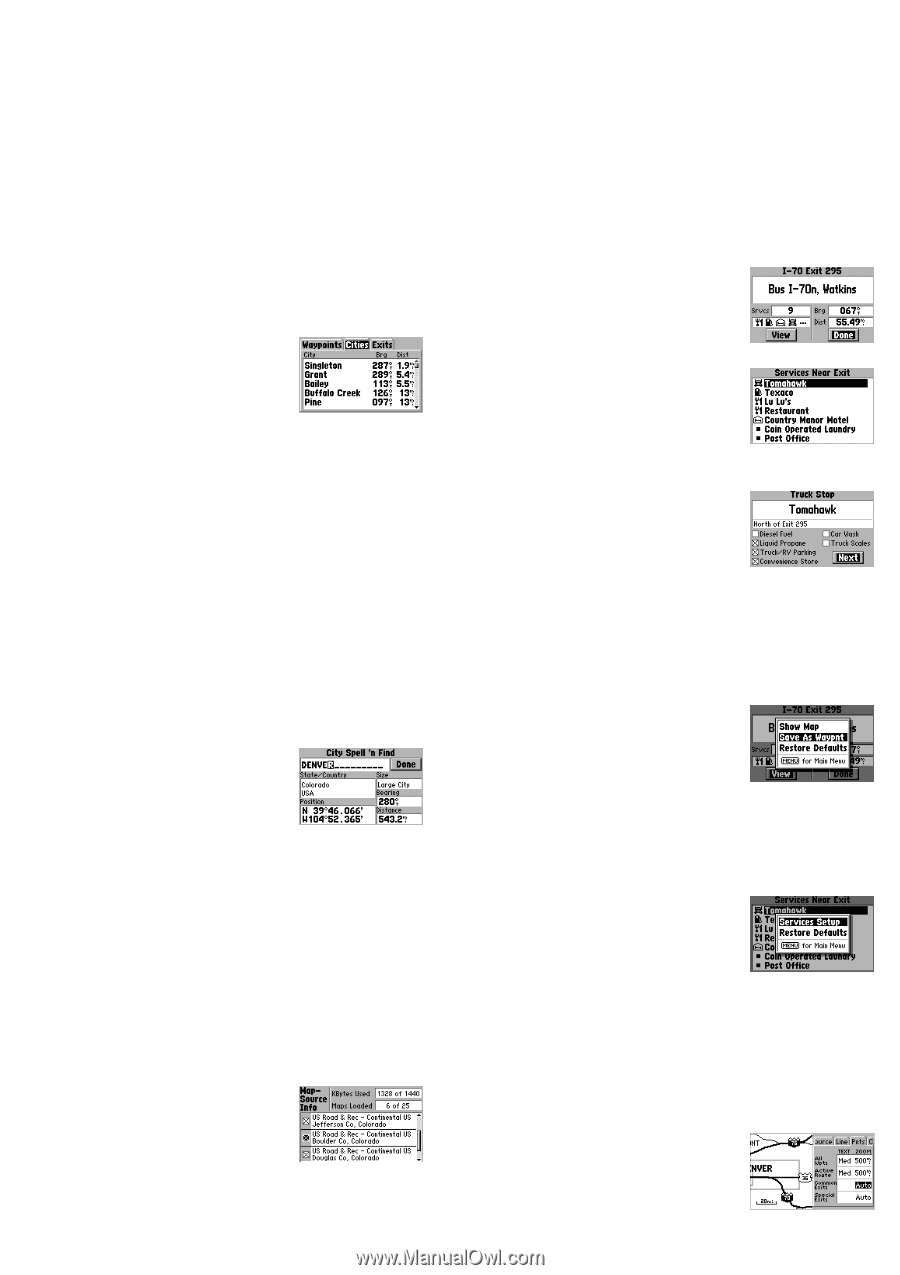
Nearest Exits and Nearest Cities The Nearest Waypoint List has been expanded to include the 50 nearest cities and 50 nearest exits. The nearest lists are arranged under “file tabs” for: Waypoints, Cities and Exits. To display the nearest exits or nearest cities: 1. Press MENU twice to display the Main Menu. 2. Use the ROCKER KEYPAD to highlight “Nearest” and press ENTER. 3. Highlight the desired file tab—”Cities” or “Exits”—to display the corresponding list. 4. Highlight any exit or city in the list and press ENTER to display an info page for that item. At this point, the “Save As Waypnt” option previously described for exits, is available for exits or cities. Other New City Features City classifications have been modified as follows: Large cities are those with approximate populations greater than 200,000. Medium cities are greater than 20,000 and small cities are greater than 5,000. Small towns have been added and include those with approximate populations under 5,000 or of unknown size. A City Spell ‘n Find feature allows you to search the built-in database for a particular city or town. The City Spell ‘n Find Page will display the size, location, bearing and distance to the selected city. To select a city from the built-in database: 1. Press MENU twice to display the Main Menu. 2. Use the ROCKER KEYPAD to highlight “Cities” and press ENTER. 3. Use the ROCKER KEYPAD to spell the name of the desired city—UP/DOWN to select the desired character and RIGHT to move to the next character space. As you enter the first few characters of the city name, the GPS III Plus will select the first entry in the database that corresponds to the characters you have entered. Once you have selected the city, press ENTER. 4. To save the city location as a waypoint, press MENU and select the “Save as Waypnt” option. 5. To determine the distance between the selected city and a waypoint, press MENU and select the “Show Reference” option. Then use the ENTER key and the ROCKER KEYPAD to enter the name of the reference waypoint. MapSource Info “MapSource Info” is a new option in the Map Page Options window. The MapSource Info Page shows the number of maps downloaded from the MapSource program and the amount of memory used (in kilobytes). Each downloaded map is described, by name, and may be deselected if you wish to retain the map in memory, but not display the data. To display the MapSource Info Page: 1. With the Map Page displayed, press MENU to display the Map Page Options. Then, use the ROCKER KEYPAD to highlight “MapSource Info” and press ENTER. 2. Use the UP or DOWN side of the ROCKER KEYPAD to scroll through the list of downloaded maps. 3. To select/deselect a map, highlight the field adjacent to the desired map. Press ENTER to select/deselect the map. The map is selected and will be displayed on the Map Page when an “X” appears in the field adjacent to that map. Exits Exit information is available from the built-in base map and any additional maps downloaded from MapSource. Exits are categorized in two types: Common Exits: traditional ramp, cloverleaf or intersection exits Special Exits: rest areas, service areas, toll booths, welcome centers and weigh stations Common exits are depicted with an open square icon when services are available and a filled-gray square icon when no services are available. To display available services for an exit shown on the map: 1. Use the ROCKER KEYPAD to place the panning pointer on the desired exit. A window will appear showing the exit number and icons depicting the available services. 2. Press ENTER to display the Exit Info Page for the selected exit. The Exit Info Page shows the number of available services, and the bearing and distance to the exit location. 3. Highlight the “View” button at the bottom of the page and press ENTER to display the Services Near Exit List. The Services Near Exit List shows a services icon and the name for each available service. 4. Highlight the desired service and press ENTER to display an Exit Service Detail Page. This page provides a checklist of available services—such as fuels, parking, convenience stores, etc. 5. Press QUIT, as often as needed, to back out of each exit services page. If you continue to press QUIT you will return to the Map Page. Several exit options are available as well—including the option to save an exit location as a waypoint and a setup feature to exclude those services you don’t wish to view. Exit symbols can also be removed from the Map Page, if desired. To save an exit location as a waypoint: 1. Select the exit location using the steps above and display the Exit Info Page for the desired exit. 2. Press MENU to display an options window. 3. Highlight “Save As Waypnt” and press ENTER. A waypoint will automatically be created using the exit name. 4. With “Done” highlighted, press ENTER to save the new waypoint. To exclude some services from the exit services pages: 1. Select the Services Near Exit Page using the steps above. 2. Press MENU to display an options window. 3. Highlight “Services Setup” and press ENTER. A Service Categories Page is displayed, allowing you to select (designated by an “X”) or deselect the services you wish to have listed. 4. To select or deselect a service category, highlight the box adjacent to the desired category and press ENTER to select or deselect the category. To remove/add exit symbols from the Map Page: 1. With the Map Page displayed, press MENU to display the Map Page Options. 2. Highlight “Map Setup” and press ENTER. The map settings pages are organized under a series of “file tabs”. 3. Highlight the “Pnts” (changed from “Wpts” in the GPS III manual) file tab. 4. Highlight the field adjacent to “Common Exits” or “Special Exits” and press ENTER. A window will appear allowing you to disable the selected exit category entirely or select the maximum scale at which you want the feature to appear. 5. Highlight the desired option and press ENTER.
-
 1
1 -
 2
2 -
 3
3 -
 4
4
 |
 |