Garmin GPSMAP 66 Instructions - Page 2
Attaching an AMPS Base Plate to the Mount
 |
View all Garmin GPSMAP 66 manuals
Add to My Manuals
Save this manual to your list of manuals |
Page 2 highlights
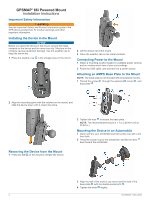
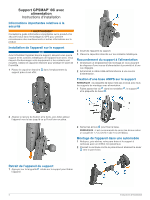
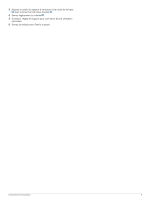
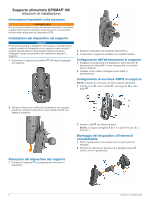
GPSMAP® 66i Powered Mount Installation Instructions Important Safety Information WARNING See the Important Safety and Product Information guide in the GPS device product box for product warnings and other important information. Installing the Device in the Mount NOTICE Before you place the device in the mount, ensure the metal contacts on the device and the mount are dry. Moisture on the contacts causes equipment damage. Use the weather cap to keep the mount dry. 1 Place the weather cap in the storage area on the mount. 2 Lift the device out of the mount. 3 Place the weather cap on the metal contacts. Connecting Power to the Mount 1 Select a mounting location based on available power sources and an unobstructed view of your surroundings. 2 Route the USB cable, and connect it to a power source. Attaching an AMPS Base Plate to the Mount NOTE: The base plate is not included with all powered mounts. 1 Thread the screws through the washers , mount , and base plate . 2 Align the mounting spine with the notches on the mount, and slide the device down until it snaps into place. Removing the Device from the Mount 1 Press the tab on the mount to release the device. 2 Tighten the nuts to secure the base plate. NOTE: The recommended torque is 1.7 to 2.25 N-m (15 to 20 lbf-in.). Mounting the Device in an Automobile 1 Clean and dry your windshield and the suction cup with a lintfree cloth. 2 Press the suction cup to the windshield, and flip the lever back toward the windshield. 3 Align the ball of the suction cup mount and the ball of the base plate with the double-socket arm . 4 Tighten the knob slightly. 2 Installation Instructions
-
 1
1 -
 2
2 -
 3
3 -
 4
4 -
 5
5 -
 6
6 -
 7
7 -
 8
8 -
9
-
10
-
11
-
12
-
13
-
14
-
15
-
16
-
17
-
18
-
19
-
20
-
21
-
22
-
23
-
24
-
25
-
26
-
27
-
28
-
29
-
30
-
31
-
32
-
33
-
34
-
35
-
36
-
37
-
38
 |
 |