Garmin GPSMAP 7212 Owner's Manual - Page 65
Configuring Speed Data Sources, Auto Guidance Line Configurations, Distance, Change Distance
 |
View all Garmin GPSMAP 7212 manuals
Add to My Manuals
Save this manual to your list of manuals |
Page 65 highlights
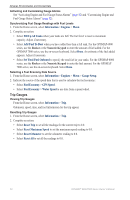
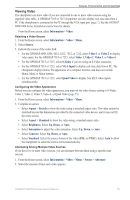
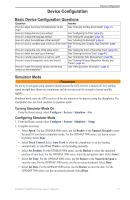
Device Configuration • Select Distance. Select Change Distance. For the GPSMAP 6000 series, use the Rocker or the Numeric Keypad to enter the distance. For the GPSMAP 7000 series, use the on-screen keyboard. 3. Select Done. Configuring Speed Data Sources You can specify the source of the speed data that is used to calculate true wind speed or fuel economy. Water speed is the speed reading from a water-speed sensor, and GPS speed is calculated from your GPS position. 1. From the Home screen, select Configure > Preferences > Navigation > Speed Sources. 2. Complete an action: • Select Wind, and indicate whether the calculated wind speed data comes from a Water Speed sensor, if it is based on the GPS Speed, or whether the chartplotter selects a speed data source automatically. • Select Fuel Economy, and indicate whether the speed data that is used to calculate fuel economy comes from a Water Speed sensor or if it is based on the GPS Speed. Auto Guidance Line Configurations You can set the data the chartplotter uses when calculating an Auto Guidance line. Note: Auto Guidance is available with a preprogrammed BlueChart g2 Vision data card. Safe Water Depth and Safe Obstacle Height CAUTION The Safe Depth and Safe Height settings influence how the chartplotter calculates an Auto Guidance line. If an area has an unknown water depth or an unknown obstacle height, the Auto Guidance line is not calculated in that area. If an area at the beginning or the end of an Auto Guidance line is shallower than the safe water depth or lower than the safe obstacle height, the Auto Guidance line is not calculated in that area. On the chart, the course through those areas appears as a gray line. When your boat enters one of those areas, a message appears. Setting the Safe Water Depth and the Safe Obstacle Height 1. From the Home screen, select Configure > Preferences > Navigation > Auto Guidance. 2. Select Safe Depth to set the minimum depth (chart depth datum) the chartplotter uses when calculating an Auto Guidance line. 3. Enter the minimum safe depth: • For the GPSMAP 6000 series, use the Rocker or the Numeric Keypad. • For the GPSMAP 7000 series, use the on-screen keyboard. 4. Select Done. 5. Select Safe Height to set the minimum height (chart height datum) of a bridge that your boat can safely travel under. 6. Enter the minimum safe height: • For the GPSMAP 6000 series, use the Rocker or the Numeric Keypad. • For the GPSMAP 7000 series, use the on-screen keyboard. 7. Select Done. GPSMAP® 6000/7000 Series Owner's Manual 59
-
 1
1 -
2
-
3
-
4
-
5
-
6
-
7
-
8
-
9
-
10
-
11
-
12
-
13
-
14
-
15
-
16
-
17
-
18
-
19
-
20
-
21
-
22
-
23
-
24
-
25
-
26
-
27
-
28
-
29
-
30
-
31
-
32
-
33
-
34
-
35
-
36
-
37
-
38
-
39
-
40
-
41
-
42
-
43
-
44
-
45
-
46
-
47
-
48
-
49
-
50
-
51
-
52
-
53
-
54
-
55
-
56
-
57
-
58
-
59
-
 60
60 -
 61
61 -
 62
62 -
 63
63 -
 64
64 -
 65
65 -
 66
66 -
 67
67 -
 68
68 -
 69
69 -
 70
70 -
71
-
72
-
73
-
74
-
75
-
76
-
77
-
78
-
79
-
80
-
81
-
82
-
83
-
84
-
85
-
86
-
87
-
88
-
89
-
90
-
91
-
92
-
93
-
94
-
95
-
96
-
97
-
98
-
99
-
100
-
101
-
102
-
103
-
104
-
105
-
106
-
107
-
108
-
109
-
110
-
111
-
112
-
113
-
114
-
115
-
116
-
117
-
118
-
119
-
120
-
121
-
122
-
123
-
124
-
125
-
126
-
127
-
128
-
129
-
130
-
131
-
132
 |
 |
