Garmin GPSMAP 86i Owners Manual - Page 5
GPSMAP 86s/sc Device Overview, GPSMAP 86i/sci Device Overview, Buttons, Charging the Device
 |
View all Garmin GPSMAP 86i manuals
Add to My Manuals
Save this manual to your list of manuals |
Page 5 highlights
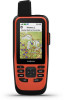
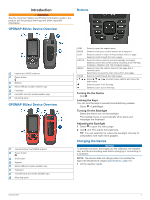
Introduction WARNING See the Important Safety and Product Information guide in the product box for product warnings and other important information. GPSMAP 86s/sc Device Overview Buttons Internal and GNSS antenna Power button Buttons Micro-USB port (under weather cap) Flashlight microSD® card slot (under weather cap) Mounting spine GPSMAP 86i/sci Device Overview Internal Iridium® and GNSS antenna Power button SOS button Keypad Micro-USB port (under weather cap) Flashlight microSD card slot (under weather cap) Mounting spine Introduction FIND MARK QUIT ENTER MENU PAGE Select to open the search menu. Select to save your current location as a waypoint. Select to cancel or return to the previous menu or page. Select to scroll through the main pages. Select to choose options and acknowledge messages. Select to control the current activity recording (from the Map, Compass, Altimeter, and Trip Computer pages). Select to open the options menu for the page that is currently open. Select twice to open the main menu (from any page). Select to scroll through the main pages. Select , , , or to select menu options and move the map cursor. Select to zoom in on the map. Select to zoom out on the map. Turning On the Device Hold . Locking the Keys You can lock the keys to prevent inadvertent key presses. Select > Lock Keys. Turning On the Backlight Select any key to turn on the backlight. The backlight turns on automatically when alerts and messages are displayed. Adjusting the Backlight 1 Select to open the status page. 2 Use and to adjust the brightness. TIP: You can select NV to reduce the backlight intensity for compatibility with night vision goggles. Charging the Device NOTICE To prevent corrosion, thoroughly dry the USB port, the weather cap, and the surrounding area before charging or connecting to a computer. NOTE: The device does not charge when it is outside the approved temperature range (Specifications, page 18). 1 Lift the weather cap . 1
-
 1
1 -
 2
2 -
 3
3 -
 4
4 -
 5
5 -
 6
6 -
 7
7 -
 8
8 -
 9
9 -
 10
10 -
 11
11 -
12
-
13
-
14
-
15
-
16
-
17
-
18
-
19
-
20
-
21
-
22
-
23
-
24
-
25
-
26
-
27
-
28
 |
 |
