Garmin GTM 12 Owner's Manual - Page 2
Connecting Your GTM 12, Using Traffic Data with Your Garmin, GPS Device - reviews
 |
UPC - 753759061357
View all Garmin GTM 12 manuals
Add to My Manuals
Save this manual to your list of manuals |
Page 2 highlights
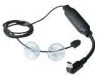
Connecting Your GTM 12 1. Connect your Garmin GPS device to external power. 2. Connect the mini-USB plug on the GTM 12 to the mini-USB connector on your Garmin GPS device. Antenna: route on windshield using the suction cups Mini-USB plug: connect to the mini-USB connector on your Garmin GPS device 3. Use the suction cups to position the antenna on the windshield. For best results, position the antenna vertically. CAUTION: Drivers in California and Minnesota are prohibited from placing anything on the windshield of a vehicle. See the back page for more information. 4. Route the GTM 12 cable so it does not interfere with vehicle operating controls. Using Traffic Data with Your Garmin GPS Device The GTM 12 works with your Garmin GPS device to show traffic flow and incident information and enable routing around traffic incidents. Although each GPS device operates differently, they all provide similar traffic information. Avoiding Traffic The Map page shows a when there is a traffic incident on your current route or on the road you are traveling on. Touch the to view the traffic information. Touch a traffic incident to review it. Touch Avoid to route around the incident. Viewing Traffic Information Each GPS device provides a list of traffic incidents. On many GPS devices, you can access this list by touching the traffic icon on the Menu page. Touch an item in the list to view the details. Severity Color Code In the traffic incidents list, the bars to the left of the traffic symbols indicate the traffic incident's severity: Green = Low severity; traffic is flowing normally. Yellow = Medium severity; traffic is a bit congested. Red = High severity; traffic is heavily congested or stopped.
-
 1
1 -
 2
2 -
 3
3 -
 4
4
 |
 |
