Garmin GTR 200 GTR 200 Installation Manual - Page 26
Post Installation Configuration and Checkout Procedures, LARGE and SMALL - harness
 |
View all Garmin GTR 200 manuals
Add to My Manuals
Save this manual to your list of manuals |
Page 26 highlights
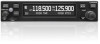
3.6 Post Installation Configuration and Checkout Procedures 3.6.1 System Configuration Overview This section contains checks to ensure the system is properly installed and functioning correctly as well as instructions for configuring the GTR 200 to the specific installation. Follow the instructions in Section 3.6.2 through Section 3.6.7.1 in order to complete all post installation configuration and checkout procedures. 3.6.2 Mounting, Wiring, and Power Checks Verify that all cables are properly secured and shields are connected to the shield block of the connectors. Check the movement of the flight and engine controls to verify there is no interference between the cabling and control systems. Ensure that all wiring is installed as described in Section 2.7. Prior to powering up the unit, the wiring harness must be checked for proper connections to the aircraft systems and other avionics equipment. Point to point continuity must be checked to expose any faults such as shorting to ground. Any faults or discrepancies must be corrected before proceeding. After accomplishing a continuity check, perform power and ground checks to verify proper power distribution to the GTR 200. Any faults or discrepancies should be corrected at this time. Remove power from the aircraft upon completion of the harness checkout. The GTR 200 can be installed after completion of the continuity and power checks. The GTR 200 should be installed into the rack and secured appropriately, as described in Section 3.4.2. The GTR 200 must be connected to the wiring harness and antenna. 3.6.3 Configuration Mode The configuration pages shown in this section reflect main software version 2.00. Some differences in operation may be observed when comparing the information in this manual to later software versions. Refer to Figure 3-1 to identify knobs, buttons, and softkeys used in the configuration procedures. Configuration mode is used to configure the unit settings for each specific installation. To access configuration mode, remove power from the unit. With the unit turned off, press and hold the SMALL Knob and apply power by turning the Power/Volume/Squelch Knob clockwise. Release the SMALL Knob when the display activates, the Config Mode Home page will be displayed (Figure 3-2). Menu Button Softkey Active Labels Frequency Frequency Standby Transfer Frequency Key Monitor Standby Frequency Power/ Volume/ Squelch Knob Micro SD Card Slot Softkeys 1 (top) Active and 2 (bottom) Frequency Identifier Standby Frequency Identifier Figure 3-1 GTR 200 Front Panel LARGE and SMALL Knobs GTR 200 Installation Manual Page 3-4 190-01553-00 Rev. A
-
 1
1 -
2
-
3
-
4
-
5
-
6
-
7
-
8
-
9
-
10
-
11
-
12
-
13
-
14
-
15
-
16
-
17
-
18
-
19
-
20
-
 21
21 -
 22
22 -
 23
23 -
 24
24 -
 25
25 -
 26
26 -
 27
27 -
 28
28 -
 29
29 -
 30
30 -
 31
31 -
32
-
33
-
34
-
35
-
36
-
37
-
38
-
39
-
40
-
41
-
42
-
43
-
44
-
45
-
46
-
47
-
48
-
49
-
50
-
51
-
52
-
53
-
54
-
55
-
56
-
57
-
58
-
59
-
60
-
61
-
62
-
63
-
64
-
65
-
66
-
67
-
68
-
69
-
70
-
71
-
72
-
73
-
74
-
75
 |
 |
