Garmin Montana 700i Owners Manual - Page 5
Device Overviews, Installing the Lithium-ion Battery - accessories
 |
View all Garmin Montana 700i manuals
Add to My Manuals
Save this manual to your list of manuals |
Page 5 highlights
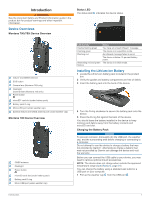
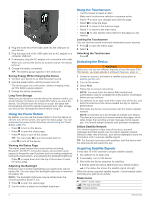
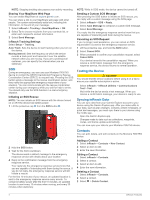
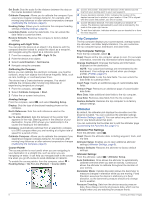
Introduction WARNING See the Important Safety and Product Information guide in the product box for product warnings and other important information. Device Overviews Montana 700i/750i Device Overview Status LED The status LED indicates the device status. Iridium® and GNSS antenna SOS button Camera lens (Montana 750i only) Flashlight Camera flash (Montana 750i only) Power button microSD® card slot (under battery pack) Battery pack D-ring Micro-USB port (under weather cap) External Iridium and GNSS antenna port (under weather cap) Montana 700 Device Overview GNSS antenna Flashlight Power button microSD card slot (under battery pack) Battery pack D-ring Micro-USB port (under weather cap) LED Activity Double flashing green Flashing green Flashing red Alternating red and green flashes Status You have an unread inReach® message. The device is in expedition mode. An inReach message failed to send. The device is below 10-percent battery power. The device is in SOS mode. Installing the Lithium-ion Battery 1 Locate the Lithium-ion battery pack included in the product box. 2 Verify the gasket and battery compartment are free of debris. 3 Insert the battery pack into the back of the device. 4 Turn the D-ring clockwise to secure the battery pack onto the device. 5 Press the D-ring flat against the back of the device. You should leave the battery installed in the device to keep moisture and debris away from the battery contacts and microSD card slot. Charging the Battery Pack NOTICE To prevent corrosion, thoroughly dry the USB port, the weather cap, and the surrounding area before charging or connecting to a computer. Do not attempt to use the device to charge a battery that was not provided by Garmin®. Attempting to charge a battery that was not provided by Garmin can damage the device and void the warranty. Before you can connect the USB cable to your device, you may need to remove optional mount accessories. NOTE: The device does not charge when outside the approved temperature range (Specifications, page 24). You can charge the battery using a standard wall outlet or a USB port on your computer. 1 Pull up the weather cap from the USB port . Introduction 1
-
 1
1 -
 2
2 -
 3
3 -
 4
4 -
 5
5 -
 6
6 -
 7
7 -
 8
8 -
 9
9 -
 10
10 -
 11
11 -
12
-
13
-
14
-
15
-
16
-
17
-
18
-
19
-
20
-
21
-
22
-
23
-
24
-
25
-
26
-
27
-
28
-
29
-
30
-
31
-
32
-
33
-
34
 |
 |