Garmin Oregon 650 Owner's Manual - Page 18
Troubleshooting, Attaching the Carabiner Clip, Optional Maps, tempe - t for sale
 |
View all Garmin Oregon 650 manuals
Add to My Manuals
Save this manual to your list of manuals |
Page 18 highlights
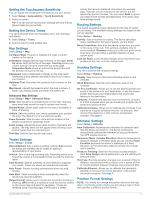
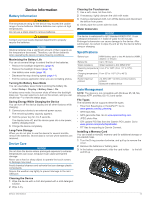
4 Place the memory card with the gold contacts facing down. Á 5 Close the card holder. 6 Slide the card holder to the right to lock it. 7 Replace the batteries or battery pack. 8 Replace the battery cover, and turn the D-ring clockwise. Connecting the Device to Your Computer NOTICE To prevent corrosion, thoroughly dry the mini-USB port, the weather cap, and the surrounding area before charging or connecting to a computer. Before you can connect the straight connector of the USB cable to your device, you may have to remove optional mount accessories. 1 Pull up the weather cap from the mini-USB port. 2 Plug the small end of the USB cable into the mini-USB port. 3 Plug the large end of the USB cable into a computer USB port. Your device and memory card (optional) appear as removable drives in My Computer on Windows computers and as mounted volumes on Mac computers. Transferring Files to Your Device 1 Connect the device to your computer (page 14). Your device and memory card (optional) appear as removable drives in My Computer on Windows computers and as mounted volumes on Mac computers. NOTE: Some computers with multiple network drives cannot display device drives. See your operating system help file to learn how to map the drive. 2 On your computer, open the file browser. 3 Select a file. 4 Select Edit > Copy. 5 Open the Garmin or memory card drive or volume. 6 Select Edit > Paste. The file appears in the list of files in the device memory or on the memory card. Deleting Files NOTICE If you do not know the purpose of a file, do not delete it. Your device memory contains important system files that should not be deleted. 1 Open the Garmin drive or volume. 2 If necessary, open a folder or volume. 3 Select a file. 4 Press the Delete key on your keyboard. Disconnecting the USB Cable If your device is connected to your computer as a removable drive or volume, you must safely disconnect your device from your computer to avoid data loss. If your device is connected to your Windows computer as a portable device, it is not necessary to safely disconnect. 1 Complete an action: • For Windows computers, select the Safely Remove Hardware icon in the system tray, and select your device. • For Mac computers, drag the volume icon to the trash. 2 Disconnect the cable from your computer. Troubleshooting Viewing Device Information You can view the unit ID, software version, and license agreement. Select Setup > About. Updating the Software NOTE: Updating the software does not erase any of your data or settings. 1 Connect your device to a computer using the USB cable. 2 Go to www.garmin.com/ products / webupdater. 3 Follow the on-screen instructions. Resetting the Device If the device stops responding, you may need to reset it. This does not erase any of your data or settings. 1 Remove the batteries. 2 Reinstall the batteries. Registering Your Device Help us better support you by completing our online registration today. • Go to http: / / my .garmin .com. • Keep the original sales receipt, or a photocopy, in a safe place. Getting More Information You can find more information about this product on the Garmin website. • Go to www.garmin.com/ outdoor. • Go to www.garmin.com/ learningcenter. • Go to http: / / buy .garmin .com, or contact your Garmin dealer for information about optional accessories and replacement parts. Appendix Attaching the Carabiner Clip 1 Position the carabiner clip in the slots on the mounting spine of the device. À Á 2 Slide the carabiner clip up until it locks in place. Removing the Carabiner Clip Lift up on the bottom of the carabiner clip, and slide the carabiner clip off the mounting spine. Optional Maps You can use additional maps with the device, such as BirdsEye satellite imagery, BlueChart g2, and City Navigator detailed maps. Detailed maps may contain additional points of interest, such as restaurants or marine services. For more information, go to http: / / buy .garmin .com or contact your Garmin dealer. tempe The tempe is an ANT + wireless temperature sensor. You can attach the sensor to a secure strap or loop where it is exposed 14 Appendix
-
 1
1 -
2
-
3
-
4
-
5
-
6
-
7
-
8
-
9
-
10
-
11
-
12
-
 13
13 -
 14
14 -
 15
15 -
 16
16 -
 17
17 -
 18
18 -
 19
19 -
 20
20 -
 21
21 -
 22
22
 |
 |