Garmin Rino 520HCx Quick Reference Guide - Page 2
Changing the Name and Symbol - gps frs radio
 |
UPC - 753759066833
View all Garmin Rino 520HCx manuals
Add to My Manuals
Save this manual to your list of manuals |
Page 2 highlights
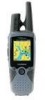
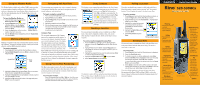
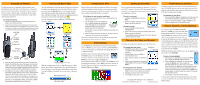
Charging the Battery The Rino operates on a rechargeable lithium-ion battery pack attached to the back of the unit. See the Rino Owner's Manual for more information about batteries. Stored data is not lost when the battery is removed. The first time you charge the battery, charge it completely while attached to the unit in order to set the battery capacity gauge calibration. To charge the battery: 1. Remove the battery pack from the product package and install it on the back of the Rino. 2. Insert the tab at the base of the battery pack in the slot at the bottom of the Rino and rotate the battery pack up into the cavity on the back of the Rino with the D-Ring vertical. Secure in place by turning the D-Ring on the battery pack 1/4 turn clockwise. Mini USB port Headset connector D-Ring Battery pack Charger Power cord Viewing the Main Pages All of the information you need to operate the Rino can be found on five default main pages (only four for the Rino 520HCx). Simply press and release the Page/Quit key to cycle through the Radio page, Map page, Compass page, Altimeter page (Rino 530HCx only), and Main Menu page. You can also access the Main pages by pressing the on-screen Main Page Menu button . If you are navigating a route, an additional Active Route page becomes available. Radio Page Map Page Main Menu Compass Page Charger Battery tab contacts Detent 3. Insert the charger power cord into the jack in the side of the charger. Connect the other end of the power cord into a wall outlet. Then, clip the charger onto the battery pack, making certain the tabs on the charger engage the detents on the battery pack. A red LED indicates that charging is in progress. 4. As charging is in progress, a Battery Gauge displaying the percentage of charge appears on the screen. A fully depleted Lithium-ion battery pack may take up to 6 hours to charge. The Rino can be operated while charging is in progress, but unless you are outdoors, you cannot receive satellite signals. Extensive use of backlighting, WAAS, and/or FRS or GMRS transmitting can significantly reduce battery life. Altimeter Page (Rino 530 Only) While these Main pages provide you with different types of information, they all share common features like Option Menus and a Main Page Menu. Access the Option Menu and Main Page Menu by using the Rocker to highlight the on-screen button. Then press Enter. Main Page Menu button Option Menu button Initializing the GPS Before the Rino can be used for navigation, the GPS receiver must be initialized. Initialization allows the Rino to receive and store satellite information and begin using the satellites for navigation. The initialization is automatic and should only take a few minutes. To initialize the unit (acquire satellites): 1. Take the Rino outside where it has an unobstructed view of the sky and turn it on. 2. The unit begins to search for satellite signals. A satellite signal graph is displayed on the radio page or you can get more detailed information by accessing the Satellite page from the Main Menu. Radio Page GPS signal graph The first time you use your Rino, initialization could take up to five minutes. 3. When the GPS is initialized and ready for navigation, three or more green GPS signal bars are displayed. If for some reason the unit is not able to gather the necessary satellite information, refer to the Owner's Manual. Entering Data Use the Rocker like a joystick that you control with your thumb. Move the Rocker up, down, right, or left. Press the Thumb Stick in to select an item on the screen, much like pressing the Enter key on a computer keyboard. Sometimes you will need to spell out things using the Rocker and an on-screen keyboard. To enter characters with the on-screen keyboard, press the Rocker up, down, left, or right to highlight the desired character (letter, number, or a space). Press Enter to select that highlighted character. Choose Back to delete the character to the left of the cursor. When you are finished entering characters, highlight OK and press Enter. The on-screen keyboard Setting Up the Radio Select a channel and code to transmit on. Channels 1-7 and 15-22 are GMRS*, channels 8-14 are for FRS. Be sure to tell the other members of your group what channel and code you are using so they can communicate with you. To select a channel: 1. Highlight the Channel field and press Enter. 2. Select an available channel and press Enter to accept the selection. To select a code: 1. Select the Code field and press the Thumb Stick in. Selecting the channel 2. Select one of the thirty-eight (38) available codes. Press Enter to accept the selection. *Using GMRS channels requires an FCC license. See the Owner's Manual for details. Changing the Name and Symbol The Name and symbol (icon) identifies you to other Rino users. To change the user name: Symbol icon 1. Highlight the Name field and press Enter to activate the field and display the Name field keyboard. 2. Highlight Clear, then press Enter to clear the default name. 3. Enter a name, up to ten (10) characters long. 4. When you have entered your new name, highlight OK and then press the Thumb Stick in. To change the user symbol: 1. Highlight the face symbol to the left of the Name field. Press Enter to show a list of available face symbols. 2. Highlight a symbol from the list of selections. 3. Press Enter to select that symbol. © Copyright 2007 Garmin Ltd. or its subsidiaries Part Number 190-00742-01 Rev. A Printed in Taiwan Transmitting on the Rino The Rino can transmit to and receive voice communications from other FRS/GMRS radio users on the same channel and code. Communicate with other Rino units in order to utilize all of the features of the Rino, such as position sending. To transmit on your Rino: 1. Press and hold the Talk key and speak in a normal voice into the microphone area from a distance of about 3-4 inches. 2. When you are finished talking, release the Talk key. Your location is updated on all receiving Rino units. Volume, Squelch, and Backlighting If you need to adjust the Volume and Squelch, press the V (Volume) key on the front of the unit to display adjustment sliders. To change the volume, press the Rocker up or down to raise or lower the slider. To set the squelch level (which allows you to hear only the individuals you want to communicate with and not the weak background noise signals), press the Thumb Stick right or left to move the slider. Move the slider to the left (-) until the background noise is audible. Then move it to the right until the background noise stops and you have squelched the unwanted signals. Stop at this point by pressing the V key or Enter. If lighting conditions make it hard for you to see the display screen, you can turn on the Backlight. To turn on the backlight: 1. With the unit on, briefly press and release the Power key to display the Backlight adjustment slider. 2. Press the Power key repeatedly to cycle the slider, or press the Rocker up or down to adjust the Backlight brightness level. When you use the Power key to set the level of brightness, the last setting is selected on the second press of the key. The backlight remains on until the set timeout period is completed or the Power key is pressed again. The unit is factory set to timeout 15 seconds after the last key press. 3. Press Enter to close the Backlight window. You may want to customize the Display Mode and Color Scheme to your own preferences by accessing the Main Menu, Setup and Display options.
-
 1
1 -
 2
2
 |
 |
