Garmin T 5 Dog Device Owner's Manual (Astro 320, T 5) - Page 17
Dog Device Battery Replacement Instructions, Replacing the Collar Strap, VHF Radio Information,
 |
View all Garmin T 5 Dog Device manuals
Add to My Manuals
Save this manual to your list of manuals |
Page 17 highlights
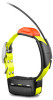
• When paired, your Garmin device receives data from only your accessory, and you can go near other accessories. Dog Device Battery Replacement Instructions T5 Components À Back plate Á Power key  Battery connector à Battery cover Ä Battery Å Power connector Removing the Old Battery Before you replace the battery, you must remove all dirt, water, and debris from the device. You must also have a small Phillips screwdriver. 1 Remove the six screws from the outer edges of the back plate. NOTE: You should leave the two inner screws in place. 2 Pry off the back plate. 3 Disconnect the battery connector and power connector. 4 Remove the screws that secure the battery cover. 5 Remove the battery cover and the battery. Remember the orientation of the battery. You must install the new battery the same way. After you remove the old battery, contact your local waste disposal department to properly recycle the battery. Installing the New Battery Before you replace the battery, you must remove the old battery (Removing the Old Battery). You also must have a small Phillips screwdriver. You may need a small flat screwdriver. 1 Install the new battery using the same orientation as the old battery. The connector À should face the end nearest the power key, and the bump Á where the wires connect to the battery should face toward the side with the charging clip contacts. 2 Replace the battery cover. 3 Replace the screws to secure the battery cover. 4 Connect the battery connector and power connector. You may need to use a flat screwdriver to help secure the connectors. 5 Select the power key to test the connections. When properly connected, a tone is emitted and the status LED blinks green. 6 Turn off the device. 7 Verify the gasket located inside the bottom cover is fully seated. 8 Replace the back plate. 9 Replace the six screws to secure the back plate. After you install the new battery, charge the collar completely. Replacing the Collar Strap Before you replace the collar strap, you must remove all dirt, water, and debris from the device (Cleaning the Device). 1 Pull the collar strap out of the GPS antenna, VHF antenna guide, and the dog device. You may need to push and pull the collar strap to properly remove it. You may need to loosen the screw on the GPS antenna case, but do not remove them. 2 Thread the new collar strap through the dog device, VHF antenna guide, and GPS antenna. 3 If necessary, tighten the screws that secure the GPS antenna case. VHF Radio Information This product may be used only on specific radio frequencies, which vary depending on the country of use. See the product packaging or go to www.garmin.com/ tracking -legal for details about the radio frequency of this product. Replacing the VHF Antenna in the Dog Collar Device NOTICE Do not excessively bend the band that connects the main device case with the GPS antenna. When the cover is removed, do not disturb the sealant opposite the VHF antenna, because this can damage the waterproof seal of the dog collar device. Before you replace the VHF antenna, you must remove all dirt, water, and debris from the device. Also, you need a small Phillips screwdriver. 1 Remove the 4 screws À from the cover over the VHF antenna. NOTE: You should note the location of the one short screw Á. Appendix 13
-
 1
1 -
2
-
3
-
4
-
5
-
6
-
7
-
8
-
9
-
10
-
11
-
 12
12 -
 13
13 -
 14
14 -
 15
15 -
 16
16 -
 17
17 -
 18
18 -
 19
19 -
 20
20 -
 21
21 -
 22
22
 |
 |
