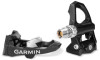
Garmin Vector Owner's Manual - Page 9
Registering Vector, Edge 800 Device Instructions, Edge 500 Device Instructions - pedals for sale
 |
View all Garmin Vector manuals
Add to My Manuals
Save this manual to your list of manuals |
Page 9 highlights
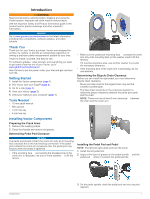
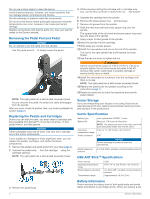
battery warning, you have approximately 10-20 hours of operation time remaining. Replacing the Pedal Pod Battery WARNING Do not use a sharp object to remove user-replaceable batteries. Contact your local waste disposal department to properly recycle the batteries. Perchlorate Material - special handling may apply. Go to www.dtsc.ca.gov/ hazardouswaste / perchlorate. NOTE: Always replace both batteries at the same time. 1 Locate the circular battery cover on the back of the pedal À pod. 2 Use a coin to twist the cover counter-clockwise, moving Á the arrow from the locked to unlocked . Â Ã 3 Remove the cover. You can use a piece of tape or a magnet to remove the Ä battery from the cover. 4 Wait 30 seconds. 5 Insert the new battery into the cover, observing polarity. 6 Replace the cover, making sure the arrow points to unlocked. 7 Use a coin to twist the cover clockwise back into place, making sure the arrow points to locked. 8 Wait 10 seconds. After you replace the pedal pod battery, you must set the installation angle on your Edge (page 2). Appendix Registering Vector Help us better support you by completing our online registration today. • Go to www.garmin.com/ vectorowner. • Keep the original sales receipt, or a photocopy, in a safe place. Edge 800 Device Instructions Pairing Vector with the Edge 800 Device 1 Bring the Edge device within range (3 m) of the sensor. NOTE: Stay 10 m away from other ANT + sensors while pairing. 2 Turn on the Edge device. 3 Select MENU > > Bike Settings > Bike Profiles. 4 Select a bike. 5 Select ANT + Power > Power Meter > Yes. 6 Rotate the crank arm a few times. 7 Select . When the sensor is paired with your Edge device, a message appears, and appears solid on the status page. You can customize a data field to display Vector data. Calibrating Vector with the Edge 800 Device 1 Enter the crank length (page 5). 2 Set the install angle of the sensors inside the pedals (page 2). 3 Calibrate the static zero reference (page 5). 4 Calibrate Vector before each ride (page 2). Entering the Crank Length The crank length is often printed on the crank arm. 1 Rotate the pedals a few times in order to activate Vector. 2 Select MENU > > Bike Settings > Bike Profiles. 3 Select a profile. 4 Select Bike Details > Crank Length > Custom. 5 Enter the crank length, and select . Performing a Static Zero Calibration NOTE: During this task, the bike must be in an upright position, and nothing can be touching the pedals. 1 Select MENU > > Bike Settings > Bike Profiles. 2 Select a profile. 3 Select ANT + Power > Calibrate. When the zero reference is determined, a message appears on the Edge device. Edge 500 Device Instructions Pairing Vector with the Edge 500 Device 1 Bring the Edge device within range (3 m) of the sensor. NOTE: Stay 10 m away from other ANT + sensors while pairing. 2 Turn on the Edge device. 3 Hold MENU. 4 Select Settings > Bike Settings. 5 Select a bike. 6 Select ANT + Power. 7 Enable the sensor, and select Search. 8 Rotate the crank arm a few times. When the sensor is paired with your Edge device, a message appears, and appears solid on the main menu. You can customize a data field to display Vector data. Calibrating Vector with the Edge 500 Device 1 Enter the crank length (page 5). 2 Set the install angle of the sensors inside the pedals (page 2). 3 Calibrate the static zero reference (page 6). 4 Calibrate Vector before each ride (page 2). Entering the Crank Length The crank length is often printed on the crank arm. 1 Rotate the pedals a few times in order to activate Vector. Appendix 5
-
 1
1 -
2
-
3
-
 4
4 -
 5
5 -
 6
6 -
 7
7 -
 8
8 -
 9
9 -
 10
10 -
 11
11 -
 12
12
 |
 |
