Garmin echo 101 Installation Instructions - Page 3
Installing the Device in the Cradle, Removing the Device from the Cradle, Specifications, Selecting - transducer
 |
View all Garmin echo 101 manuals
Add to My Manuals
Save this manual to your list of manuals |
Page 3 highlights
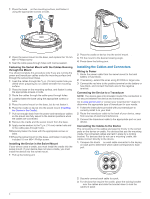
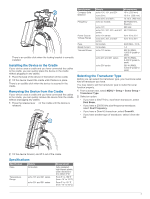
There is an audible click when the locking bracket is correctly installed. Installing the Device in the Cradle If your device uses a cradle and you have connected the cables to the cradle, you can quickly place the device in the cradle without plugging in any cables. 1 Place the base of the device in the bottom of the cradle. 2 Tilt the device toward the cradle until it fastens in place. There is an audible click when the device is secured in the cradle. Removing the Device from the Cradle If your device uses a cradle and you have connected the cables to the cradle, you can quickly remove the device from the cradle without unplugging any cables. 1 Press the release lever on the cradle until the device is À released. Specification Compass-Safe Distance Frequency Power Source Voltage Range Fuse Rated Current Transmit Power Models echo 101, 151, and 201 echo 301c echo 501c and 551c echo dv models echo 101 echo 151, 201, 301, and 501 series echo 101 series echo 201, 301, and 501 series All models All models echo 101 series echo 201 and 301 series echo 501 series Measurement 10 in. (250 mm) 13. 8 in. (350 mm) 15. 75 in. (400 mm) 50/77/200 kHz, DownVü 200 kHz 50/77/200 kHz from 10 to 20 V from 10 to 28 V AGC/3AG - 3. 0 A 1 A 200 W (RMS), 1,600 W (peak-topeak) 300 W (RMS), 2,400 W (peak-topeak) 500 W (RMS), 4,000 W (peak-topeak) Selecting the Transducer Type Before you can select the transducer type, you must know what kind of transducer you have. You may need to set the transducer type to make the sonar function properly. 1 From a sonar view, select MENU > Setup > Sonar Setup > Transducer Type. 2 Select an option: • If you have a 200/77 kHz, dual-beam transducer, select Dual Beam. • If you have a 200/50 kHz dual-frequency transducer, select Dual Frequency. • If you have a DownVü transducer, select DownVü. • If you have another type of transducer, select it from the list. 2 Tilt the device forward, and lift it out of the cradle. Specifications Specification Case Models All models Temperature Range echo 101 and 201 series echo 301 and 501 series Measurement Fully gasketed, high-impact plastic, water resistant to IEC 60529 IPX7 From 5° to 158°F (from -15° to 70°C) From 5° to 131°F (from -15° to 55°C) 3
-
 1
1 -
 2
2 -
 3
3 -
 4
4
 |
 |
