Garmin echoMAP 70s Chartplotter Configuration Guide for Mercury Zeus and Axius - Page 1
Garmin echoMAP 70s Manual
 |
View all Garmin echoMAP 70s manuals
Add to My Manuals
Save this manual to your list of manuals |
Page 1 highlights
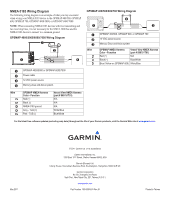
Chartplotter Configuration Guide for Mercury Zeus and Axius Systems This document describes the procedure to configure the following Garmin chartplotter series to work with Mercury Zeus and Axius systems: • GPSMAP 400/500 • GPSMAP 600 • GPSMAP 700 • GPSMAP 4000/5000 • GPSMAP 6000/7000 Check Chartplotter Software Before you can configure the chartplotter, you must verify that the chartplotter has the most current software. Checking a GPSMAP 600 Series Device 1. Go to www.garmin.com/products/webupdater, and download WebUpdater to your computer. 2. Connect the GPSMAP 600 to your computer using the mini-USB cable. 3. Run WebUpdater, and follow the on-screen instructions. After confirming that you want to perform an update, WebUpdater automatically downloads the update and installs it on your device. Checking a GPSMAP 400/500, 700, 4000/5000, and 6000/7000 Series Device 1. Select Home > Configure > System > System Information to check the software version currently on your chartplotter. 2. Go to www.garmin.com/support/software/marine.html to find the latest software version available for your chartplotter. 3. Select an option: • For the GPSMAP 400/500 and 700 series, in the section called "Chartplotters with SD card", click Download. • For the GPSMAP 4000/5000 and 6000/7000 series, in the section called "Garmin Marine Network with SD card", click Download. 4. Select I agree to the above terms and want to proceed to the download page. 5. Scroll down the screen to find your chartplotter model and the available software version. If the software version is a higher number than the number recorded from your chartplotter, follow the installation instructions at the bottom of the software update page to update the software on your chartplotter. NMEA 0183 Port Types Before you can connect the chartplotter to a Mercury Zeus or Axius system, you must configure the NMEA 0183 port types on your chartplotter. Configuring a GPSMAP 600 Series Device You must set all NMEA 0183 port types to NMEA Standard. 1. Select Home > Configure > Communications > NMEA Port 1. 2. Select NMEA Standard > NMEA Port 2 > NMEA Standard. Configuring a GPSMAP 400/500 or 700 Series Device You must set all NMEA 0183 port types to NMEA Standard. 1. Select Home > Configure > Communications > Serial Port 1. 2. Select NMEA Standard > Serial Port 2 > NMEA Standard. Configuring GPSMAP 4000/5000 or 6000/7000 Series Device You must set all NMEA 0183 port types to NMEA Standard. 1. Select Home > Configure > Communications > NMEA 0183 Setup > Port Types. 2. Select the first port. 3. Select NMEA Standard. 4. Repeat steps 2 and 3 for all input and output ports. NMEA 0183 Output Sentences Before you can connect the chartplotter to a Mercury Zeus or Axius system, you must configure the NMEA 0183 output sentences on your chartplotter. Configuring the NMEA 0183 Output Sentences Specific NMEA 0183 sentences must always be turned on for proper Zeus or Axius operation. Others must be turned on only if using a sounder. 1. Select an option: • If you are configuring a GPSMAP 600 series, select Home > Configure > Communications > NMEA Setup. • If you are configuring a GPSMAP 400/500 or 700 series, select Home > Configure > Communications > NMEA 0183 Setup. • If you are configuring a GPSMAP 4000/5000 or 6000/7000 series, select Home > Configure > Communications > NMEA 0183 Setup > Output Sentences. 2. Select Route. 3. Set GPBWC to On and set all of the other route sentences to Off. 4. Select Back. 5. Select System. 6. Set GPRMB and GPRMC to On, and set all of the other system sentences to Off. 7. Select Back. 8. Select Garmin, and set all of the sentences to Off. Configuring the Turn Transition Before you can use the chartplotter to navigate a boat equipped with the Mercury Zeus or Axius system, you must configure the turn transition. 1. Select an option: • If you are configuring a GPSMAP 600 or 700 series, select Home > Configure > Navigation > Turn Transition Activation > Distance > Turn Transition Distance. • If you are configuring a GPSMAP 400/500, 4000/5000, or 6000/7000 series, select Home > Configure > Preferences > Navigation > Turn Transition > Activation > Distance > Change Distance. 2. Set the distance to 300 ft. (90 m). 3. Select Done.
-
 1
1 -
 2
2
 |
 |