Garmin nuvi 2689LMT Owner's Manual - Page 9
Starting a Route, Navigating to Locations Within a Venue, Your Route on the Map - features
 |
View all Garmin nuvi 2689LMT manuals
Add to My Manuals
Save this manual to your list of manuals |
Page 9 highlights
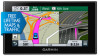
Finding Custom POIs Before you can find custom POIs, you must load custom POIs on your device using the POI Loader software (Installing POI Loader). 1 Select Where To? > Categories. 2 Scroll to the Other Categories section, and select a category. 2 Select > Explore this Venue. 3 Select a category. 4 Select a point of interest. 5 Select Go!. Your Route on the Map Navigation Starting a Route 1 Search for a location (Locations). 2 Select a location. 3 Select Go!. Previewing Multiple Routes 1 Search for a location (Finding a Location by Category). 2 From the search results, select a location. 3 Select Routes. 4 Select a route. Changing the Route Calculation Mode The route calculation is based on road speeds and vehicle acceleration data for a given route. The calculation mode affects only automobile routes. 1 Select Settings > Navigation > Calculation Mode. 2 Select an option: • Select Faster Time to calculate routes that are faster to drive but can be longer in distance. • Select Shorter Distance to calculate routes that are shorter in distance but can take more time to drive. • Select Off Road to calculate point-to-point routes (without roads). • Select Less Fuel to calculate routes that are more fuelefficient. Navigating Off Road If you are not following roadways as you navigate, you can use Off Road mode. 1 Select Settings > Navigation. 2 Select Calculation Mode > Off Road > Save. The next route will be calculated as a straight line to the location. Starting a Route to a Saved Location 1 Select Where To? > Saved. 2 If necessary, select a category, or select All Saved Places. 3 Select a location. 4 Select Go!. Navigating to Locations Within a Venue When navigating to a venue that contains more than one point of interest, the device lists additional points of interest located within the venue. 1 Search for a venue, such as a mall or airport. 2 Select the venue. A list of categories appears below the venue. 3 Select a category. 4 Select a point of interest, and select Go!. Exploring a Venue You can view a list of all points of interest located within each venue. 1 Select a venue. NOTICE The speed limit feature is for information only and does not replace your responsibility to abide by all posted speed limit signs and to use safe driving judgment at all times. Garmin will not be responsible for any traffic fines or citations you receive for failing to follow all applicable traffic laws and signs. The route is marked with a magenta line. A checkered flag marks your destination. As you travel, the device guides you to the destination with voice prompts, arrows on the map, and directions at the top of the map. If you depart from the original route, the device recalculates the route and provides new directions. A data field displaying the current speed limit may appear as you travel on major roadways. Using the Map 1 Select View Map. 2 Select anywhere on the map. 3 Select an option: • To zoom in or out, select or . • To switch between North Up and 3-D views, select . • To view specific categories, select . Adding a Point to a Route Before you can add a point, you must be navigating a route. 1 From the map, select > Where To?. 2 Search for a location. 3 Select a location. 4 Select Go!. 5 Select Add to Active Route. Taking a Detour Before you can take a detour, you must be navigating a route and you must add the change route tool to the map tools menu (Customizing the Map Tools). You can take a detour for a specified distance along your route or detour around specific roads. This is useful if you encounter construction zones, closed roads, or poor road conditions. 1 From the map, select > Change Route. 2 Select an option: • To detour your route for a specific distance, select Detour by Distance. • To detour around a specific road on the route, select Detour by Road. Stopping the Route From the map, select > . Navigation 5
-
 1
1 -
2
-
3
-
 4
4 -
 5
5 -
 6
6 -
 7
7 -
 8
8 -
 9
9 -
 10
10 -
 11
11 -
 12
12 -
 13
13 -
 14
14 -
15
-
16
-
17
-
18
-
19
-
20
-
21
-
22
-
23
-
24
 |
 |
