Garmin tactix Quick Start Manual - Page 3
Navigating Using TracBack, Applications, ANT+™ Sensors, Troubleshooting - watch
 |
View all Garmin tactix manuals
Add to My Manuals
Save this manual to your list of manuals |
Page 3 highlights
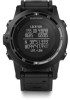
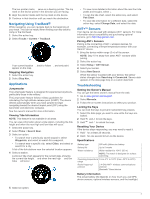
The two pointer marks serve as a bearing pointer. The top mark on the device pointÃs in the direction you are facing. 8 Align the pointer marks with the top mark on the device. 9 Continue in that direction until you reach the destination. Navigating Using TracBack® While navigating, you can navigate back to the beginning of your track. This can be helpful when finding your way back to camp or the trail head. 1 Select the action key. 2 Select Tracks > Current > TracBack. Your current location , track to follow , and end point À Á Â appear on the map. Stopping Navigation 1 Select the action key. 2 Select Stop Nav. . Applications Jumpmaster The jumpmaster feature is designed for experienced skydivers, particularly those in the military. The jumpmaster feature follows military guidelines for calculating the high altitude release point (HARP). The device detects automatically when you have jumped to begin navigating toward the desired impact point (DIP) using the barometer and electronic compass. See the owner's manual for more information. Viewing Tide Information NOTE: This feature is not available in all areas. You can view information about a tide station, including the tide height and when the next high and low tides will occur. 1 Select the action key. 2 Select Tides > Search Near. 3 Select an option: • To search near a previously saved waypoint, select Waypoints, and select or search for a waypoint. • To search near a specific city, select Cities, and select or search for a city. A list of the tide stations near the selected location appears. 4 Select a station. A 24-hour tide chart appears for the current date, showing the current tide height and when the next high and low À Á tides will occur. Â • To view more detailed information about the next four tide peaks and troughs, select . • To pan the tide chart, select the action key, and select Pan Chart. • To view tide information for a different date, select the action key, select Change Date, and select the date. ANT +™ Sensors Your device can be used with wireless ANT + sensors. For more information about compatibility and purchasing optional sensors, go to http: / / buy .garmin .com. Pairing ANT+ Sensors Pairing is the connecting of ANT + wireless devices, for example, connecting a tempe temperature sensor with your Garmin® device. 1 Bring the device within range (3 m) of the sensor. NOTE: Stay 10 m away from other ANT + sensors while pairing. 2 Select the action key. 3 Select Setup > ANT Sensor. 4 Select your sensor. 5 Select New Search. When the sensor is paired with your device, the sensor status changes from Searching to Connected. Sensor data appears in the data page loop or a custom data field. Troubleshooting Getting the Owner's Manual You can get the latest owner's manual from the web. 1 Go to www.garmin.com/ support. 2 Select Manuals. 3 Follow the on-screen instructions to select your product. Locking the Keys You can lock the keys to prevent inadvertent key presses. 1 Select the data page you want to view while the keys are locked. 2 Hold and to lock the keys. 3 Hold and to unlock the keys. Resetting Your Device If the device stops responding, you may need to reset it. 1 Hold for at least 25 seconds. 2 Hold for one second to turn on the device. Specifications Battery type 500 mAh Lithium-ion battery Battery life Up to 5 weeks Water resistance Water resistant to 164 ft. (50 m) NOTE: The watch is designed for surface swimming. Operating temperature From -4ºF to 122ºF (from -20ºC to 50ºC) range Radio frequency/ protocol 2. 4 GHz ANT + wireless communications protocol Bluetooth® Smart device Battery Information The actual battery life depends on how much you use GPS, device sensors, optional wireless sensors, and the backlight. 5 Select an option: 3
-
 1
1 -
 2
2 -
 3
3 -
 4
4
 |
 |