Garmin zumo 395LM Owners Manual - Page 8
Red Light and Speed Cameras - battery replacement
 |
View all Garmin zumo 395LM manuals
Add to My Manuals
Save this manual to your list of manuals |
Page 8 highlights
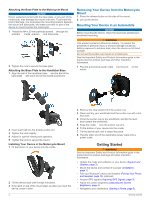
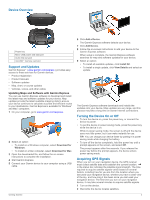
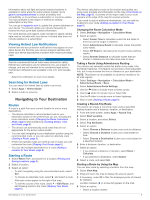
3 If necessary, go outdoors to an open area, away from tall buildings and trees. When turns green, the device has acquired satellite signals and is ready for navigation. Status Bar Icons The status bar is located at the top of the main menu. The status bar icons display information about features on the device. You can select some icons to change settings or view additional information. GPS signal status. Hold to view GPS accuracy and acquired satellite information (Viewing GPS Signal Status, page 19). Bluetooth technology status. Select to view the Bluetooth settings (Bluetooth Settings, page 16). Connected to hands-free calling. Select to place a phone call (Hands-Free Calling, page 13). Active vehicle profile. Select to view the vehicle profile settings. Current time. Select to set the time (Setting the Time, page 16). Battery charge level. Fuel status. Select to view fuel tracking information. Using the On-Screen Buttons On-screen buttons allow you to navigate the pages, menus, and menu options on your device. • Select to return to the previous menu screen. • Hold to quickly return to the main menu. • Select or to scroll through lists or menus. • Hold or to scroll faster. • Select to see a context-based menu of options for the current screen. Adjusting the Volume Before you can adjust the volume, you must connect your device to a powered mount or a headset using Bluetooth wireless technology. 1 Select Volume. 2 Select an option: • Use the slider bar to adjust the volume. • Select to mute the device. • Select for additional options. Adjusting the Screen Brightness 1 Select Settings > Display > Brightness. 2 Use the slider bar to adjust the brightness. Transportation Modes Routing and navigation are calculated differently based on your transportation mode. The current transportation mode is indicated by an icon in the status bar. Automobile mode Motorcycle mode Off-road mode • Select to delete a search entry. • Select to delete a character. • Select to change the keyboard language mode. • Select marks. to enter special characters, such as punctuation • Select to change character capitalization. Using the Large Button Keyboard You can enable additional keyboard languages or layouts in the language and keyboard settings (Language and Keyboard Settings, page 16). • Select or to view more characters. • Select to switch to other keyboard languages and layouts. Rider Awareness Features and Alerts NOTICE The rider alerts and speed limit features are for information only and do not replace your responsibility to abide by all posted speed limit signs and to use safe driving judgment at all times. Garmin is not responsible for any traffic fines or citations you receive for failing to follow all applicable traffic laws and signs. Your device provides features that can help encourage safer riding and increase efficiency, even when you are riding in a familiar area. The device plays an audible tone or message and displays information for each alert. You can enable or disable the audible tone or message for each type of alert. Not all alerts are available in all areas. School zone or nearby school: The device plays a tone and displays the distance to and speed limit (if available) for an upcoming school or school zone. Speed limit reduction: The device plays a tone and displays the upcoming reduced speed limit so you can be prepared to reduce your speed. Speed limit exceeded: The device plays a tone and displays a red border on the speed limit icon when you exceed the posted speed limit for the current road. Railroad crossing: The device plays a tone and displays the distance to an upcoming railroad crossing. Animal crossing: The device plays a tone and displays the distance to an upcoming animal crossing area. Curve: The device plays a tone and displays the distance to a curve in the road. Slower traffic: The device plays a tone and displays the distance to slower traffic when you approach slower traffic at a higher speed. Your device must be receiving traffic information to use this feature. Fatigue warning: The device plays a tone and suggests upcoming rest stops after you have been driving for more than two hours without stopping. Enabling or Disabling Rider Alerts You can turn off individual audible rider alerts. Visual alerts appears even when the audible alert is disabled. 1 Select Settings > Map & Vehicle > Audible Rider Alerts. 2 Select or clear the check box next to each alert. Red Light and Speed Cameras Choosing a Transportation Mode Select . Using the On-Screen Keyboard See "Language and Keyboard Settings" to change the keyboard layout (Language and Keyboard Settings, page 16). NOTICE Garmin is not responsible for the accuracy of or the consequences of using a red light or speed camera database. NOTE: This feature is not available for all regions or product models. 4 Rider Awareness Features and Alerts
-
 1
1 -
2
-
 3
3 -
 4
4 -
 5
5 -
 6
6 -
 7
7 -
 8
8 -
 9
9 -
 10
10 -
 11
11 -
 12
12 -
 13
13 -
14
-
15
-
16
-
17
-
18
-
19
-
20
-
21
-
22
-
23
-
24
-
25
-
26
 |
 |
