Gastroback 98102 User Manual - Page 5
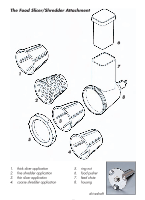
Example for uses of the applications, Fine Shredder, Coarse Shredder, Thick Slicer, Thin Slicer,
 |
View all Gastroback 98102 manuals
Add to My Manuals
Save this manual to your list of manuals |
Page 5 highlights
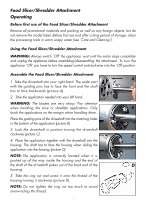
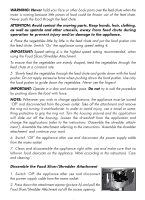
The Food Slicer/Shredder Attachment is now assembled and E can be attached to the Design Standmixer Advanced. 6. Prop up the attachment access (picture E). 7. Press down the attachment ejector (picture F) and slide the Food Slicer/Shredder Attachment into the opening. Release the attachment ejector and turn the Food Slicer/Shredder Attachment F slightly so that the shaft engages in the socket with pin of the access opening located in the hole of the attachment. The Food Slicer/Shredder Attachment is now ready for use (picture G). G Example for uses of the applications: Fine Shredder: Finely shreds hard and crisp vegetables, such as carrots, beets, turnip, potatoes, celery or nuts, firm and cold cheese, coconut and dry bread. Coarse Shredder: Coarsly shreds carrots, celery, onions, fruit, nuts or chocolat. Potato can be shredded for hush browns. Thick Slicer: Gives a thick slice for firm foods. Perfect for vegetables that are to be steamed, fried or scalloped. Thin Slicer: Thinly slices vegetables for cole slaw, potato chips, sauerkraut, sliced cucumber, radishes, celery and nuts. To operate the Food Slicer/Shredder Attachment WARNING: For the case that liquid runs over the appliance while operating turn the appliance ´Off` immediately and pull the plug. Clean and dry the appliance according to the instructions ´Care and cleaning`. 1. Prepare the vegetables (peel, wash, get seeds out and cut of the stem). 2. Assemble the Food Slicer/Shredder Attachment as described, attach it to the Design Standmixer Advanced and place a plate or dish in front of the outlet. WARNING: Always make sure that the appliance is turned ´Off` before plugging in the power supply. 3. Plug the power supply cable into a mains socket.
-
 1
1 -
 2
2 -
 3
3 -
 4
4 -
 5
5 -
 6
6 -
 7
7 -
 8
8 -
 9
9 -
 10
10 -
 11
11 -
12
 |
 |