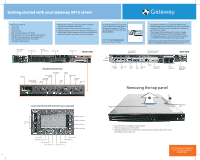
Gateway 9415 Gateway 9415 Setup Poster - Page 2
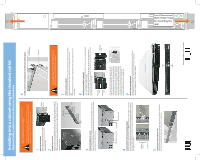
Installing into a cabinet using the standard rail kit - server
 |
View all Gateway 9415 manuals
Add to My Manuals
Save this manual to your list of manuals |
Page 2 highlights
Installing into a cabinet using the standard rail kit Optional sliding rail kit contains alternate instructions Before attaching cabinet accessories, make sure that the server is turned off and all power cords are unplugged. The cabinet must provide sufficient airflow to the front of the server to maintain correct cooling. It must also include ventilation sufficient to exhaust a maximum of 1200 BTUs per hour for this server. 6 Install a nut bar or mounting nuts on the front cabinet posts Nut bar or mounting nuts 1 Remove the handles Remove the two screws from each handle, then set the handles and screws aside for reattachment later. 2 Attach rails to server Align the slots in a server rail with the studs on the side of the server, then place the rail against the server and slide the rail as far back as it will go. Align the locking screw holes in the rails with the threaded screw holes in the server, then install two locking screws through the each rail. 3 Attach disk guides to server Place a disk guide over the disk guide screw hole towards the back of the server, then insert a small screw through the disk guide and tighten the screw. Attach the remaining guide to the other side of the server. Server rail Screws are required to support the front of the server! You must support the server while installing or removing the front screws and while sliding the server on or off the cabinet rails. 7 Attach server to cabinet Push the server toward the back of the cabinet until the front of the server rails touch the front cabinet posts, then secure with two screws through each server rail. OR Follow the instructions in Step 8 on installing the handles and securing the server in the cabinet. 8 Install server handles (optional) Note: The handles are required to hold the bezel on. If you are not installing the bezel, you do not need to install the handles. With the server pulled out from the cabinet, align the holes in the handle with the holes in the front sides of the server. Attach the handles to the sides of the server with two mounting screws on each side. Mounting screw Mounting screw Mounting hole Disk guide screw hole Disk guide Disk guide screw 4 Attach cabinet rails to back cabinet posts Attach a nut bar to the inside of the two back cabinet posts using medium screws, but do not completely tighten the screws (leave them loose enough to allow insertion of the cabinet rail). Insert the slotted foot of a cabinet rail between each nut bar and post, then tighten the screws. Medium screws Nut bar 5 Install server onto cabinet rails With the front of the server facing you, lift the server, insert it into the cabinet from the front, then position the disk guides so they fit in the cabinet rails. Push the server, with the handles attached, into the cabinet to determine which holes in the front posts of the cabinet that the holes in the handles will line up with. Pull the server from the cabinet, then install the mounting nuts (nuts equipped with spring clips that come with most server cabinets) into the holes in the front posts of the cabinet. Push the server into the cabinet again. Use one screw through each handle to secure the server to the cabinet posts. 9 Attach the bezel (optional) Remove the bezel lock keys from the inside of the bezel, then snap on the bezel . To lock the bezel, insert the key into the lock and rotate it ¼ turn clockwise. To unlock it, rotate the key ¼ turn counter-clockwise. Lock Unlock A MAN 9415 SETUP PSTR R0 03/05
-
 1
1 -
 2
2
 |
 |
