Gateway 9715 Server Pedestal Conversion Kit - Page 2
partially tighten the screws in at least four places before fully tightening
 |
View all Gateway 9715 manuals
Add to My Manuals
Save this manual to your list of manuals |
Page 2 highlights
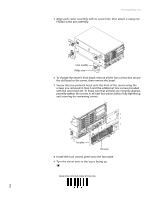
www.gateway.com 5 Align each caster assembly with its screw hole, then attach it using one Phillips screw per assembly. Caster assembly Phillips screw 6 To change the server's front bezel, remove all the Torx screws that secure the old bezel to the server, then remove the bezel. 7 Secure the new pedestal bezel onto the front of the server using the screws you removed in Step 6 and the additional Torx screws provided with the conversion kit. To make sure that all holes are correctly aligned, partially tighten the screws in at least four places before fully tightening and inserting the remaining screws. Face plate Torx screw 8 Install the local control panel onto the face plate. 9 Turn the server over so the top is facing up. MAN INTEL SRV PED CONV KIT R0 2/06 2
-
 1
1 -
 2
2
 |
 |
