Gateway DX420QS 8511625 - Gateway Computer Hardware Reference (6-Bay Micro BTX - Page 31
Replacing the power supply
 |
View all Gateway DX420QS manuals
Add to My Manuals
Save this manual to your list of manuals |
Page 31 highlights
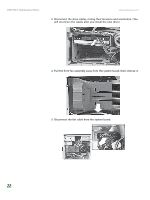
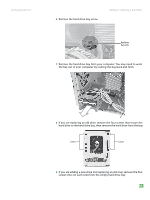
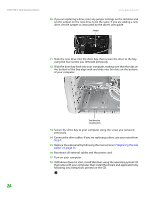
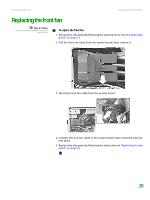
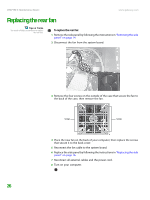
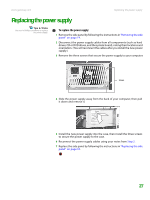
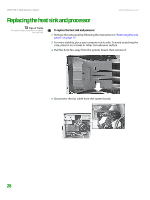
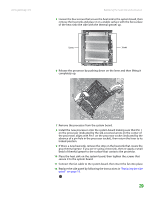
www.gateway.com Replacing the power supply Replacing the power supply Tips & Tricks You need a Phillips screwdriver to replace the power supply. To replace the power supply: 1 Remove the side panel by following the instructions in "Removing the side panel" on page 14. 2 Disconnect the power supply cables from all components (such as hard drives, CD or DVD drives, and the system board), noting their locations and orientation. (You will reconnect the cables after you install the new power supply.) 3 Remove the three screws that secure the power supply to your computer. Screws 4 Slide the power supply away from the back of your computer, then pull it down and remove it. 5 Install the new power supply into the case, then install the three screws to secure the power supply to the case. 6 Reconnect the power supply cables using your notes from Step 2. 7 Replace the side panel by following the instructions in "Replacing the side panel" on page 16. 27
-
 1
1 -
2
-
3
-
4
-
5
-
6
-
7
-
8
-
9
-
10
-
11
-
12
-
13
-
14
-
15
-
16
-
17
-
18
-
19
-
20
-
21
-
22
-
23
-
24
-
25
-
 26
26 -
 27
27 -
 28
28 -
 29
29 -
 30
30 -
 31
31 -
 32
32 -
 33
33 -
 34
34 -
 35
35 -
 36
36 -
37
-
38
-
39
-
40
-
41
-
42
-
43
-
44
-
45
-
46
-
47
-
48
-
49
-
50
-
51
-
52
 |
 |
