Gateway FX8040 8511859 - FX Setup Guide - Page 2
Setup Guide - memory
 |
View all Gateway FX8040 manuals
Add to My Manuals
Save this manual to your list of manuals |
Page 2 highlights
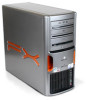
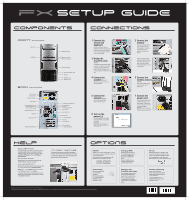
SETUP GUIDE components connections FRONT (may vary with options) Optical drive USB port BACK (may vary with options) Power connector Cover release lever Case cover thumbscrew Safety seal tape Audio in/side speaker jack Surround left/right jack Ethernet (network) jack IEEE 1394/FireWire™ port Parallel port PS/2 mouse port Telephone jack (optional) Additional drive bay Memory card reader Power button/indicator Hard drive indicator IEEE 1394/FireWire™ ports USB ports Headphone jack Microphone jack Headphone/front speaker jack Microphone jack S/PDIF jack Center/subwoofer jack USB ports Coaxial digital audio Serial port PS/2 keyboard port Video card TV tuner (optional) Video card (optional) Modem jack (optional) 1 Connect the mouse and keyboard If you have a wireless mouse or keyboard, follow the instructions that came with the mouse and keyboard. If you have a USB mouse, connect it to one of the USB ports. 3 Bridge the CrossFire cards (optional) Connect the CrossFire cable's VHDCI plug to the VHDCI port on the upper CrossFire card, then connect the longer of the two DVI cables on the CrossFire cable to the lower CrossFire card. 4 Connect the speakers (optional) Follow the instructions that came with your speakers. 6 Connect the network (optional) Connect the network (RJ45) cable to the Ethernet jack. 8 Turn on the power ( ) Turn on the monitor and computer. Follow the Windows setup screen instructions. IMPORTANT: Connect devices, such as a printer or scanner, after you complete the Windows setup. Follow the instructions that came with the device. 2 Connect the monitor If you have a standard video card, connect the monitor to the video port, or use the included DVI-to-VGA adapter to connect a VGA monitor. Connect your DVI monitor's cable to the shorter of the two DVI cables on the CrossFire cable, or use the included DVI-to-VGA adapter to connect a VGA monitor. 5 Connect the wireless antenna (optional) Connect the wireless antenna to the connectors on the wireless card. 7 Connect the power cord Connect the power cable to the computer, then plug it into a power supply. To protect your system from power fluctuations, use a surge protector. WARNING: To protect your computer during electrical storms, unplug the power cord and the modem and network cables. HELP DOCUMENTATION For detailed information about using your Gateway computer, see the online User Guide or printed Reference Guide. To access the online user guide, click Start, All Programs, then click Gateway Documentation. STARTER GUIDE After setting up your computer, read the Starter Guide for tips on using your computer. online SUPPORT For help and information about common issues, visit our Internet Support Site at www.gateway.com. SERIAL NUMBER/CONTACT INFORMATION LABEL Located on the side of your computer. Refer to this label for your serial number and Gateway Customer Care telephone number. to open the case Disconnect the power cord and all peripheral devices, then remove the thumbscrew and tape. Lift the cover release lever, then swing the side panel away from the computer. OPTIONS HD DVD Watch up to 5.5 hours of HD video, 14 hours of SD video, or read up to 30 GB of data from a dual-layer HD DVD. For more information, see "About your HD DVD drive" in your Reference Guide. Setting up RAID Rest easy with the security of redundant hard drives, or crank out incredible hard drive access speeds with RAID For more information, see "Setting up RAID drives" in your Reference Guide. Overclocking Boost your speed with an overclocked processor. For more information, see "Overclocking the processor" in your Reference Guide. Setting up your CrossFire video cards Fire off higher frame rates and smoother anti-aliasing with linked CrossFire video cards. For more information, see "Connecting your CrossFire video cards" in your Reference Guide. Actual product may vary from image shown. Product specifications subject to change without notice. © 2007 Gateway, Inc. All rights reserved. Trademarks used herein are trademarks or registered trademarks of Gateway, Inc. in the United States and other countries. All other brands and product names are trademarks or registered trademarks of their respective companies. Blu-ray Record and store up to 50 GB of data, 9 hours of HD video, or 23 hours of SD video on a single, dual-layer Blu-ray disc. For more information, see "About your Blu-ray Disc drive" in your Reference Guide. Wireless networking Set up camp anywhere, without worrying about network cables snaking across the floor or over doorways. For more information, see "Wireless Networking" in your Reference Guide. MAN BTX CONS SETUP PSTR V R0 12/06
-
 1
1 -
 2
2
 |
 |
