Gateway MX6961 8511264 - User Guide Gateway Notebook - Page 124
Automatically retry sending a fax, Automatically canceling a fax
 |
View all Gateway MX6961 manuals
Add to My Manuals
Save this manual to your list of manuals |
Page 124 highlights
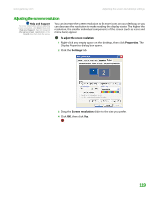
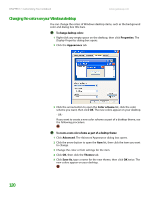
CHAPTER 10: Sending and Receiving Faxes www.gateway.com Automatically retry sending a fax Important Fax is automatically set up to retry three times at ten minute intervals. You can set up Fax so it continues to try sending your fax if the receiving fax machine is busy. To automatically retry sending a fax: 1 Click Start, then click Control Panel. The Control Panel window opens. 2 If your Control Panel is in Category View, click Printers and Other Hardware. Click View installed printers or fax printers. The Printers and Faxes window opens. -OR- If your Control Panel is in Classic View, double-click the Printers and Faxes icon. The Printers and Faxes window opens. 3 Right-click Fax, then click Properties. The Fax Properties dialog box opens. 4 Click the Devices tab, then click Properties. The Modem dialog box opens. 5 Specify the number of retries and the amount of time between retries. 6 Click OK. Automatically canceling a fax If your notebook tried to send a fax and failed to connect to a fax machine, you can automatically cancel a failed fax. To automatically cancel a failed fax: 1 Click Start, then click Control Panel. The Control Panel window opens. 2 If your Control Panel is in Category View, click Printers and Other Hardware. Click View installed printers or fax printers. The Printers and Faxes window opens. -OR- If your Control Panel is in Classic View, double-click the Printers and Faxes icon. The Printers and Faxes window opens. 3 Right-click Fax, then click Properties. The Fax Properties dialog box opens. 4 Click the Devices tab, then click Properties. The Modem dialog box opens. 5 Click the Cleanup tab. 6 Click to select the Automatically delete failed faxes after check box and specify the number of days. 7 Click OK. 116
-
 1
1 -
2
-
3
-
4
-
5
-
6
-
7
-
8
-
9
-
10
-
11
-
12
-
13
-
14
-
15
-
16
-
17
-
18
-
19
-
20
-
21
-
22
-
23
-
24
-
25
-
26
-
27
-
28
-
29
-
30
-
31
-
32
-
33
-
34
-
35
-
36
-
37
-
38
-
39
-
40
-
41
-
42
-
43
-
44
-
45
-
46
-
47
-
48
-
49
-
50
-
51
-
52
-
53
-
54
-
55
-
56
-
57
-
58
-
59
-
60
-
61
-
62
-
63
-
64
-
65
-
66
-
67
-
68
-
69
-
70
-
71
-
72
-
73
-
74
-
75
-
76
-
77
-
78
-
79
-
80
-
81
-
82
-
83
-
84
-
85
-
86
-
87
-
88
-
89
-
90
-
91
-
92
-
93
-
94
-
95
-
96
-
97
-
98
-
99
-
100
-
101
-
102
-
103
-
104
-
105
-
106
-
107
-
108
-
109
-
110
-
111
-
112
-
113
-
114
-
115
-
116
-
117
-
118
-
 119
119 -
 120
120 -
 121
121 -
 122
122 -
 123
123 -
 124
124 -
 125
125 -
 126
126 -
 127
127 -
 128
128 -
 129
129 -
130
-
131
-
132
-
133
-
134
-
135
-
136
-
137
-
138
-
139
-
140
-
141
-
142
-
143
-
144
-
145
-
146
-
147
-
148
-
149
-
150
-
151
-
152
-
153
-
154
-
155
-
156
-
157
-
158
-
159
-
160
-
161
-
162
-
163
-
164
-
165
-
166
-
167
-
168
-
169
-
170
-
171
-
172
-
173
-
174
-
175
-
176
-
177
-
178
-
179
-
180
-
181
-
182
-
183
-
184
-
185
-
186
-
187
-
188
 |
 |