GE AJCM10DCD Use and Care Manual - Page 6
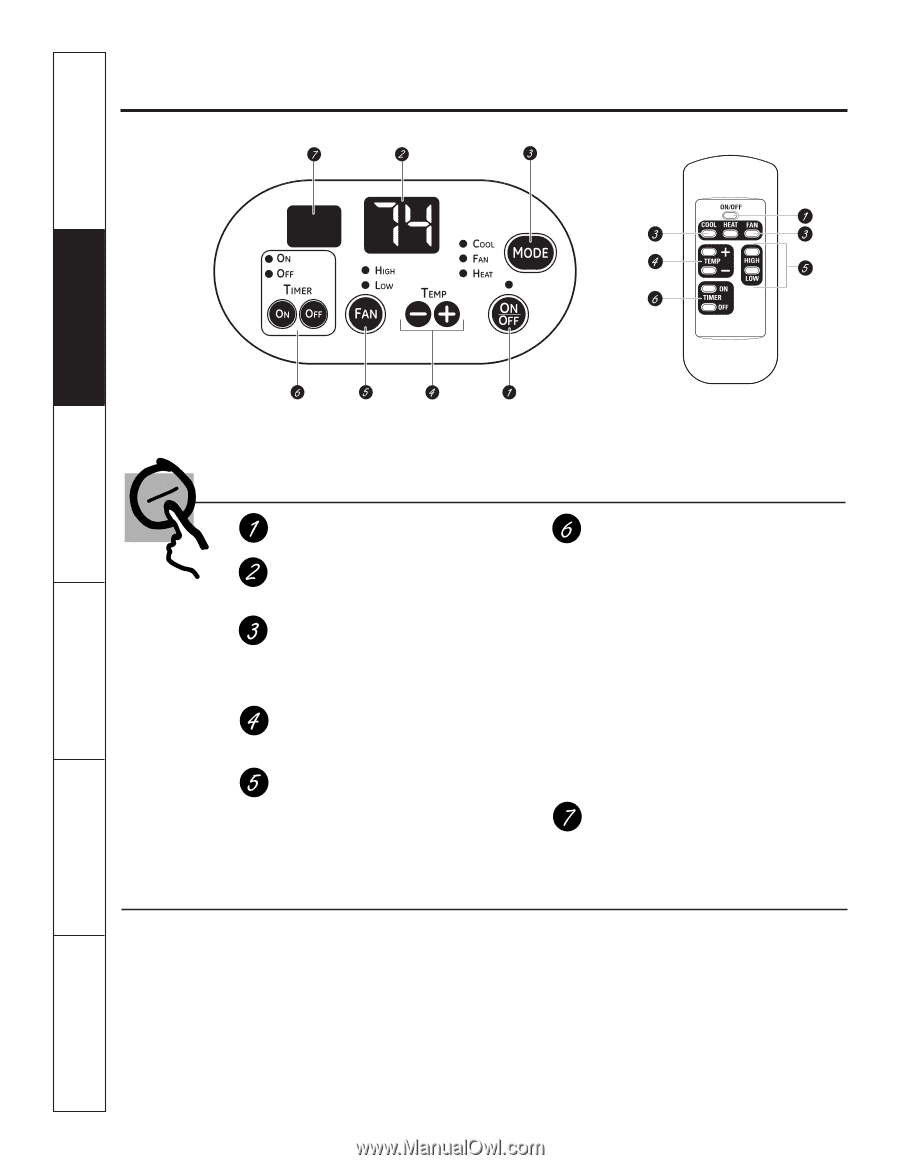
About the controls on the air conditioner-Heat/Cool Models
 |
View all GE AJCM10DCD manuals
Add to My Manuals
Save this manual to your list of manuals |
Page 6 highlights
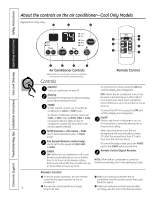
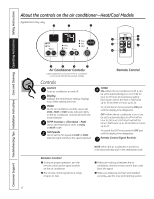
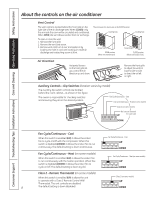
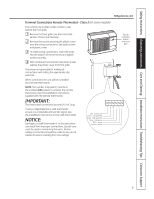
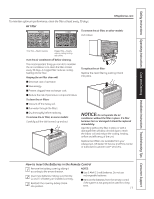
Consumer Support Troubleshooting Tips Installation Instructions Care and Cleaning Operating Instructions Safety Instructions About the controls on the air conditioner-Heat/Cool Models Appearance may vary. Air Conditioner Controls Lights beside the touch pads on the air conditioner control panel indicate the selected settings. Controls ON/OFF Turns air conditioner on and off. Display Displays the temperature setting. Displays hours when setting the timer. MODE On the air conditioner controls, use to set COOL, HEAT or FAN mode. Indicator lights on the air conditioner controls will show the mode selected. TEMP Increase + /Decrease - Pads Use to set temperature when in COOL or HEAT mode. FAN Speeds Use to set the fan speed at LOW or HIGH. Indicator lights will show the speed selected. Remote Control TIMER ON-When the air conditioner is off, it can be set to automatically turn on in half an hour to 24 hours at its previous setting. Each touch will set the time in half hours up to 10 and then in hours up to 24. To cancel the On Timer, press the ON pad until the display time disappears. OFF-When the air conditioner is on, it can be set to automatically turn off in half an hour to 24 hours. Each touch will set the time in half hours up to 10 and then in hours up to 24. To cancel the Off Timer, press the OFF pad until the display time disappears. Remote Control Signal Receiver Remote Control ■ To ensure proper operation, aim the remote control at the signal receiver on the air conditioner. ■ The remote control signal has a range of up to 21 feet. NOTE: When the air conditioner is turned on, it will automatically start in the setting last used. ■ Make sure nothing is between the air conditioner and the remote control that could block the signal. ■ Make sure batteries are fresh and installed correctly-see the Care and Cleaning section. 6
-
 1
1 -
 2
2 -
 3
3 -
 4
4 -
 5
5 -
 6
6 -
 7
7 -
 8
8 -
 9
9 -
 10
10 -
 11
11 -
 12
12 -
13
-
14
-
15
-
16
-
17
-
18
-
19
-
20
-
21
-
22
-
23
-
24
-
25
-
26
-
27
-
28
-
29
-
30
-
31
-
32
-
33
-
34
-
35
-
36
-
37
-
38
-
39
-
40
-
41
-
42
-
43
-
44
-
45
-
46
-
47
-
48
-
49
-
50
-
51
-
52
-
53
-
54
-
55
-
56
-
57
-
58
-
59
-
60
-
61
-
62
-
63
-
64
-
65
-
66
-
67
-
68
-
69
-
70
-
71
-
72
 |
 |