GE CW9000SDSS Quick Specs - Page 1
GE CW9000SDSS Manual
 |
View all GE CW9000SDSS manuals
Add to My Manuals
Save this manual to your list of manuals |
Page 1 highlights
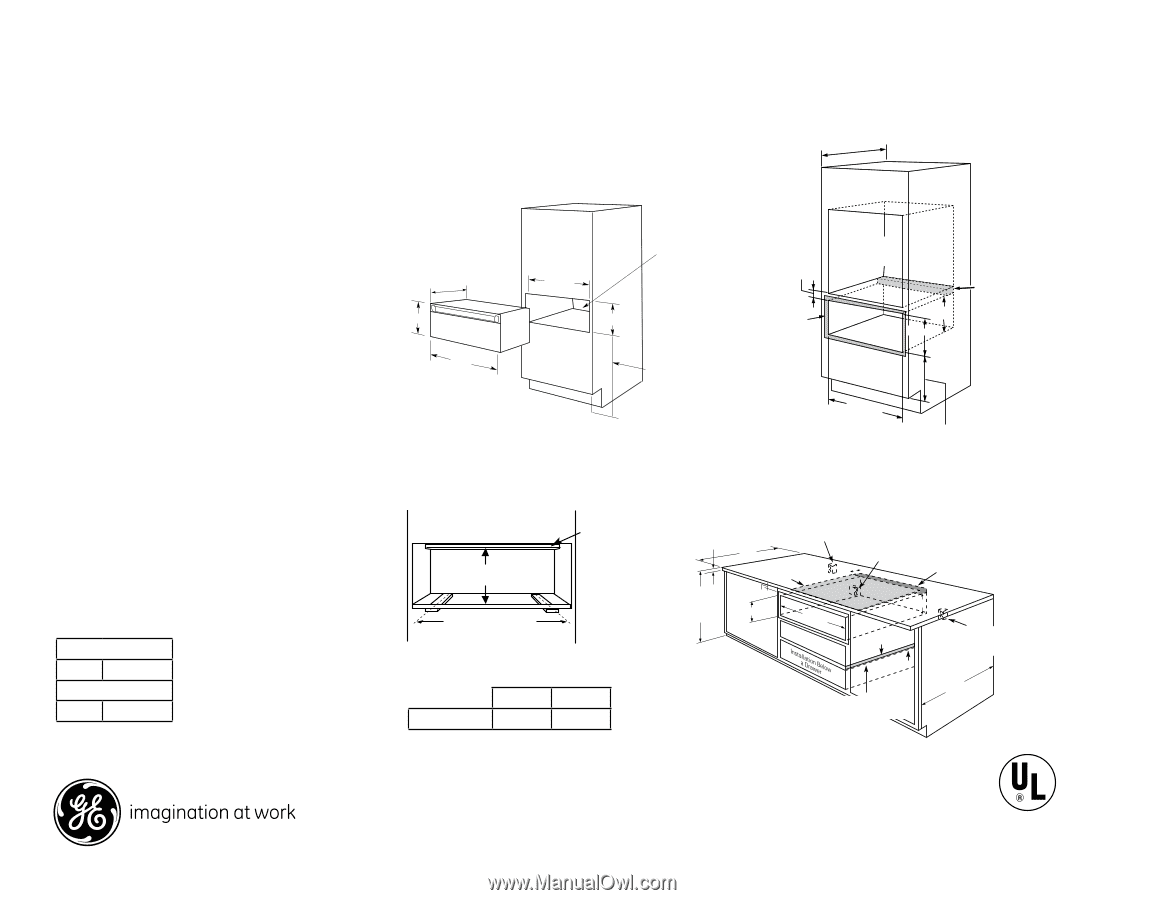
CW9000SDSS GE Cafe™ Series 30" Warming Drawer Locate electrical outlet in adjacent cabinet 16" from left side or 42" fromUnrdigehr tOsviedne Installation Dimensions and Installation Information (in inches) 23-213/-21"/m2"inm. in. 23-1/2" min. 2" min. Optional Accessories: ZXD30B -1/4" panel kit capability 23-1/4"Warming Drawer Dime2n8s-i1on/2s" LocLaotLceoacetaeleteecleterlecicctartrilcicaall Note: Custom panel will not be flush with adjacent cabinetry drawers and doors. Undercounter Installation: A solid bar1ri0er-1m/u2s"t be installed at least 1" from the lowest point of the bottom of cooktop burner box to the top of the 23-1/4" 23-213/-41"/4" 28-218/-21"/22"8-1/2" outoleuotluienttleaitndinajaadcdjeajanccteenntt cabcaincbeaitnb1ien6te"1t f16r6"o"fmrfroomm leftlesfiltdesfetidsoiedreo4or2r"4422"" 9-1/4" frofmrofrmriogmrhigtrishgihtdtsesididee 24" 22"" mm2"iinnm.. in. OcuvOcteounvutOcetounvutetonut Allow 5/8" overlap on 2x2 or22xx24xo2r o2rx42x4 all sides aawngatalil-in9tis"aaptfngbrroeaatloima-ngicntrtakispi-itntbrispeltoabrcrelkoacrk floor towbawolltat9ol"lmf9r"ofmrom cutout. Use any solid material such as 1/4"-thick plywood. Allow at least 1/4" air gap between the10-110/-21"/23" 01"0-1/2" barrier and the top of the warming drawer. See label on top of the warming drawer for approved 30" cooktop models. 30"30" Under Oven Installation: Additional clearance 9-1/4" 9-19/-41"/4" 24" 2re4c"2roe4mcrff"roeoomrcmmouemnmfndlmodeeorenernddeedd frofmrocfmolouofnlroteorrtop forfourninudsnetardlleartion coucnoutenrteorptop recoAAolmlvloAloewlrwlmola5w5p//8e8o5"n"/n8"ded fromoaavllleoalsfsrivlldllidaoeseerpisdolsaoeprnson for under 9" 9-1/4" 9" 9o"f blocflkooflrootor btootbtotmtom of bolfobclkock 9-19/-41"/4" countertop installation 28-1/2" 28-218/-21"/2" 1" min. above toekick between cutouts may be required. Check to be sure that oven supports above the warming insitnaslltaatliloantion or adjust to oven insta1l"lam1ti"oinnm.hianeb.igaohvbteovtoeetkoieckick or oardajudsjtutsot otoveonven drawer location do not obstruct the required insitnaslltaatliloantiohneihgehigt ht interior 23-1/2" depth and 9-1/4" height. Door handle protrudes 2-3/4" from door face. Cabinets and drawers on adjacent 45° and 90° walls should be placed to avoid interference with the handle. Installation Information: Before installing, consult installation instructions packed with product for current dimensional data. KW Rating 120V .45 Install 2x4 or 2x2 anti-tip 9" InsItnaslltablllock 9" I2nxs4taollr 2x2 9" 9"run2nxb4eorotstroo2mrxs2o2abfrlxnliood42abftmcri-xnlookot4tfmirc9pil-ook2"tftoofirxro9plforo2b"bmoxloor2tfctlookomr anti-tip 2x42xo4r(Mo2urxs2t xS2upport t1o50btolobtbst.o) tmtom 9" runrunnernseorsr osorlsidolid of bolfobclkock block 9" botbtotmtom from floor (Mu(Mstu2SsutxpS4uppooprtor1rt5201x5lb02sl.b) s.) to bottom runners or solid of block bottom Electrical outlet Undercounter Installation 1-1/2" Cabinet top 42" max. from Electrical outlet right side flush with side of Install 2x4 or 2x2 25" EleEcltercictarilcoaul toleutlceatbinet 7" max. anti-tip block against 1-11/2-1" /2" Electrical outlet C3Ca6ob"Cuinnatebetirnttoeoptptop251""2M5in"*. Ibnes4ltoaw2ll aa"4scom2oloid"katbomapxrr.iaerfxro. fmrom7 rigrhigt shitdseide 42" max. from height 9-1/4I"nstaInllsataslol laidsbo2ali8dr-r1bie/a2rr"rier right side 1-1/2" belobwealocwoaokctooopktop rear cabinet wall 9" from EflulesEfclhulterswcichtiartwihlcoiastuhlidtosleeuidtoleeffltooforIntosIbtnaosltlttao2mlxl 42oxof4rblo2orxck2x2 cabcainbeitn7e"t m7"9amx.ax. anati-nttipi-tbiplobclkocakgaginasitnst 77 rearreacar bcainbeitnwetawll a9l"l f9r"ofmrom Eflleocotfrlirocaotlor btootbtotmtoomf bolfobclkock Cabinet top 36"36" 1" M1in"*.Min*. 25" CouCnotuenrttoeprtop Solid barrier outlet 16" max. 9 9 from left side heighhetight 9-1/94-"1/4" 28-12/82-"1/2" 1/4" Air gap Install a soSliodlibdSaobrlairdrierbirearrrier 23-1/2" mIbinn.eslEotolauewtlcEolletluaaretitc1lsceta6rotoli"c1lomia6dkl"atbmxoa.parxr.ier below a cooktop fromfrolemftlesifdteside 36" 1" 1/4"1A/4ir"gAairpgap Min*. Breaker Size 120V 15 Amps (Must SupportA150 lbs.)B 30" Drawer 28-1/2" 29-3/4" Countertop height " 9-1/423-12/32-"1m/2i"n.min. InstIanlsl taalsl oalisdobliadrbriaerrier belobweloawcoaockotopktop 28-1/2" Oven cutout 28-1/2" Electrical outl flush with sid cabinet 7" ma 7 Solid barrier For answers to your Monogram® or GE® appliance questions, visit our website at geappliances.com or call GE Answer Center® service, 800.626.2000. Listed by ULanbdoerrawtorirtieers1s/4" Air gap Specification Revised 3/13 Instal2l 2a1s1o2l9id barrier below a cooktop
-
 1
1 -
 2
2
 |
 |