GE DB3482539 User Guide - Page 13
Connecting the Telephone Line
 |
UPC - 940356303656
View all GE DB3482539 manuals
Add to My Manuals
Save this manual to your list of manuals |
Page 13 highlights
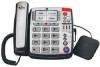
NOTE: Remove the batteries if storing the unit for over 30 days to prevent damage in the event of leaking batteries. Connecting the Telephone Line NOTE: The unit is shipped from the factory for placement on a level surface. 1. Choose an area near a telephone wall jack (RJ11C), and place your cordless telephone on a level surface, such as a desktop or tabletop, or you may mount it on the wall. 2. Plug one end of the telephone line cord into the Line jack at the back of the base and the other end into a modular jack. 3. If you have another device (example, an additional auxiliary phone or data modem) need to be connected to the unit, please connect it to the Data jack on the back of the unit. 4. Plug the AC power adaptor into the electrical outlet and the DC connector into the jack on the back of the base. 13
-
 1
1 -
2
-
3
-
4
-
5
-
6
-
7
-
 8
8 -
 9
9 -
 10
10 -
 11
11 -
 12
12 -
 13
13 -
 14
14 -
 15
15 -
 16
16 -
 17
17 -
 18
18 -
19
-
20
-
21
-
22
-
23
-
24
-
25
-
26
-
27
-
28
-
29
-
30
-
31
-
32
-
33
-
34
-
35
-
36
-
37
-
38
-
39
-
40
-
41
-
42
-
43
-
44
-
45
-
46
-
47
-
48
-
49
-
50
-
51
-
52
-
53
-
54
-
55
-
56
-
57
-
58
-
59
-
60
-
61
-
62
-
63
-
64
-
65
-
66
-
67
-
68
-
69
-
70
-
71
-
72
 |
 |
