GE GRDN510EMWS Installation Instructions - Page 8
Water Supply Requirements, Connecting Inlet Hoses, Connecting Inlet Hoses Cont., Servicing, Call
 |
View all GE GRDN510EMWS manuals
Add to My Manuals
Save this manual to your list of manuals |
Page 8 highlights
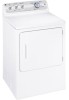
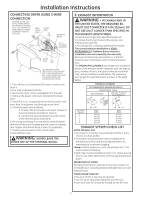
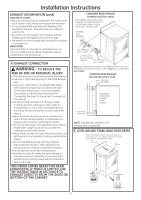
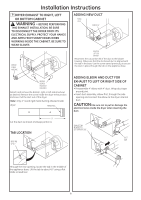
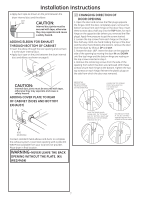
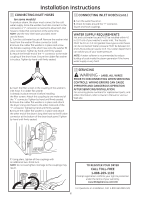
Installation Instructions 11 CONNECTING INLET HOSES (on some models) To produce steam, the dryer must connect to the cold water supply. Since the washer must also connect to the cold water, a "Y" connector is inserted to allow both inlet hoses to make that connection at the same time. NOTE: Use the new inlet hoses provided; never use old hoses. 1. Turn the cold water faucet off. Remove the washer inlet hose from the washer fill valve connector (cold). 2. Ensure the rubber flat washer is in place and screw the female coupling of the short hose onto the washer fill valve connector. Tighten by hand until firmly seated. 3. Attach the female end of the ''Y'' connector to the male coupling of the short hose. Ensure the rubber flat washer is in place. Tighten by hand until firmly seated. 11 CONNECTING INLET HOSES (cont.) 8. Turn the water faucet on. 9. Check for leaks around the ''Y'' connector, faucet and hose couplings. WATER SUPPLY REQUIREMENTS Hot and cold water faucets MUST be installed within 42 in. (107 cm) of your washer's water inlet. The faucets MUST be 3/4 in. (1.9 cm) garden hose-type so inlet hoses can be connected. Water pressure MUST be between 10 and 120 pounds per square inch. Your water department can advise you of your water pressure. NOTE: A water softener is recommended to reduce buildup of scale inside the steam generator if the home water supply is very hard. 4. Insert the filter screen in the coupling of the washer's inlet hose. If a rubber flat washer is already in place remove it before installing the filter screen. Attach this coupling to one male end of the ''Y'' connector. Tighten by hand until firmly seated. 5. Ensure the rubber flat washer is in place and attach the dryer's long inlet hose to the other male end of the ''Y'' connector. Tighten by hand until firmly seated. 6. Ensure the rubber flat washer is in place and attach the other end of the dryer's long inlet hose to the fill valve connector at the bottom of the dryer back panel. Tighten by hand until firmly seated. 12 SERVICING WARNING - LABEL ALL WIRES PRIOR TO DISCONNECTING WHEN SERVICING CONTROLS. WIRING ERRORS CAN CAUSE IMPROPER AND DANGEROUS OPERATION AFTER SERVICING/INSTALLATION. For servicing phone numbers for replacement parts, and other information, refer to Owner's Manual or visit our Web site. 7. Using pliers, tighten all the couplings with an additional two-thirds turn. NOTE: Do not overtighten. Damage to the couplings may result . TO REGISTER YOUR DRYER CALL TOLL-FREE 1-888-269-1192 Prompt registration confirms your right to protection under the terms of your warranty. www.GEAppliances.com (US) For Questions on Installation, Call: 1-800-GECARES (US) 8
-
 1
1 -
2
-
 3
3 -
 4
4 -
 5
5 -
 6
6 -
 7
7 -
 8
8
 |
 |
