GE GSH22JSDSS Owners Manual - Page 6
About the controls on the refrigerator. - refrigerators model
 |
View all GE GSH22JSDSS manuals
Add to My Manuals
Save this manual to your list of manuals |
Page 6 highlights
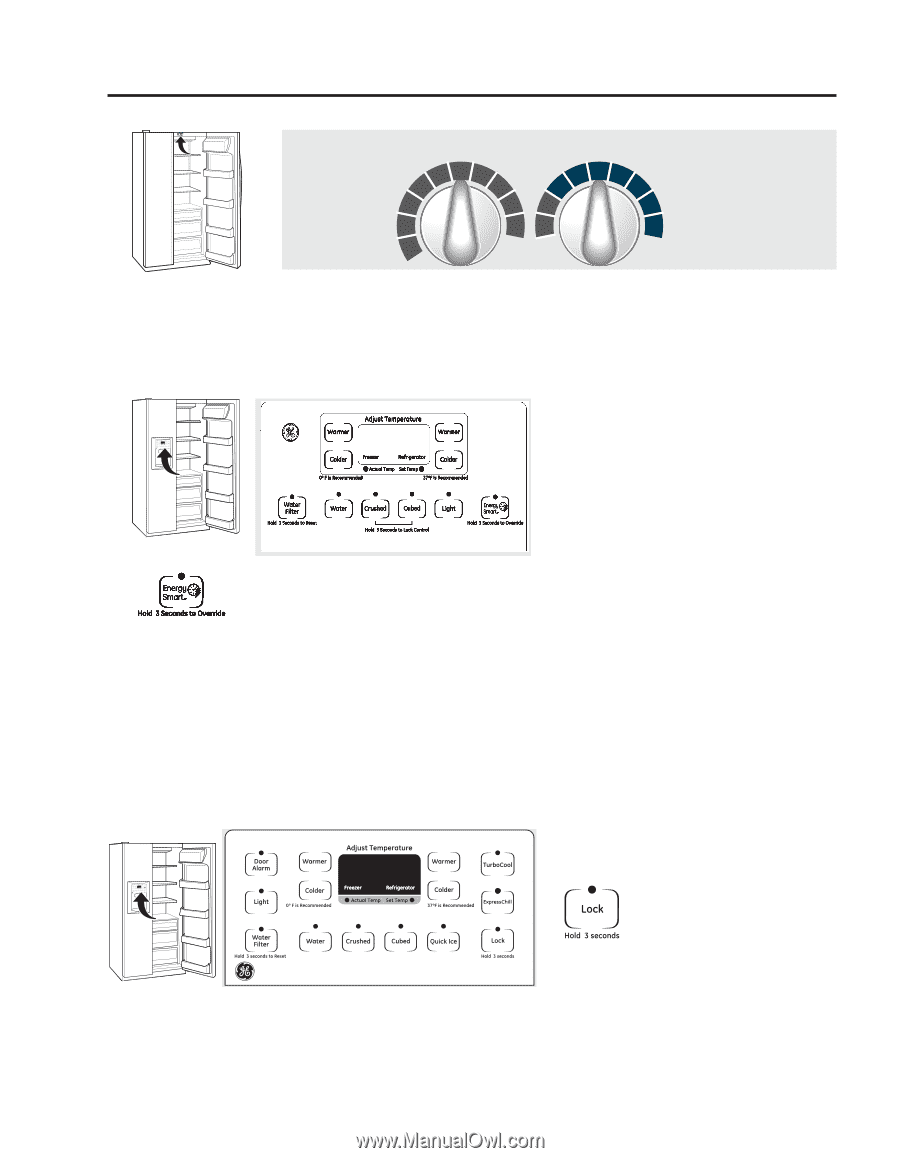
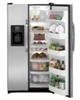
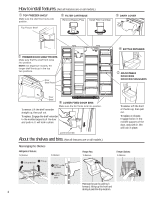
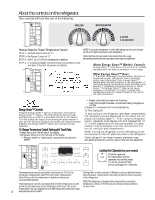
012 12 012 12 89 89 89 89 About the controls on the refrigerator. Your controls will look like one of the following: 34 5 67 FREEZER 34 5 67 FRESH FOOD 9 IS COLDEST 0 IS OFF FREEZER 34 5 67 REFRIGERATOR 34 5 67 09IISS OCOFFLDEST 9 IS0CISOOLDFFEST Startup Steps for Proper Temperature Control STEP 1-Set Fresh Food Control on "5." STEP 2-Set Freezer Control on "5." STEP 3-WAIT 12 HOURS for temperature to stabilize. STEP 4-If a change is needed, move the control one number at a time and allow 12 hours for temperature to stabilize. NOTE: Turning the refrigerator to the 0 (off) setting via the controls does not shut off electrical power to the refrigerator. Control settings will vary based on personal preferences, usage and operating conditions and may require more than one adjustment. About Energy Smart™ Models Controls Energy Smart™ is located on the controls of models equipped with the feature, as shown in the image. What Energy Smart™ Does If the ACM (Appliance Communication Module) is connected to your refrigerator and is receiving utility rate information, then Energy Smart™ feature alters the performance of the refrigerator. It minimizes energy consumption when directed by the NucleusTM (separately purchased device) or Smart Meter. The Energy SmartTM feature can cause changes in refrigerator or freezer compartment temperatures and can cause changes in the rate of ice cube production. Energy Smart™ Override Press the Energy Smart™ pad for 3 seconds to override the Energy Smart™ feature. The LED above the pad will flash multiple times to confirm a successful override of the feature. This will disable the feature from altering the performance of your unit for 18 hours. Eighteen hours after the feature has been disabled, the Energy Smart™ feature will continue normal operation. To Change Temperature Control Setting with Touch Pads: • Freezer setting is on the left side of the display. • Refrigerator setting is on the right side of the display. - Press the Warmer or Colder pad for compartment and direction desired. - Present control setting number will illuminate. - Each time the pad is touched, compartment setting changes one number. A display of 1 is warmest and 9 is the coldest setting. To Turn Cooling Off: To stop cooling in the refrigerator and freezer compartments, first repeatedly press the Warmer pad for the freezer until its display continuously flashes "1". Then, using the refrigerator control, repeatedly press Warmer until both displays flash "0". "0" in both displays turns off the cooling system. On some models, it may be necessary to set only one control to 0 to turn off cooling in both compartments. NOTE: Turning the refrigerator to the 0 (off) setting via the controls does not shut off electrical power to the refrigerator. Control settings will vary based on personal preferences, usage and operating conditions and may require more than one adjustment. Locking the Dispenser (on some models) Press the Lock pad for 3 seconds to lock the dispenser and control panel. To unlock, press and hold the key pads again for 3 seconds. The temperature controls are preset in the factory at 37°F for the Setting either or both controls to OFF stops cooling in both the freezer refrigerator compartment and 0°F for the freezer compartment. and refrigerator compartments, but does not shut off electrical power Allow 24 hours for the temperature to stabilize to the preset to the refrigerator. recommended settings. NOTE: The refrigerator is shipped with protective film covering the The temperature controls can display both the SET temperature as well temperature controls. If this film was not removed during installation, as the actual temperature in the refrigerator and freezer. The actual remove it now. temperature may vary slightly from the SET temperature based on usage 6 and operating environment.
-
 1
1 -
 2
2 -
 3
3 -
 4
4 -
 5
5 -
 6
6 -
 7
7 -
 8
8 -
 9
9 -
 10
10 -
 11
11 -
 12
12 -
13
-
14
-
15
-
16
-
17
-
18
-
19
-
20
-
21
-
22
-
23
-
24
-
25
-
26
-
27
-
28
-
29
-
30
-
31
-
32
-
33
-
34
-
35
-
36
-
37
-
38
-
39
-
40
-
41
-
42
-
43
-
44
-
45
-
46
-
47
-
48
-
49
-
50
-
51
-
52
-
53
-
54
-
55
-
56
-
57
-
58
-
59
-
60
-
61
-
62
-
63
-
64
 |
 |