GE GTH18KBXBB Use and Care Manual - Page 14
Re-hanging The Doors, Cont., Reversing The Door Handles
 |
UPC - 084691176121
View all GE GTH18KBXBB manuals
Add to My Manuals
Save this manual to your list of manuals |
Page 14 highlights
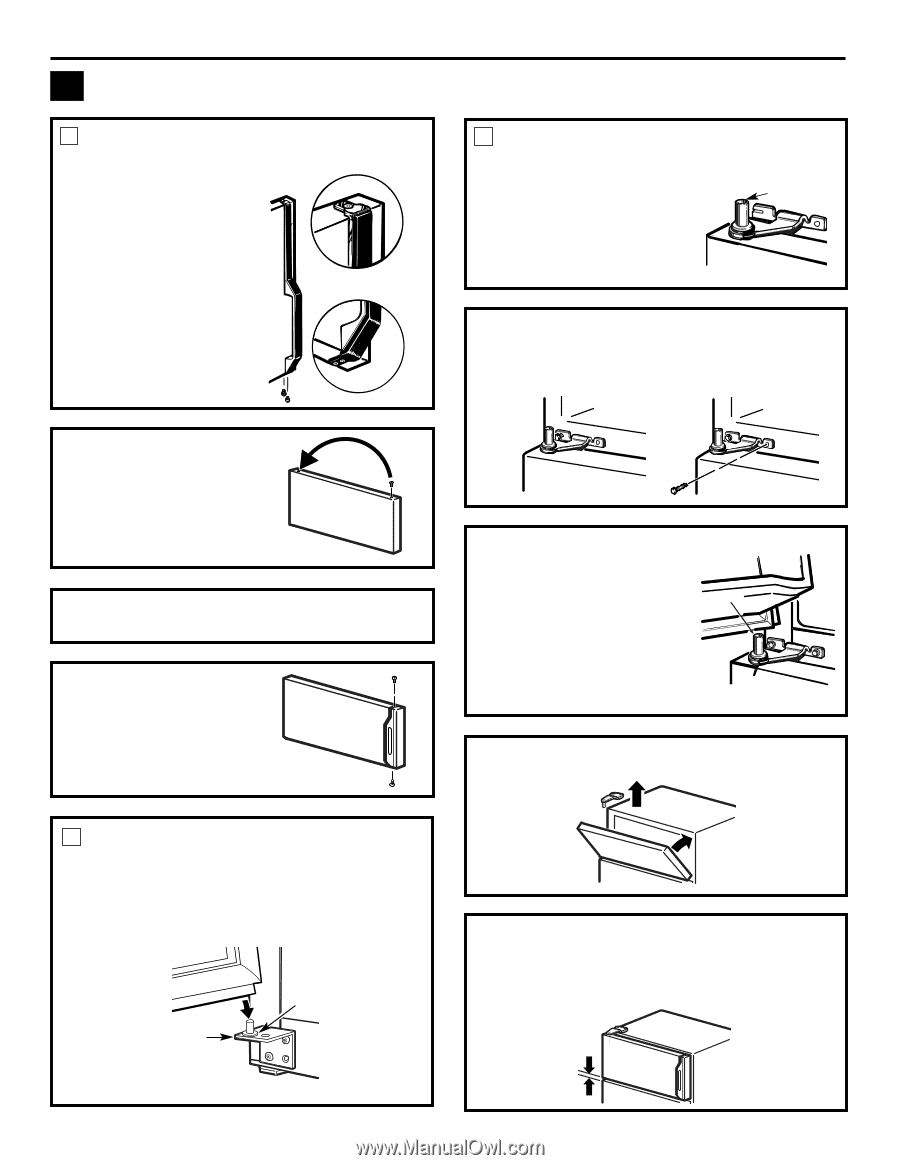
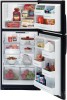
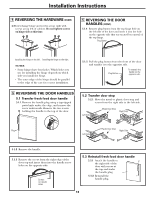
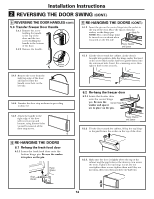
Installation Instructions 2 REVERSING THE DOOR SWING (CONT.) 5 REVERSING THE DOOR HANDLES (CONT.) 5.4 Transfer Freezer Door Handle 5.4.1 Remove the screw TToOpP holding the handle to the top of the door and the two screws holding the handle to the bottom of the door. 5.4.2 Remove the handle. 6 RE-HANGING THE DOORS (CONT.) 6.1.2 Insert the pin on the center hinge into the socket in the top of the door. Place the spacer, then the washer, on the hinge pin. Hinge Pin NOTE: The center hinge must be turned over as shown when mounted on the left side. Plastic Washer and Spacer BBoOtTtToOmM 6.1.3 Tilt the door toward the cabinet. As the door is brought into position, slide the hinge under the head of the screw which earlier had been partly driven into the outermost hole. Insert the remaining screw, then tighten both screws securely. 5.4.3 Remove the screw from the right top edge of the door and insert it into the handle screw hole on the left side. 5.4.4 Transfer the door stop as shown in preceding section 5.2. 5.4.5 Attach the handle to the right edge of the door with screws at top and bottom, using bottom holes vacated by removal of the door stop screws. 6.2 Re-hang the freezer door 6.2.1 Lower the freezer door onto the center hinge pin. Be sure the Center Hinge Pin washer and spacer are in place on the pin. Plastic Washer and Spacer 6.2.2 Tilt the door toward the cabinet, lifting the top hinge so the pin fits into the socket on the top of the door. 6 RE-HANGING THE DOORS 6.1 Re-hang the fresh food door 6.1.1 Lower the fresh food door onto the bottom hinge pin. Be sure the washer is in place on the pin. Hinge Bracket Plastic Washer 6.2.3. Make sure the door is slightly above the top of the cabinet and the gap between the doors is even across the front. Tighten the top hinge screws. Do not overtighten these screws-tighten them until they are just snug, then turn them another one-half turn. 14
-
 1
1 -
2
-
3
-
4
-
5
-
6
-
7
-
8
-
 9
9 -
 10
10 -
 11
11 -
 12
12 -
 13
13 -
 14
14 -
 15
15 -
 16
16 -
 17
17 -
 18
18 -
 19
19 -
20
-
21
-
22
-
23
-
24
-
25
-
26
-
27
-
28
-
29
-
30
-
31
-
32
-
33
-
34
-
35
-
36
-
37
-
38
-
39
-
40
-
41
-
42
-
43
-
44
-
45
-
46
-
47
-
48
-
49
-
50
-
51
-
52
-
53
-
54
-
55
-
56
-
57
-
58
-
59
-
60
-
61
-
62
-
63
-
64
 |
 |