GE JGSP28DENWW Use and Care Manual - Page 11
Oven Control, Clock and Timer Features and Settings
 |
UPC - 084691179979
View all GE JGSP28DENWW manuals
Add to My Manuals
Save this manual to your list of manuals |
Page 11 highlights
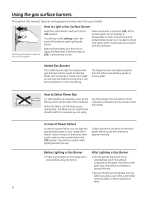
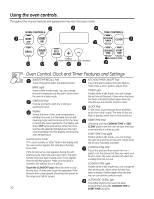
GEAppliances.com Oven Control, Clock and Timer Features and Settings - Pad Short taps to this pad will decrease the time or temperature by small amounts. Touch and hold the pad to decrease the time or temperature by larger amounts. + Pad Short taps to this pad will increase the time or temperature by small amounts. Touch and hold the pad to increase the time or temperature by larger amounts. SELF CLEAN Pad Touch this pad to select the self-cleaning function. See the Using the self-cleaning oven section. CLEAN Light Flashes while in edit mode-you can change the length of time for the self-clean cycle at this point. Glows when the oven is in the self-clean cycle. After the self-clean cycle, the light will turn off. Unlatch the door. CLEAR/OFF Pad Touch this pad to cancel ALL oven operations except the clock and timer. BROIL HI/LO Pad Touch this pad to select the broil function. BROIL Light Flashes while in edit mode-you can switch from HI to LO BROIL at this point. Glows when the oven is in broil mode. Indicator Lights (on some pads) EDIT mode lasts several seconds after the last pad press. START TIME ON/OFF and COOKING TIME ON/OFF will be the only pads lit if either of these options is selected. (Example: START TIME is selected with BAKE-the START TIME pad will remain lit until the clock reaches the programmed time, at which point it will turn off and the BAKE/TEMP RECALL pad light will light up). CONTROL LOCK/UNLOCK PRESS + AND - AND HOLD FOR 3 SECONDS Control Lockout Your control will allow you to lock out the touch pads so they cannot be activated when touched. To lock/unlock the controls: Touch the + and - pads at the same time for 3 seconds, until the display shows LOC ON. To unlock the control, touch the + and - pads at the same time for 3 seconds, until the display shows LOC OFF. When this feature is on and the touch pads are touched, the control will beep and the display will show LOC ON. n The control lockout mode affects all touch pads. No touch pads will work when this feature is activated. n The adjustment will be retained in memory after a power failure. Power Outage CAUTION: Do not make any attempt to operate the electric ignition oven during an electrical power failure. The oven or broiler cannot be lit during a power failure. Gas will not flow unless the glow bar is hot. If the oven is in use when a power failure occurs, the oven burner shuts off and cannot be re-lit until power is restored. This is because the flow of gas is automatically stopped and will not resume when power is restored until the glow bar has reached operating temperature. If a flashing time is in the display, electric power has been restored. Reset the clock. If your oven was set for a timed oven operation and a power outage occurred, the clock and all programmed functions must be reset. To reset the clock, touch the CLOCK pad. Enter the correct time of day by touching the + or - pads. Touch the START/ON pad. 11
-
 1
1 -
2
-
3
-
4
-
5
-
 6
6 -
 7
7 -
 8
8 -
 9
9 -
 10
10 -
 11
11 -
 12
12 -
 13
13 -
 14
14 -
 15
15 -
 16
16 -
17
-
18
-
19
-
20
-
21
-
22
-
23
-
24
-
25
-
26
-
27
-
28
-
29
-
30
-
31
-
32
-
33
-
34
-
35
-
36
 |
 |
