GE JKP90SPSS Use and Care Manual - Page 32
Tones at the End of a Timed Cycle, Hour, 24-Hour or Clock Blackout, Cook and Hold, Clear/Off
 |
UPC - 084691196730
View all GE JKP90SPSS manuals
Add to My Manuals
Save this manual to your list of manuals |
Page 32 highlights
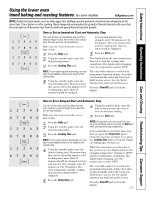
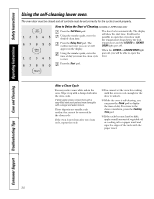
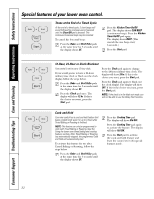
Consumer Support Troubleshooting Tips Care and Cleaning Operating Instructions Safety Instructions Special features of your lower oven control. Tones at the End of a Timed Cycle + At the end of a timed cycle, 3 short beeps will sound followed by one beep every 6 seconds Press the Kitchen Timer On/Off pad. The display shows CON BEEP until the Clear/Off pad is pressed. This continuous 6-second beep may be canceled. (continuous beep). Press the Kitchen Timer On/Off pad again. To cancel the 6-second beep: The display shows BEEP. (This Press the Bake and Broil Hi/Lo pads at the same time for 3 seconds until cancels the one beep every 6 seconds.) the display shows SF. Press the Start pad. 12-Hour, 24-Hour or Clock Blackout + Your control is set to use a 12-hour clock. Press the Clock pad again to change If you would prefer to have a 24-hour military time clock or black out the clock display, follow the steps below. to the 24-hour military time clock. The display will show 24 hr. If this is the choice you want, press the Start pad. Press the Bake and Broil Hi/Lo pads at the same time for 3 seconds until the display shows SF. Press the Clock pad again to black out the clock display. The display will show OFF. If this is the choice you want, press the Start pad. Press the Clock pad once. The display will show 12 hr. If this is the choice you want, press the NOTE: If the clock is in the black-out mode, you will not be able to use the Delay Start function. Start pad. Cook and Hold + Your new control has a cook and hold feature that keeps cooked foods warm for up to 3 hours after Press the Cooking Time pad. The display will show Hld OFF. Timed Baking or Roasting is finished. NOTE: This feature can only be programmed to work with Timed Baking or Roasting. (See the Using the lower oven timed baking and roasting Press the Cooking Time pad again to activate the feature. The display will show Hld ON. features section.) After Timed Baking or Roasting has automatically stopped, the programmed Cook and Hold will automatically start. Press the Start pad to activate the cook and hold feature and leave the control set in this special To activate this feature for use after features mode. Timed Baking or Roasting, follow the steps below. Press the Bake and Broil Hi/Lo pads at the same time for 3 seconds until the display shows SF. 32
-
 1
1 -
2
-
3
-
4
-
5
-
6
-
7
-
8
-
9
-
10
-
11
-
12
-
13
-
14
-
15
-
16
-
17
-
18
-
19
-
20
-
21
-
22
-
23
-
24
-
25
-
26
-
 27
27 -
 28
28 -
 29
29 -
 30
30 -
 31
31 -
 32
32 -
 33
33 -
 34
34 -
 35
35 -
 36
36 -
 37
37 -
38
-
39
-
40
-
41
-
42
-
43
-
44
-
45
-
46
-
47
-
48
-
49
-
50
-
51
-
52
-
53
-
54
-
55
-
56
-
57
-
58
-
59
-
60
-
61
-
62
-
63
-
64
-
65
-
66
-
67
-
68
-
69
-
70
-
71
-
72
-
73
-
74
-
75
-
76
-
77
-
78
-
79
-
80
-
81
-
82
-
83
-
84
-
85
-
86
-
87
-
88
 |
 |
