GE JP328BKBB Use and Care Manual - Page 9
Installation, Instructions - warranty
 |
UPC - 084691130840
View all GE JP328BKBB manuals
Add to My Manuals
Save this manual to your list of manuals |
Page 9 highlights
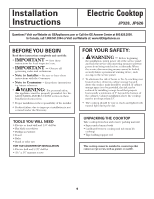
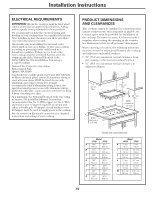
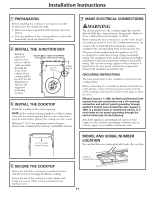
Installation Instructions Electric Cooktop JP328, JP626 Questions? Visit our Website at: GEAppliances.com or Call the GE Answer Center at 800.626.2000. In Canada, call 1.800.561.3344 or Visit our Website at: www.GEAppliances.ca BEFORE YOU BEGIN Read these instructions completely and carefully. • IMPORTANT - Save these instructions for local inspector's use. • IMPORTANT - Observe all governing codes and ordinances. • Note to Installer - Be sure to leave these instructions with the Consumer. • Note to Consumer - Keep these instructions for future reference. • WARNING: For personal safety, this appliance must be properly grounded. See the GROUNDING INSTRUCTIONS section in these Installation Instructions. • Proper installation is the responsibility of the installer. • Product failure due to improper installation is not covered under the Warranty. TOOLS YOU WILL NEED • Electric or hand drill and 1/8″ drill bit • Flat blade screwdriver • Phillips screwdriver • Pencil • Ruler • Hand or saber saw FOR TILE COUNTERTOP INSTALLATION • Electric drill and 5/32″ drill bit • 43⁄16″ x 11⁄4″ masonry screws FOR YOUR SAFETY: • WARNING - Before beginning the installation, switch power off at the service panel and lock the service disconnecting means to prevent power from being switched on accidentally. When the service disconnecting means cannot be locked, securely fasten a prominent warning device, such as a tag, to the service panel. • To eliminate the risk of burns or fire by reaching over heated surface elements, cabinet storage located above the surface units should be avoided. If cabinet storage space is to be provided, the risk can be reduced by installing a range hood that projects horizontally a minimum of 5″ beyond the bottom of the cabinets. Cabinet installation above the cooktop may be no deeper than 13″. • The cooktop should be easy to reach and lighted with natural light during the day. UNPACKING THE COOKTOP Take cooktop from box and remove packing material: • Paper under burner bowls • Cardboard between cooktop and tub (must lift cooktop) • Tape holding support rod This cooktop cannot be installed in countertops that cannot accept screws, such as granite or marble. 9
-
 1
1 -
2
-
3
-
 4
4 -
 5
5 -
 6
6 -
 7
7 -
 8
8 -
 9
9 -
 10
10 -
 11
11 -
 12
12 -
 13
13 -
 14
14 -
15
-
16
-
17
-
18
-
19
-
20
-
21
-
22
-
23
-
24
-
25
-
26
-
27
-
28
-
29
-
30
-
31
-
32
-
33
-
34
-
35
-
36
-
37
-
38
-
39
-
40
-
41
-
42
-
43
-
44
-
45
-
46
-
47
-
48
 |
 |
