GE PFCS1NJWSS Owners Manual - Page 15
Trim kits and decorator panels., Consumer Support, Troubleshooting Tips, Operating Instructions
 |
View all GE PFCS1NJWSS manuals
Add to My Manuals
Save this manual to your list of manuals |
Page 15 highlights
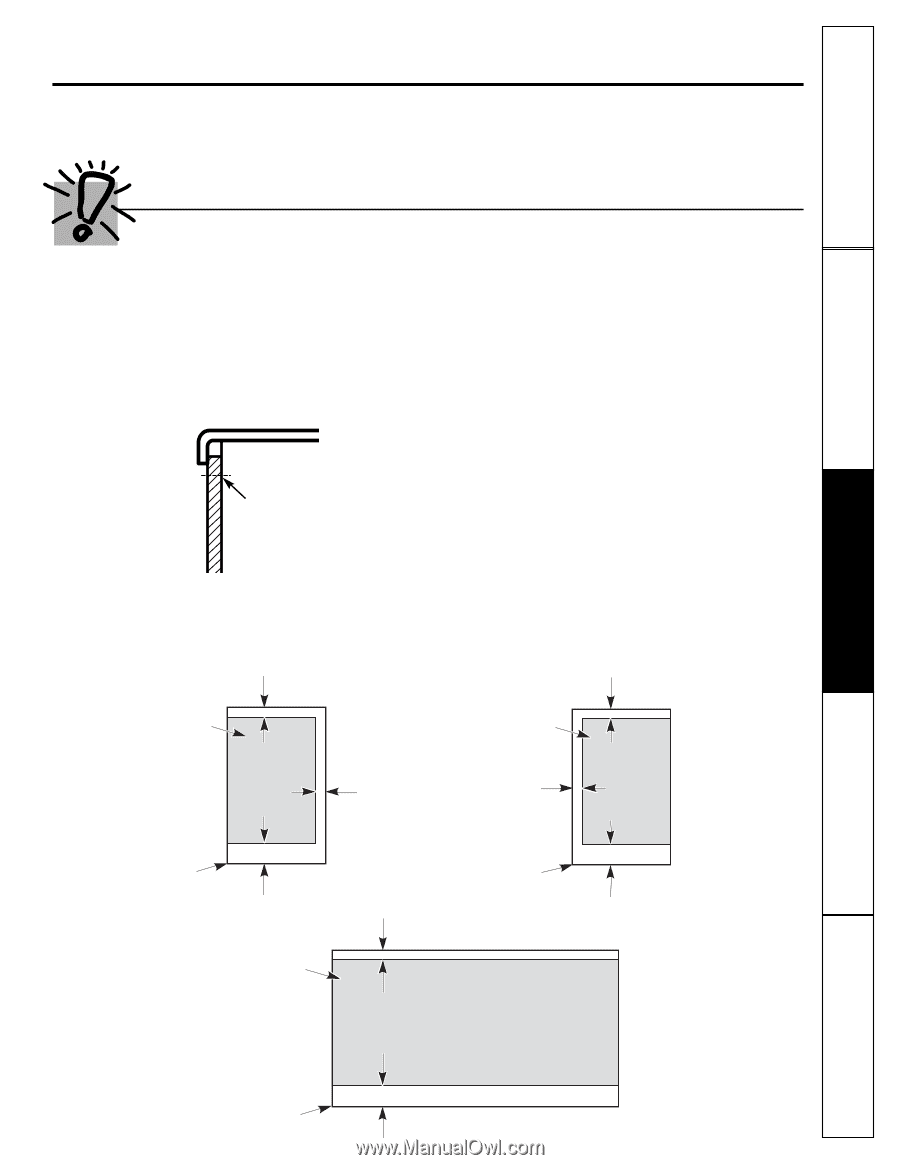
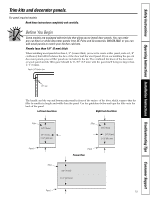
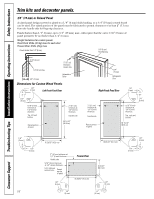
Safety Instructions Operating Instructions Installation Instructions Troubleshooting Tips Consumer Support Trim kits and decorator panels. For panel required models Read these instructions completely and carefully. Before You Begin Some models are equipped with trim kits that allow you to install door panels. You can order pre-cut black or white decorator panels from GE Parts and Accessories, 800.626.2002, or you can add wood panels to match your kitchen cabinets. Panels less than 1/4″ (6 mm) thick When installing wood panels less than 1/4″ (6 mm) thick, you need to create a filler panel, such as 1/8″ cardboard, that will fit between the face of the door and the wood panel. If you are installing the pre-cut decorator panels, pre-cut filler panels are included in the kit. The combined thickness of the decorator or wood panel and the filler panel should be 11/32″ (8.7 mm) with the panel itself being no larger than 1/4″ (6 mm). Panels 1/4″ thick or less 1/4″ max The handle and the top and bottom trim stand in front of the surface of the door, which requires that the filler be smaller in length and width than the panel. Use the guidelines below and tape the filler onto the back of the panel. Left Fresh Food Door Right Fresh Food Door Filler 3/4″ (19 mm) 3/4″ (19 mm) 2 1/2″ (63.5 mm) Filler 3/4″ (19 mm) 3/4″ (19 mm) 2 1/2″ (63.5 mm) Panel Panel Freezer Door Filler 3/4″ (19 mm) 2 1/2″ (63.5 mm) Panel 15
-
 1
1 -
2
-
3
-
4
-
5
-
6
-
7
-
8
-
9
-
 10
10 -
 11
11 -
 12
12 -
 13
13 -
 14
14 -
 15
15 -
 16
16 -
 17
17 -
 18
18 -
 19
19 -
 20
20 -
21
-
22
-
23
-
24
-
25
-
26
-
27
-
28
-
29
-
30
-
31
-
32
-
33
-
34
-
35
-
36
-
37
-
38
-
39
-
40
-
41
-
42
-
43
-
44
-
45
-
46
-
47
-
48
-
49
-
50
-
51
-
52
-
53
-
54
-
55
-
56
-
57
-
58
-
59
-
60
-
61
-
62
-
63
-
64
-
65
-
66
-
67
-
68
-
69
-
70
-
71
-
72
-
73
-
74
-
75
-
76
-
77
-
78
-
79
-
80
-
81
-
82
-
83
-
84
-
85
-
86
-
87
-
88
-
89
-
90
-
91
-
92
-
93
-
94
-
95
-
96
-
97
-
98
-
99
-
100
-
101
-
102
-
103
-
104
-
105
-
106
-
107
-
108
-
109
-
110
-
111
-
112
-
113
-
114
-
115
-
116
-
117
-
118
-
119
-
120
-
121
-
122
-
123
-
124
-
125
-
126
-
127
-
128
-
129
-
130
-
131
-
132
-
133
-
134
-
135
-
136
-
137
-
138
-
139
-
140
 |
 |