GE PP950BMBB Owners Manual - Page 7
Safety Instructions, Care and Cleaning, Troubleshooting Tips, Consumer Support, Operating Instructions
 |
View all GE PP950BMBB manuals
Add to My Manuals
Save this manual to your list of manuals |
Page 7 highlights
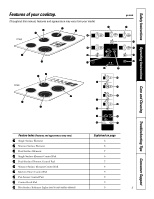
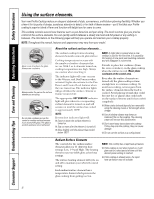
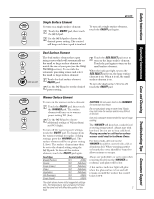
Safety Instructions Operating Instructions Care and Cleaning Troubleshooting Tips Consumer Support ge.com Single Surface Element ON OFF To turn on a single surface element: To turn off a single surface element, Touch the ON/OFF pad, then touch touch the ON/OFF pad again. the (+)/(-) pad. OR Use the (+)/(-) pad to choose the desired power setting. The control will beep each time a pad is touched. ON OFF OR SIZE SELECT Dual Surface Element The dual surface element has a pan sizing sensor which will automatically set the small or large surface element to match the size of your pan (see the Using Pan Sizing section). To override the automatic pan sizing sensor and select the small or large surface element: Touch the dual surface element ON/OFF pad. Use the (+)/(-) pad to set the desired power setting. Touch the SIZE SELECT pad once to turn on the large surface element. Touch the pad again to turn on the small surface element. When the indicator light next to the SIZE SELECT pad is on, the large surface element is on. When it is off, the small surface element is on. To turn the dual surface element off, touch the ON/OFF pad. ON OFF WARMER OR Warmer Surface Element To turn on the warmer surface element: Touch the ON/OFF pad, then touch the WARMER pad. The surface element will turn on to warmer power setting W1 (low). Use the (+)/(-) pad to choose additional settings of W2(medium) and W3 (high). To turn off the warmer power settings, touch the ON/OFF pad. To change from the warmer settings to regular cooking settings, press the WARMER pad. The surface element will be on power setting L (low). The surface element may then be set to the desired setting using the (+)/(-) pads. To turn off the surface element, touch the ON/OFF pad again. Food Type Breads/Pastries Sauces Soups (cream) Stews Vegetables Hot Beverages Soups (liquid) Control Setting W1 (LOW) W2 (Medium) W2 (Medium) W2 (Medium) W2 (Medium) W3 (HIGH) W3 (HIGH) The chart above shows initial suggested settings only. The temperature, type and amount of food, and the time held will affect the quality of the food. CAUTION: Do not warm food on the WARMER for more than two hours. Do not use plastic wrap to cover food. Plastic may melt onto the surface and be very difficult to remove. Use only cookware recommended for top-of-range cooking. The WARMER will keep hot, cooked food at serving temperature. Always start with hot food. Do not use to heat cold food. Placing uncooked or cold food on surface warmer could result in foodborne illness. For best results, all food on the WARMER should be covered with a lid or aluminum foil. When warming pastries or breads, the cover should be vented to allow moisture to escape. Always use potholders or oven mitts when removing food from the WARMER as cookware and plates will be hot. A hot surface indicator light will glow when the glass surface is hot and will remain on until the surface has cooled below 150°F. 7
-
 1
1 -
 2
2 -
 3
3 -
 4
4 -
 5
5 -
 6
6 -
 7
7 -
 8
8 -
 9
9 -
 10
10 -
 11
11 -
 12
12 -
13
-
14
-
15
-
16
-
17
-
18
-
19
-
20
-
21
-
22
-
23
-
24
-
25
-
26
-
27
-
28
-
29
-
30
-
31
-
32
-
33
-
34
-
35
-
36
-
37
-
38
-
39
-
40
 |
 |
