GE PSB42YGXSV Use and Care Manual - Page 31
Grounding The Refrigerator, Side Panels, Flooring, Do Not Use An Extension Cord
 |
UPC - 084691172932
View all GE PSB42YGXSV manuals
Add to My Manuals
Save this manual to your list of manuals |
Page 31 highlights
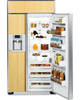
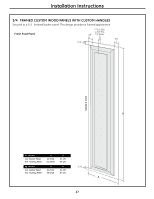
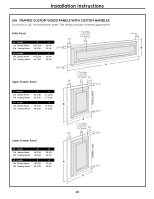
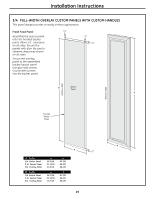
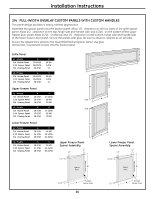
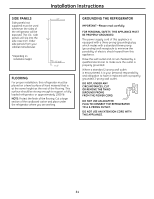
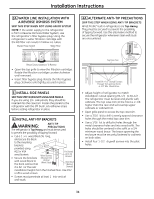
Installation Instructions SIDE PANELS Side panels (not supplied) must be used whenever the sides of the refrigerator will be exposed. The 1/4″ side panels will slip into the side case trim. Order side panels from your cabinet manufacturer. * Depending on installation height. 24" *84" *3" to 4" 1-1/2" FLOORING For proper installation, this refrigerator must be placed on a level surface of hard material that is at the same height as the rest of the flooring. This surface should be strong enough to support a fully loaded refrigerator, or approximately 1500 lb. NOTE: Protect the finish of the flooring. Cut a large section of the cardboard carton and place under the refrigerator where you are working. GROUNDING THE REFRIGERATOR IMPORTANT-Please read carefully FOR PERSONAL SAFETY, THIS APPLIANCE MUST BE PROPERLY GROUNDED. The power supply cord of this appliance is equipped with a three-prong (grounding) plug which mates with a standard three-prong (grounding) wall receptacle to minimize the possibility of electric shock hazard from this appliance. Have the wall outlet and circuit checked by a qualified electrician to make sure the outlet is properly grounded. Where a standard 2-prong wall outlet is encountered, it is your personal responsibility and obligation to have it replaced with a properly grounded 3-prong wall outlet. DO NOT, UNDER ANY CIRCUMSTANCES, CUT OR REMOVE THE THIRD (GROUND) PRONG FROM THE POWER CORD. DO NOT USE AN ADAPTER PLUG TO CONNECT THE REFRIGERATOR TO A 2-PRONG OUTLET. DO NOT USE AN EXTENSION CORD WITH THIS APPLIANCE. 31
-
 1
1 -
2
-
3
-
4
-
5
-
6
-
7
-
8
-
9
-
10
-
11
-
12
-
13
-
14
-
15
-
16
-
17
-
18
-
19
-
20
-
21
-
22
-
23
-
24
-
25
-
 26
26 -
 27
27 -
 28
28 -
 29
29 -
 30
30 -
 31
31 -
 32
32 -
 33
33 -
 34
34 -
 35
35 -
 36
36 -
37
-
38
-
39
-
40
-
41
-
42
-
43
-
44
-
45
-
46
-
47
-
48
-
49
-
50
-
51
-
52
-
53
-
54
-
55
-
56
-
57
-
58
-
59
-
60
-
61
-
62
-
63
-
64
-
65
-
66
-
67
-
68
-
69
-
70
-
71
-
72
-
73
-
74
-
75
-
76
-
77
-
78
-
79
-
80
-
81
-
82
-
83
-
84
-
85
-
86
-
87
-
88
-
89
-
90
-
91
-
92
-
93
-
94
-
95
-
96
-
97
-
98
-
99
-
100
 |
 |
