GE PSHF6RGXBB Owners Manual - Page 25
Installation Instructions, REMOVING THE FREEZER DRAWER, on some models, REMOVE THE BASKET
 |
UPC - 084691171997
View all GE PSHF6RGXBB manuals
Add to My Manuals
Save this manual to your list of manuals |
Page 25 highlights
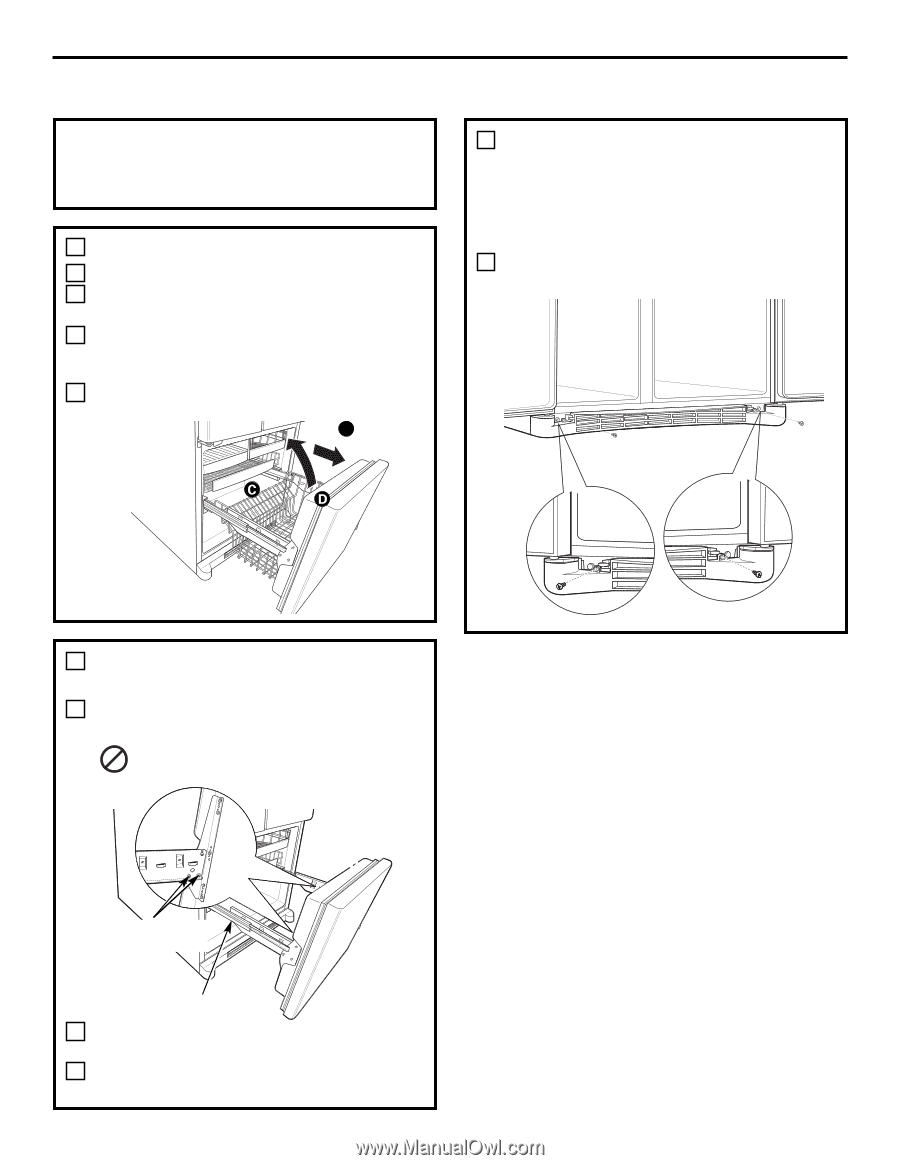
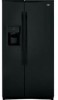
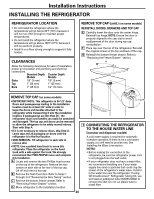
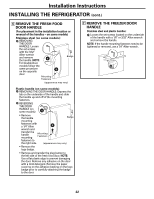
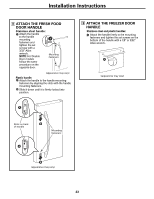
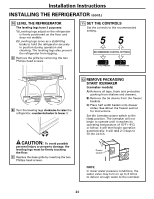
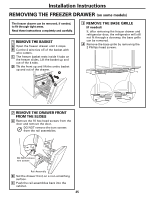
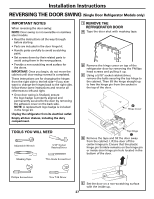
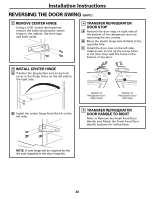
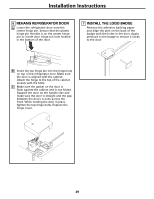
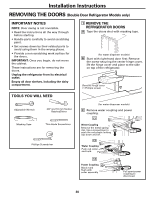
Installation Instructions REMOVING THE FREEZER DRAWER (on some models) The freezer drawer can be removed, if needed, to fit through tight areas. Read these instructions completely and carefully. 1 REMOVE THE BASKET A Open the freezer drawer until it stops. B Cut the 2 wire ties off of the basket with wire cutters. C The freezer basket rests inside 4 tabs on the freezer slides. Lift the basket up and out of the 4 tabs. D Tilt the front up and lift the entire basket up and out of the drawer. A 3 REMOVE THE BASE GRILLE (if needed) If, after removing the freezer drawer and refrigerator door, the refrigerator will still not fit through a doorway, the base grille can be removed. A Remove the base grille by removing the 2 Phillips head screws. 2 REMOVE THE DRAWER FRONT FROM THE SLIDES A Remove the 10 hex head screws from the door and remove the door. DO NOT remove the torx screws from the rail assemblies. DO NOT remove torx screws Rail Assembly B Set the drawer front on a non-scratching surface. C Push the rail assemblies back into the cabinet. 25
-
 1
1 -
2
-
3
-
4
-
5
-
6
-
7
-
8
-
9
-
10
-
11
-
12
-
13
-
14
-
15
-
16
-
17
-
18
-
19
-
 20
20 -
 21
21 -
 22
22 -
 23
23 -
 24
24 -
 25
25 -
 26
26 -
 27
27 -
 28
28 -
 29
29 -
 30
30 -
31
-
32
-
33
-
34
-
35
-
36
-
37
-
38
-
39
-
40
-
41
-
42
-
43
-
44
-
45
-
46
-
47
-
48
-
49
-
50
-
51
-
52
-
53
-
54
-
55
-
56
-
57
-
58
-
59
-
60
-
61
-
62
-
63
-
64
-
65
-
66
-
67
-
68
-
69
-
70
-
71
-
72
-
73
-
74
-
75
-
76
-
77
-
78
-
79
-
80
-
81
-
82
-
83
-
84
-
85
-
86
-
87
-
88
-
89
-
90
-
91
-
92
-
93
-
94
-
95
-
96
-
97
-
98
-
99
-
100
-
101
-
102
-
103
-
104
-
105
-
106
-
107
-
108
-
109
-
110
-
111
-
112
-
113
-
114
-
115
-
116
-
117
-
118
-
119
-
120
-
121
-
122
-
123
-
124
-
125
-
126
-
127
-
128
-
129
-
130
-
131
-
132
-
133
-
134
-
135
-
136
-
137
-
138
-
139
-
140
 |
 |