GE WNRD2050GWC Installation Instructions - Page 5
Caution, Warning - water usage
 |
View all GE WNRD2050GWC manuals
Add to My Manuals
Save this manual to your list of manuals |
Page 5 highlights
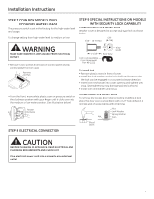
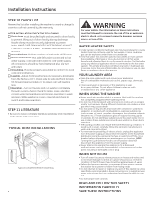
Installation Instructions STEP 7 COIN BOX MODELS ONLY ECONOMY WATER USAGE The pressure switch is set in the factory for the high water level and usage. To change setting from high water level to medium or low: STEP 9 SPECIAL INSTRUCTIONS ON MODELS WITH SECURITY LOCK CAPABILITY COVER SECURITY LOCK INSTALLATION Washer cover is designed to accept stud type lock as shown below. 5/8" 5/16" - 18 Thread WARNING MAKE SURE WASHER IS UNPLUGGED FROM ELECTRICAL OUTLET. • Remove 4 torx screws from back of control panel and lay control panel front on cover. Remove Screws 1-1/16" Cam Lock Available From Greenwald Part #8-1222 3/4" Rear View 9/32" Width To install lock: • Remove plastic insert in front of cover. • Install the lock washer on the lock shaft and locate so that the lock can be engaged in a counterclockwise direction. • Insert lock mechanism into cover opening and tighten until snug. (Overtightening may damage painted surfaces.) • Install cam and tighten until snug. • From the front, move white plastic cam on pressure switch in the clockwise position with your finger until it clicks over into the medium or low water position. (See illustration below). Rotate Clockwise ACCESS DOOR LOCK INSTALLATION To remove the access door retainer before installing a lock, place the door over a wood block with a 1/2" hole drilled in it and tap end of screw lightly with a hammer. Nut Lock Washer Spring Washer Nut Cam Wood Block STEP 8 ELECTRICAL CONNECTION CAUTION BEFORE PLUGGING IN APPLIANCE, READ ELECTRICAL AND PLUMBING REQUIREMENTS AND CHECK LIST. Plug electrical power cord into a properly grounded wall outlet . 5
-
 1
1 -
 2
2 -
 3
3 -
 4
4 -
 5
5 -
 6
6 -
 7
7 -
 8
8 -
 9
9 -
 10
10 -
 11
11 -
12
-
13
-
14
-
15
-
16
-
17
-
18
-
19
-
20
 |
 |
