GE WSLP1500JWW Installation Instructions
GE WSLP1500JWW Manual
 |
UPC - 084691183143
View all GE WSLP1500JWW manuals
Add to My Manuals
Save this manual to your list of manuals |
GE WSLP1500JWW manual content summary:
- GE WSLP1500JWW | Installation Instructions - Page 1
Grounding Instructions 10 Installation Requirements 9 Leveling the Washer 10 Washer Connections for Portable Model 13-16 Washer Connections for Stationary Model 11, 12 Troubleshooting Tips Before You Call For Service . . . . . 17-20 Status Indicators 17 Consumer Support Consumer Support Back - GE WSLP1500JWW | Installation Instructions - Page 2
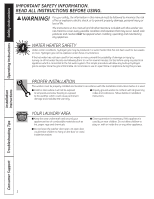
could entice children to hang on the door or crawl inside the washer. ■ Close supervision is necessary if this appliance is used by or near children. Do not allow children to play on, with or inside this or any other appliance. Installation Instructions Consumer Support Troubleshooting Tips 2 - GE WSLP1500JWW | Installation Instructions - Page 3
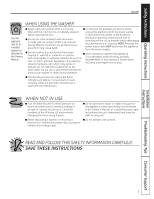
Safety Instructions Operating Instructions ge.com WHEN USING THE WASHER Use this appliance only for its intended purpose as described in this Owner's Manual. ■ Never reach into washer while it is moving. ■ To minimize the possibility of electric shock, Wait until the machine has completely - GE WSLP1500JWW | Installation Instructions - Page 4
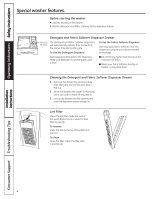
Filter Clean the lint filter inside the wall of the wash basket once a week for best filtering results. To remove: Press the tab at the top of the filter and pull out. To clean: Open the filter. Clean the filter with a toothbrush. Installation Instructions Consumer Support Troubleshooting Tips 4 - GE WSLP1500JWW | Installation Instructions - Page 5
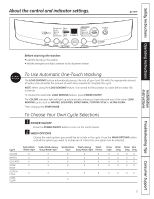
X X X X X Soak+Wash+Heavy Duty+Rinse+Spin X X X X X Wash+Rinse Wash+Heavy Wash +Spin Duty+Rinse+Spin +Rinse X X X X X X X X X X X X X X X X Rinse +Spin X X X X Wash Only X X X X Rinse Spin Only Only X X X X X X X X X X X X 5 Troubleshooting Tips Consumer Support - GE WSLP1500JWW | Installation Instructions - Page 6
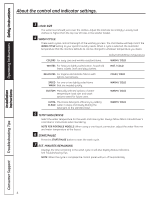
Operating Instructions Safety Instructions About the control and indicator settings. 3 LOAD SIZE The water level should just cover the clothes. Adjust the load size accordingly. Loosely load clothes no higher than the top row of holes in the washer basket. 4 WASH CYCLE These wash cycles control - GE WSLP1500JWW | Installation Instructions - Page 7
to remove water from drain pump and hoses. Do not store the washer where it will be exposed to the weather. Long Vacations: Be sure water supply is shut off at faucets. Drain all water from hoses if weather will be below freezing. Installation Instructions Troubleshooting Tips Consumer Support 7 - GE WSLP1500JWW | Installation Instructions - Page 8
High Normal Permanent Press/ Gentle/ wrinkle resistant delicate Do not dry Do not tumble dry (used with do not wash) Medium Low No heat/air Special instructions Line dry/ hang to dry Drip dry Dry flat In the shade Installation Instructions Consumer Support Troubleshooting Tips 8 - GE WSLP1500JWW | Installation Instructions - Page 9
Warranty. • Note - This appliance must be properly grounded, and electrical service to the washer must conform with local codes and ordinances and the latest edition of the National Electrical Code, ANSI/NFPA 70. WASHER LOCATION Washer must be installed on firm flooring to minimize vibration during - GE WSLP1500JWW | Installation Instructions - Page 10
electric supply provided does not meet the above requirements, call a licensed electrician. LEVELING THE WASHER- STATIONARY MODELS Before connecting the hoses, the washer loaded leveling feet. The washer will automatically level itself. Insure proper ground exists before use GROUNDING INSTRUCTIONS - GE WSLP1500JWW | Installation Instructions - Page 11
Installation Instructions WASHER CONNECTIONS FOR STATIONARY MODEL WSLS1500 WARNING: Make sure the washer is unplugged. 1 FLUSH WATER LINES Run some water from the hot and cold faucets to flush the water lines and remove particles that might clog up the water valve screens. 4 CONNECT DRAIN HOSE - GE WSLP1500JWW | Installation Instructions - Page 12
PANEL 9 READ THE REST OF THIS OWNER'S MANUAL It contains valuable and helpful information that will save you time and money. NOTE: If your washer does not operate, please review the Before You Call For Service section. ALCOVE OR CLOSET INSTALLATION If your washer is approved for installation in an - GE WSLP1500JWW | Installation Instructions - Page 13
Installation Instructions WASHER CONNECTIONS FOR PORTABLE MODEL WSLP1500- ONE-FAUCET CONNECTIONS Use the hose connector provided with the washer for a one-faucet connection. TO CONNECT THE WASHER: 1 REMOVE THE UNI-COUPLE® HOSE FROM INSIDE THE WASHER BASKET 3 CONNECT TO VALVE INLET Attach the COLD - GE WSLP1500JWW | Installation Instructions - Page 14
Installation Instructions WASHER CONNECTIONS FOR PORTABLE MODEL WSLP1500- ONE-FAUCET CONNECTIONS (CONT.) 6 OUTLET The electrical power cord is on the back of the washer. 10 INSTALLATION CHECKLIST Before starting the washer, check to make sure: ❏ Main power is turned on. ❏ The washer is plugged - GE WSLP1500JWW | Installation Instructions - Page 15
Installation Instructions TO DISCONNECT THE WASHER: 1 TURN WATER FAUCET OFF 4 DISCONNECT FROM WATER LINE Move the locking collar down and pull the hose connector down to disengage from the faucet adapter. Locking Collar 2 UNPLUG POWER CORD AND RETURN IT TO THE STORAGE AREA Hose Connector 5 DRAIN - GE WSLP1500JWW | Installation Instructions - Page 16
Installation Instructions WASHER CONNECTIONS FOR PORTABLE MODEL WSLP1500- TWO-FAUCET CONNECTIONS If you have two separate water connections, your washer can be connected to both the hot and cold water faucets. This kit can be purchased from your dealer or from Parts and Accessories. In the United - GE WSLP1500JWW | Installation Instructions - Page 17
Instructions Installation Instructions Before you call for service... Troubleshooting Tips Save time and money! Review the charts on the following pages first and you may not need to call for service. Status Indicators IE ■ Press POWER ON/OFF and call service. ge.com FF ■ Indicates washer - GE WSLP1500JWW | Installation Instructions - Page 18
turn the water back on. • Make sure house water heater is delivering water at 120°F-140°F (48°C-60°C). • Straighten drain hose and make sure washer is not sitting on it. • Top of drain outlet should be less than 8 ft. above floor. Installation Instructions Consumer Support Troubleshooting Tips 18 - GE WSLP1500JWW | Installation Instructions - Page 19
• Make sure load size selector matches clothes load size. • Check fabric softener package for instructions and follow directions for using dispenser. • While this is not caused by the washer, you can slow the pilling process by washing garments inside out. 19 Troubleshooting Tips Consumer Support - GE WSLP1500JWW | Installation Instructions - Page 20
needed. • This is normal. WHAT TO DO • Use a hair dryer set at the lowest heat setting, directing the air at the label for a short amount of time. This will release the adhesive easily, without damaging the surface of the washer. Installation Instructions Consumer Support Troubleshooting Tips 20 - GE WSLP1500JWW | Installation Instructions - Page 21
Please place in envelope and mail to: Veuillez mettre dans une enveloppe et envoyez à : OWNERSHIP REGISTRATION P.O. BOX 1780 MISSISSAUGA, ONTARIO L4Y 4G1 (FOR CANADIAN CONSUMERS ONLY) 21 - GE WSLP1500JWW | Installation Instructions - Page 22
22 - GE WSLP1500JWW | Installation Instructions - Page 23
have other rights which vary from state to state. To know what your legal rights are, consult your local or state consumer affairs office or your state's Attorney General. Warrantor: General Electric Company. Louisville, KY 40225 Installation Instructions Troubleshooting Tips Consumer Support 23 - GE WSLP1500JWW | Installation Instructions - Page 24
Operating Instructions Safety Instructions GE Washer Warranty. (For customers in Canada) All warranty service provided by our Factory Service Centres or an authorized technician. For service, call 1.800.561.3344. Please have serial number and model number available when calling for service. For - GE WSLP1500JWW | Installation Instructions - Page 25
curit 26, 27 Consignes d'utilisation Caractéristiques et commandes . . .29, 30 Caractéristiques particulières de la laveuse 28 Chargement et utilisation de la laveuse 31, 32 Instructions d'installation Branchements pour le modèle fixe 35, 36 Branchements pour le modèle portatif 37-40 Exigences - GE WSLP1500JWW | Installation Instructions - Page 26
la laveuse à la terre conformément à tous les codes et règlements en vigueur. Suivez tous les détails donnés dans les Instructions d'Installation porte de la laveuse ouverte. Une porte ouverte pourrait encourager les enfants à se pendre à la porte ou à grimper à l'intérieur de la machine. ■ Une - GE WSLP1500JWW | Installation Instructions - Page 27
ce Vérifiez l'état des tuyaux de remplissage; GE vous manuel ou dans des instructions de réparation recommande de les changer tous les 5 ans. par l'utilisateur publiées que vous comprenez et ■ Avant de mettre votre laveuse au rebut ou de la mettre hors service, retirez la porte pour éviter pour - GE WSLP1500JWW | Installation Instructions - Page 28
puis en inclinant l'ouverture avant vers le bas. Retirez le tiroir. 3. Alignez le tiroir avec l'ouverture puis encastrez-le directement dans la laveuse. 2. Rincez le tiroir à l'eau. Si nécessaire, utilisez un chiffon doux pour essuyer les débris restants. Filtre à charpie Une fois par semaine - GE WSLP1500JWW | Installation Instructions - Page 29
3 SECS TO LOCK/UNLOCK CONTROLS OPTIONS ULTRA CLEAN LOAD SENSING COLORS WHITES DELICATES SPEED WASH CUSTOM CYCLE START PAUSE POWER CYCLES D1EtoL1A8YHWOUARSSH Avant de mettre la laveuse en marche : • Chargez le linge dans votre laveuse. • Ajoutez le détergent et l'adoucissant dans le tiroir - GE WSLP1500JWW | Installation Instructions - Page 30
LOAD SIZE (TAILLE DE BRASSÉE) Le niveau d'eau devrait juste recouvrir les vêtements. Adaptez la taille de la brassée en conséquence. Placez les vêtements sans les comprimer en ne dépassant pas la dernière rangée de trous dans le panier de la laveuse. 4 WASH fabricant ou ses instructions pour le - GE WSLP1500JWW | Installation Instructions - Page 31
eau douce, une brassée plus petite ou du linge peu sale. GE recommande l'utilisation de détergent à grande efficacité High Efficiency . Les mise en marche de la laveuse, ouvrez le couvercle et ajoutez les articles supplémentaires. Fermez le couvercle. La machine se mettra en marche automatiquement - GE WSLP1500JWW | Installation Instructions - Page 32
Fonctionnement Mesures de sécurité Chargement et utilisation de la laveuse. Étiquettes de tissus Les symboles suivants de tissus se trouvent sur les vêtements que vous allez laver. Étiquettes de lavage Cycle de lavage à la machine Normal Tissus sans repassage/ résistants aux plis Doux/ dé - GE WSLP1500JWW | Installation Instructions - Page 33
être correctement mis à la terre. Le branchement électrique de la laveuse doit être conforme aux codes et règlements locaux et à la dernière édition du National Electrical Code, ANSI/NFPA 70. EMPLACEMENT DE LA LAVEUSE La laveuse doit être installée sur un sol stable pour minimiser les vibrations - GE WSLP1500JWW | Installation Instructions - Page 34
la terre du cordon d'alimentation. Veuillez suivre les codes électriques nationaux ou les codes et règlements locaux. Cet appareil doit être aliment . La laveuse se mettra de niveau automatiquement . Assurez-vous que la mise à la terre soit correcte avant toute utilisation. INSTRUCTIONS DE MISE - GE WSLP1500JWW | Installation Instructions - Page 35
Instructions d'installation BRANCHEMENTS POUR LE MODÈLE FIXE-WSLS1500 AVERTISSEMENT : Assurez-vous que la laveuse est débranchée. 1 RINÇ l'absence de fuites. Collier de serrage Cuve de lessivage 3 PLACEZ LA LAVEUSE À SON EMPLACEMENT FINAL AVEC PRÉCAUTION Collier de serrage Tuyau de refoulement - GE WSLP1500JWW | Installation Instructions - Page 36
Instructions d'installation BRANCHEMENTS POUR LE MODÈLE FIXE-WSLS1500 6 LISTE DE VÉRIFICATION D'INSTALLATION Avant de mettre la laveuse en marche, vérifiez que : ❏ L'alimentation principale est connectée. ❏ La laveuse est branchée. ❏ Les robinets d'eau sont ouverts. ❏ L'appareil est de niveau. ❏ - GE WSLP1500JWW | Installation Instructions - Page 37
Instructions d'installation BRANCHEMENTS POUR LE MODÈLE PORTATIF WSLP1500- ROBINET UNIQUE Utilisez le raccord de tuyau fourni avec la laveuse pour effectuer le branchement à un robinet unique. BRANCHEMENT DE LA LAVEUSE : 1 RETIREZ LE TUYAU UNI-COUPLE® DE L'INTÉRIEUR DU PANIER DE LA LAVEUSE - GE WSLP1500JWW | Installation Instructions - Page 38
Instructions d'installation BRANCHEMENTS POUR LE MODÈLE PORTATIF WSLP1500- ROBINET UNIQUE ( l'arrière de la laveuse. 10 LISTE DE VÉRIFICATION D'INSTALLATION Avant de mettre la laveuse en marche, vérifiez que : ❏ L'alimentation principale est connectée. ❏ La laveuse est branchée. ❏ Les robinets - GE WSLP1500JWW | Installation Instructions - Page 39
Instructions d'installation POUR DÉBRANCHER LA LAVEUSE : 1 FERMEZ LE ROBINET 4 DÉBRANCHEZ LA CONDUITE D'EAU Déplacez le collier de verrouillage et tirez le raccord du tuyau vers le bas pour dégager l'adaptateur du - GE WSLP1500JWW | Installation Instructions - Page 40
Instructions d'installation BRANCHEMENTS POUR LE MODÈLE PORTATIF WSLP1500- RACCORD À 2 ROBINETS Si vous disposez de deux branchements distincts à la conduite d'eau, votre laveuse dans notre service de Pièces Détachées et Accessoires. Aux Etats-Unis, appelez le 800.626.2002. Au Canada, consultez les - GE WSLP1500JWW | Installation Instructions - Page 41
les robinets sont ouverts et que le tuyau de remplissage n'est pas bouché ou entortillé. dr ■ Indique que l'eau ne se vidange pas de la laveuse. Assurez-vous que le tuyau de vidange n'est pas entortillé ou mal branché. Ub ■ Indique que la brassée est mal équilibrée. Répartissez le linge uniform - GE WSLP1500JWW | Installation Instructions - Page 42
variant de 48 à 60°C (120 à 140°F). Le tuyau de vidange est entortillé ou mal branché • Redressez le tuyau de vidange et assurez-vous que la laveuse ne soit pas posée dessus. • La partie supérieure du tuyau de vidange doit être à moins de 8 pieds du sol. Installation Conseils de dépannage - GE WSLP1500JWW | Installation Instructions - Page 43
dépasser la dernière rangée de trous dans le panier de la laveuse. • Réglez le sélecteur de brassée en fonction de votre brassée de vêtements. • Vérifiez les instructions sur la bouteille d'adoucissant et suivez les instructions d'utilisation du distributeur. • Même si ce problème n'est pas provoqu - GE WSLP1500JWW | Installation Instructions - Page 44
et répartissez à nouveau la brassée. Fermez le couvercle et redémarrez la laveuse. • Eloignez la laveuse du mur d'environ 4 po. Bruit de raclement avant le remplissage de la cuve Lors de l'utilisation de la fonction LOAD SENSING (Capteur de charge), l'agitateur tourne avant que l'eau ne remplisse - GE WSLP1500JWW | Installation Instructions - Page 45
Please place in envelope and mail to: Veuillez mettre dans une enveloppe et envoyez à : OWNERSHIP REGISTRATION P.O. BOX 1780 MISSISSAUGA, ONTARIO L4Y 4G1 (FOR CANADIAN CONSUMERS ONLY) 45 - GE WSLP1500JWW | Installation Instructions - Page 46
46 - GE WSLP1500JWW | Installation Instructions - Page 47
Garantie de laveuse GE. Tout le service sous garantie est fourni par nos Centres de service de fabrique ou par un technicien autorisé. Pour le service, appelez équent d'un produit acheté en vue d'une utilisation domestique au Canada. Le service à domicile en vertu de la garantie sera fourni dans les - GE WSLP1500JWW | Installation Instructions - Page 48
les consommateurs, Mabe Canada Inc. Bureau 310, 1 Factory Lane Moncton, N.B. E1C 9M3 Prolongation de garantie www.electromenagersge.ca Achetez un contrat d'entretien GE avant que votre garantie n'expire et bénéficiez d'un rabais substantiel. Ainsi le service après-vente GE sera toujours là apr - GE WSLP1500JWW | Installation Instructions - Page 49
Instrucciones de seguridad Instrucciones de funcionamiento Instrucciones de instalación Información de seguridad . . . . 50, 51 Instrucciones de funcionamiento Características especiales de la lavadora 52 Cómo cargar y utilizar la lavadora 55, 56 Configuraciones de control y de indicador 53, - GE WSLP1500JWW | Installation Instructions - Page 50
de funcionamiento INFORMACIÓN DE SEGURIDAD IMPORTANTE. LEA TODAS LAS INSTRUCCIONES ANTES DEL USO. ¡ADVERTENCIA! Para su seguridad, siga la información de este manual con el fin de minimizar el riesgo de incendio, explosión o descarga eléctrica, así como para evitar daños materiales, lesiones o la - GE WSLP1500JWW | Installation Instructions - Page 51
Instrucciones de seguridad Instrucciones de funcionamiento ge.com AL UTILIZAR LA LAVADORA ■ No abra nunca pieza de este electrodoméstico, a menos que se recomiende de manera explícita en el manual del propietario o en instrucciones publicadas de uso y reparación que sean comprensibles y que pueda - GE WSLP1500JWW | Installation Instructions - Page 52
de la canasta de lavado una vez por semana para lograr mejores resultados de filtrado. Para quitar: Presione la lengüeta ubicada en la parte superior del filtro y tire hacia afuera. Para limpiar: Abra el filtro. Limpie el filtro con un cepillo de dientes. Instrucciones de instalación Consejos para - GE WSLP1500JWW | Installation Instructions - Page 53
las configuraciones de control y de indicador. ge.com Instrucciones de seguridad Instrucciones de funcionamiento Instrucciones de instalación COLD HOT WARM EXTRA LARGE LARGE MEDIUM SMALL EXTRA SMALL SOAK WASH HEAVY DUTY RINSE SPIN EST. MINUTES REMAINING TEMP LOAD LOCK HOLD 3 SECS TO LOCK - GE WSLP1500JWW | Installation Instructions - Page 54
instalación Sobre las configuraciones de control y de indicador. 3 LOAD SIZE (tamaño de carga) El nivel de agua debe cubrir sin apretar ni superar la hilera superior de orificios del tambor de la lavadora. 4 WASH CYCLE (ciclo de lavado) Estos ciclos de lavado controlan la duración del proceso de - GE WSLP1500JWW | Installation Instructions - Page 55
es una causa común de problemas de lavado. Use menos detergente si cuenta con agua blanda, una carga más pequeña o una carga poco sucia. GE recomienda el uso de detergentes de High Efficiency (alta eficiencia) . Los detergentes HE están formulados para funcionar en sistemas de lavado y enjuague con - GE WSLP1500JWW | Installation Instructions - Page 56
Instrucciones de seguridad Instrucciones de funcionamiento Cómo cargar y utilizar la lavadora. Etiquetas de cuidado de tejido A continuación se muestran "símbolos" de etiquetas de cuidado de tejido que afectan a las prendas que se lavan. ETIQUETAS DE LAVADO Ciclo de lavado en máquina Normal - GE WSLP1500JWW | Installation Instructions - Page 57
Si tiene alguna pregunta, llame a 800.GE.CARES (800.432.2737) o visite nuestro sitio Web en: ge.com ANTES DE COMENZAR Lea estas instrucciones por y frecuencia indicados en la placa de clasificación (ubicada en la parte trasera de la lavadora) y debe conectarse a un circuito derivado HERRAMIENTAS - GE WSLP1500JWW | Installation Instructions - Page 58
o códigos y ordenanzas locales vigentes. Este aparato debe recibir el voltaje y frecuencia indicados en la placa de clasificación (ubicada en la parte trasera de la lavadora) y debe conectarse a un circuito derivado individual con adecuada conexión a tierra, protegido por un interruptor de circuitos - GE WSLP1500JWW | Installation Instructions - Page 59
esté desenchufada. 1 PURGUE LAS LÍNEAS DE AGUA Haga correr agua de los grifos de agua caliente y fría para purgar las líneas de agua y para quitar partículas que podrían tapar los filtros de la válvula de agua. 4 CONECTE LA MANGUERA DE DRENAJE Dé una forma de U al extremo de la manguera - GE WSLP1500JWW | Installation Instructions - Page 60
LA PELÍCULA PROTECTORA QUE CUBRE EL PANEL DE CONTROL 9 LEA EL RESTO DEL MANUAL DEL PROPIETARIO Contiene información valiosa y útil que le hará ahorrar tiempo y instalación en un nicho o en un closet, habrá una etiqueta en la parte trasera de la máquina con una descripción de los requisitos. • Las - GE WSLP1500JWW | Installation Instructions - Page 61
CALIENTE para las conexiones del uni-coupler porque pueden producirse pérdidas. Tapa plástica 5 CONECTE LA MANGUERA DE DRENAJE Sujete la manguera de drenaje a la parte trasera de la lavadora. Instale la abrazadera en la manguera de drenaje y ajuste para evitar pérdidas de agua. 61 - GE WSLP1500JWW | Installation Instructions - Page 62
DESEADA 8 ENCHUFE EL CABLE DE ENERGÍA A UN TOMACORRIENTE DE 3 CLAVIJAS CON CONEXIÓN A TIERRA El cable de energía eléctrica se encuentra en la parte trasera de la lavadora. 10 LISTA DE CONTROL DE LA INSTALACIÓN Antes de accionar la lavadora, verifique que se cumplan los siguientes puntos: ❏ El - GE WSLP1500JWW | Installation Instructions - Page 63
Instrucciones de instalación PARA DESCONECTAR LA LAVADORA: 1 CIERRE EL GRIFO DE AGUA 4 DESCONECTE DE LA LÍNEA DE AGUA Desplace el collarín de bloqueo hacia abajo y tire del conector de la manguera hacia abajo para quitarlo del adaptador del grifo. Collarín de bloqueo 2 DESENCHUFE EL CABLE DE - GE WSLP1500JWW | Installation Instructions - Page 64
, su lavadora puede conectarse a los grifos de agua caliente y fría. Este kit puede adquirirse en la tienda donde adquirió la lavadora o solicitándolo a Partes y Accesorios. En los EE.UU., llame al 800.626.2002. 3 ENCHUFE EL CABLE DE ENERGÍA EN UN TOMACORRIENTE DE 3 CLAVIJAS CON CONEXIÓN A TIERRA - GE WSLP1500JWW | Installation Instructions - Page 65
páginas y quizás no necesite llamar al servicio técnico. Indicadores de estado IE ■ Presione POWER ON/OFF (encendido/apagado) y llame al servicio técnico. ge.com FF ■ Indica que la lavadora no se ha llenado. Verifique que todos los grifos estén abiertos y que la manguera de llenado no se - GE WSLP1500JWW | Installation Instructions - Page 66
. Los filtros de la válvula de agua quedaron trabados • Cierre el suministro de agua y quite las mangueras de conexión de agua de la parte superior trasera de la lavadora. Quite los filtros y utilice un cepillo o escarbadientes para limpiar los filtros de la máquina. Vuelva a instalar los filtros - GE WSLP1500JWW | Installation Instructions - Page 67
ge.com Instrucciones de seguridad Instrucciones de funcionamiento Instrucciones de instalación OPERACIÓN CAUSAS POSIBLES QUÉ HACER La lavadora se La lavadora normalmente se detiene durante un - GE WSLP1500JWW | Installation Instructions - Page 68
el tambor se llene de agua Cuando detecta la función LOAD SENSING (sensor de carga), el agitador gira antes de que se llene el tambor. • Esto es normal. OTROS Las etiquetas de la parte exterior de la lavadora no pueden quitarse bien CAUSAS POSIBLES A veces el - GE WSLP1500JWW | Installation Instructions - Page 69
á situado en un área que no dispone de servicio por parte de un proveedor de servicio autorizado de GE, podría tener que hacerse cargo de los costes de envío local o la oficina del Prucurador (Attorney General) en su localidad. Garante: General Electric Company. Louisville, KY 40225 Instrucciones de - GE WSLP1500JWW | Installation Instructions - Page 70
Notas. 70 Soporte al consumidor Consejos para la solución de problemas Instrucciones de instalación Instrucciones de funcionamiento Instrucciones de seguridad - GE WSLP1500JWW | Installation Instructions - Page 71
durante horas normales de oficina. GE Consumer Home Services estará aún ahí cuando su garantía termine. Piezas y accesorios ge.com Aquellos individuos con la en este manual cubren los procedimientos a seguir por cualquier usuario. Cualquier otra reparación debería, por regla general, referirse a - GE WSLP1500JWW | Installation Instructions - Page 72
Consumer Support. GE Appliances Website In the U.S.: ge.com Have a question or need assistance with your appliance? Try the GE Appliances Website 24 hours a day, any day of the year! For greater convenience and faster service, you can now download Owner's Manuals, order parts or even schedule
-
 1
1 -
 2
2 -
 3
3 -
 4
4 -
 5
5 -
 6
6 -
 7
7 -
8
-
9
-
10
-
11
-
12
-
13
-
14
-
15
-
16
-
17
-
18
-
19
-
20
-
21
-
22
-
23
-
24
-
25
-
26
-
27
-
28
-
29
-
30
-
31
-
32
-
33
-
34
-
35
-
36
-
37
-
38
-
39
-
40
-
41
-
42
-
43
-
44
-
45
-
46
-
47
-
48
-
49
-
50
-
51
-
52
-
53
-
54
-
55
-
56
-
57
-
58
-
59
-
60
-
61
-
62
-
63
-
64
-
65
-
66
-
67
-
68
-
69
-
70
-
71
-
72
 |
 |

ge.com
WSLP1500
WSLS1500
Owner’s Manual &
Installation Instructions
Washers
175D1807P628
49-90361-1
12-08 JR
Safety Information
. . . . . . . . . . . 2, 3
Operating Instructions
Control and Indicator Settings . . . . . .5, 6
Loading and Using the Washer . . . .7, 8
Special Washer Features . . . . . . . . . . . .4
Installation Instructions
Alcove or Closet Installation
. . . . . . . 12
Electrical Requirements
. . . . . . . . . . . 10
Grounding Instructions . . . . . . . . . . . .10
Installation Requirements . . . . . . . . . . . 9
Leveling the Washer
. . . . . . . . . . . . . . 10
Washer Connections for
Portable Model . . . . . . . . . . . . . . . .13–16
Washer Connections for
Stationary Model . . . . . . . . . . . . . .11, 12
Troubleshooting Tips
Before You Call For Service . . . . . 17–20
Status Indicators . . . . . . . . . . . . . . . . . .17
Consumer Support
Consumer Support
. . . . . . . Back Cover
Ownership Registration for
Customers in Canada Only . . . . .21, 22
Warranty for Customers
in Canada . . . . . . . . . . . . . . . . . . . . . . . . .24
Warranty for Customers
in the U.S.A. . . . . . . . . . . . . . . . . . . . . . . .23
Write the model and serial
numbers here:
#
#
You can find them on a label
on the back of the washer.
Laveuses
Lavadoras
Manuel d’utilisation
et d’installation
Manual del propietario
e instalación
La section française commence à la page 25
La sección en español empieza en la página 49