GE WSLP1500JWW Installation Instructions - Page 20
What To Do, Possible Causes
 |
UPC - 084691183143
View all GE WSLP1500JWW manuals
Add to My Manuals
Save this manual to your list of manuals |
Page 20 highlights
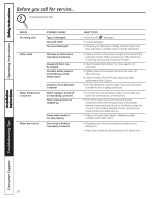
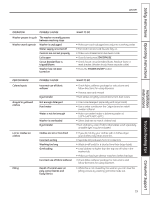
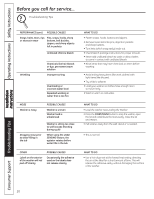
Operating Instructions Safety Instructions Before you call for service... Troubleshooting Tips PERFORMANCE (cont.) POSSIBLE CAUSES Snags, holes, tears, rips or excessive wear Pins, snaps, hooks, sharp buttons, belt buckles, zippers, and sharp objects left in pockets Undiluted chlorine bleach Wrinkling Chemicals like hair bleach or dye, permanent wave solution Improper sorting Overloading or incorrect water level Repeated washing in water that is too hot NOISE Washer is noisy POSSIBLE CAUSES Washer is uneven Washer load is unbalanced Dragging noise prior to water filling in the tub Washer is sitting too close to wall (causes knocking during cycle) When using the LOAD SENSING feature, the agitator rotates before water fills in the tub OTHER Labels on the exterior of the washer will not peel off cleanly POSSIBLE CAUSES Occasionally the adhesive used on the labels does not release cleanly WHAT TO DO • Fasten snaps, hooks, buttons and zippers. • Remove loose items like pins, objects in pockets and sharp buttons. • Turn knits (which snag easily) inside out. • Check bleach package instructions for proper amount. • Never add undiluted bleach to wash or allow clothes to come in contact with undiluted bleach. • Rinse items that may have chemicals on them before washing. • Avoid mixing heavy items (like work clothes) with light items (like blouses). • Try a fabric softener. • Load your washer so clothes have enough room to move freely. • Wash in warm or cold water. WHAT TO DO • Level the washer. See Leveling the Washer. • Press the START/PAUSE button to stop the washer, open the lid and redistribute the load evenly. Close the lid and restart. • Pull washer away from the wall; about 4" is needed. • This is normal. WHAT TO DO • Use a hair dryer set at the lowest heat setting, directing the air at the label for a short amount of time. This will release the adhesive easily, without damaging the surface of the washer. Installation Instructions Consumer Support Troubleshooting Tips 20
-
 1
1 -
2
-
3
-
4
-
5
-
6
-
7
-
8
-
9
-
10
-
11
-
12
-
13
-
14
-
 15
15 -
 16
16 -
 17
17 -
 18
18 -
 19
19 -
 20
20 -
 21
21 -
 22
22 -
 23
23 -
 24
24 -
 25
25 -
26
-
27
-
28
-
29
-
30
-
31
-
32
-
33
-
34
-
35
-
36
-
37
-
38
-
39
-
40
-
41
-
42
-
43
-
44
-
45
-
46
-
47
-
48
-
49
-
50
-
51
-
52
-
53
-
54
-
55
-
56
-
57
-
58
-
59
-
60
-
61
-
62
-
63
-
64
-
65
-
66
-
67
-
68
-
69
-
70
-
71
-
72
 |
 |