Genie DirectLift Plus Owner's Manual - Page 4
Warning - screw 1 2
 |
View all Genie DirectLift Plus manuals
Add to My Manuals
Save this manual to your list of manuals |
Page 4 highlights
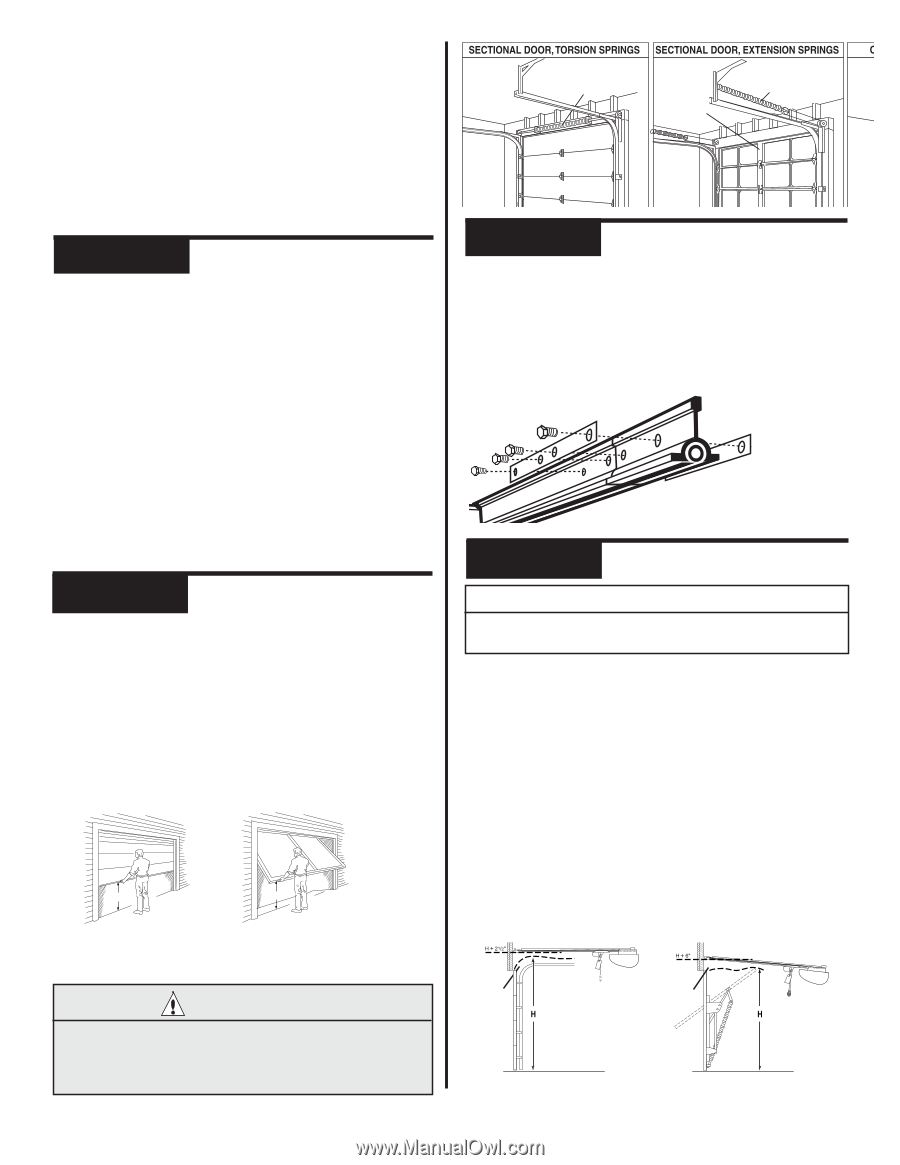
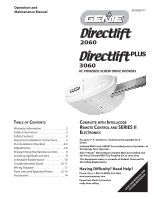
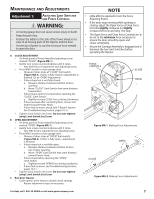
Pre-Installation Checklist This Opener includes parts and supplies needed to install in most garages and connect to most garage doors. There are many variations of garages and garage doors. A few additional parts and supplies may be needed to install Opener into your garage and connect to your garage door. While checking items listed below, note any additional items you will need. Tools used in this section: • 12'+ Tape Measure • Pencil • Ladder • Level Check following items before assembling Opener: Check Step 1: Check Door Condition and Thickness Check condition of vertical stile in center of door, and its connection to door's top and bottom beams. (Figure 2) A If door frame is nailed together and not a solid connection, door frame must be braced or reinforced before installing Opener. B If door is "lightweight" (made with frame and skin - not solid), door (including door frame) must be braced or reinforced before installing Opener. C A door opener reinforcement bracket may also be needed to connect garage door to Opener's Door Bracket. This Opener is designed for installation on a properly braced sectional door or solidly braced one-piece door. D Contact your Genie Factory Authorized Dealer or dealer of your garage door for any necessary bracing and a door opener reinforcement bracket (if needed) before proceeding. E If you have a wooden door, measure door's thickness. If your door is less than 2" thick, brace door or use shorter Door Bracket Lag Screws (1/4" x 1-1/4" - not included) Ch ec k S t e p 2: AChliegcnkmGenatr,aOgepDeroaotiron and Balance A Raise door, check alignment and see if it moves freely (Figure 1). If door appears out of alignment, binds, or does not move smoothly, contact a Genie Factory Authorized Dealer or dealer of your garage door for repairs and adjustments to door mechanism. B Raise door to 3' - 4' above ground and carefully let go. Door should stay stationary. Slight movement is acceptable. More than slight movement means door is out of balance. Contact a Genie Factory Authorized Dealer or dealer of your garage door for repairs and adjustments to door mechanism. KEEP FEET CLEAR OF DOOR 3' - 4' Sectional 3' - 4' One-Piece Door Door Figure 1 Checking door balance C Check door type. Make a note of whether it is a sectional or a onepiece door for reference later (Figure 2). WARNING: If your door sticks, binds, or is out of balance, have it adjusted by a Genie Factory Authorized Dealer. Door springs, cables, pulleys, brackets and associated hardware are under extreme tension and can cause serious injury or death. 4 Torsion Springs Center Stile Extension Springs Header Area Center Stile Figure 2 Note Door Type Check Step 3: Measure Garage Door Height A Measure door height (floor to top of door) using a tape measure. B This new Garage Door Opener is designed for doors up to and including 7' 6" tall. If door height is 7' 6" or less continue to Check Step 4. C If door height is 8'-0", you need a Rail Extension Kit. (Figure 3). (See Accessories Order Form, Page 14). D If the door height is taller than 8'-0", the opener you purchased is the wrong version. Contact your Customer Service Representative at 1-800-354-3643. Rail Extension for 8' door Figure 3 Rail Extension Kit Ch ec k Ste p 4: Check Door Header Area NOTE The header is a heavily reinforced section of the wall just above the top of the garage door opening. A Find vertical center line of door and header: • Close door Measure door width at top. • Mark a point at center of door and on header directly above door. Draw a center line to connect points. B Find Header Bracket mounting height (Figure 4): (Do not attach Header Bracket). • Raise door, watching top edge of door and stop door when its edge reaches its highest point. • Measure distance ("H") from top edge of door to floor. - For sectional doors, add 1" to "H". Mark a point on center line. Bottom of Header Bracket will be installed here. - For one-piece doors, add 7" to "H". Mark this point on center line. Bottom of Header Bracket will be installed here. SECTIONAL DOOR ONE-PIECE DOOR HEADER HEADER Figure 4 Find Highest Point of Travel For Help, call 1-800-35-GENIE or visit www.geniecompany.com
-
 1
1 -
 2
2 -
 3
3 -
 4
4 -
 5
5 -
 6
6 -
 7
7 -
 8
8 -
 9
9 -
 10
10 -
11
-
12
-
13
-
14
 |
 |