Gigabyte 7VM333M-RZ User Manual - Page 8
Hardware Installation Process, Step 1: Set System Jumper JP1
 |
View all Gigabyte 7VM333M-RZ manuals
Add to My Manuals
Save this manual to your list of manuals |
Page 8 highlights
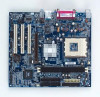
English Hardware Installation Process To set up your computer, you must complete the following steps: Step 1- SetSystem Jumper (JP1) Step 2- Install the Central Processing Unit (CPU) Step 3- Install Memory Modules Step 4- Install Expansion Cards Step 5- Install I/O Peripherals Cables Step 2 Step 3 Step 5 Step 5 Step 4 Step 1 Step 1: Set System Jumper (JP1) The system bus frequency can be switched at 100/133/166MHz by adjusting system jumper (JP1). (The internal frequency depend on CPU.) Short: 100MHz 1 Open: 133/166MHz 1 100MHz : Fix FSB 200M Hz CPU 133/166M Hz : Supports FSB 266/333M Hz CPU If you want to use a CPU with 200MHz FSB, please set JP1 to 100MHz. JP1 7VM 333M -RZ M otherboard - 8 -
-
 1
1 -
2
-
 3
3 -
 4
4 -
 5
5 -
 6
6 -
 7
7 -
 8
8 -
 9
9 -
 10
10 -
 11
11 -
 12
12 -
 13
13 -
14
-
15
-
16
-
17
-
18
-
19
-
20
-
21
-
22
-
23
-
24
-
25
-
26
-
27
-
28
-
29
-
30
-
31
-
32
-
33
-
34
-
35
-
36
 |
 |

- 8 -
7VM333M-RZ Motherboard
English
Hardware Installation Process
To set up your computer, you must complete the following steps:
Step 1- Set System Jumper (JP1)
Step 2- Install the Central Processing Unit (CPU)
Step 3- Install Memory Modules
Step 4- Install Expansion Cards
Step 5- Install I/O Peripherals Cables
Step 1: Set System Jumper (JP1)
The system bus frequency can be switched at 100/133/166MHz by adjusting system jumper (JP1).
(The internal frequency depend on CPU.)
JP1
Short: 100MHz
1
1
Open: 133/166MHz
Step 3
Step 2
Step 5
Step 5
Step 4
Step 1
100MHz
: Fix FSB 200MHz CPU
133/166MHz : Supports FSB 266/333MHz CPU
If you want to use a CPU with 200MHz FSB, please
set JP1 to 100MHz.