Gigabyte GA-5YXS1-RH Manual - Page 12
Installation Steps
 |
View all Gigabyte GA-5YXS1-RH manuals
Add to My Manuals
Save this manual to your list of manuals |
Page 12 highlights
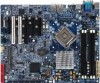
English GA-5YXS1-RH/GA-5YXS-RH Motherboard Installation Steps: 1. Unlock a DIMM socket by pressing the retaining clips outwards.Aling a DIMM on the socket such that the notch on the DIMM exactly match the notch in the socket. 2. Firmly insert the DIMMinto the socket until the retaining clips snap back in place. NOTE!! We recommened you to populate the same device size on each socket and the same DIMM size. 4. Reverse the installation steps if you want to remove the DIMM module. 12
-
 1
1 -
2
-
3
-
4
-
5
-
6
-
 7
7 -
 8
8 -
 9
9 -
 10
10 -
 11
11 -
 12
12 -
 13
13 -
 14
14 -
 15
15 -
 16
16 -
 17
17 -
18
-
19
-
20
-
21
-
22
-
23
-
24
-
25
-
26
-
27
-
28
-
29
-
30
-
31
-
32
-
33
-
34
-
35
-
36
-
37
-
38
-
39
-
40
-
41
-
42
-
43
-
44
-
45
-
46
-
47
-
48
-
49
-
50
-
51
-
52
-
53
-
54
 |
 |

12
English
GA-5YXS1-RH/GA-5YXS-RH Motherboard
Installation Steps:
1.
Unlock a DIMM socket by pressing the retaining clips outwards.Aling a DIMM on the socket such
that the notch on the DIMM exactly match the notch in the socket.
2.
Firmly insert the DIMMinto the socket until the retaining clips snap back in place.
NOTE!! We recommened you to populate the same device size on each socket and the
same DIMM size.
4. Reverse the installation steps if you want to remove the DIMM module.