Gigabyte GA-8I945P-G Manual - Page 77
/ 6- / 8- Channel Audio Function Introduction - sound driver
 |
View all Gigabyte GA-8I945P-G manuals
Add to My Manuals
Save this manual to your list of manuals |
Page 77 highlights
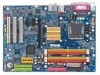
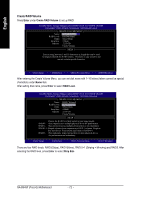
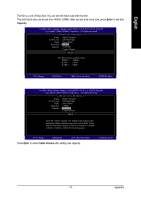
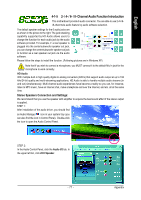
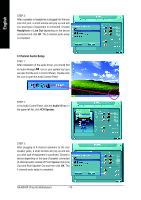
English 4-1-5 2- / 4- / 6- / 8- Channel Audio Function Introduction This motherboard provide 6 audio connector. You are able to use 2-/4-/6/8-channnels audio feature by audio software selection. The default speaker settings for the 6 audio jacks are as shown in the picture to the right. The jack retasking capability supported by HD Audio allows users to change the function for each audio jack by the audio software provided. For example, if a rear speaker is plugged into the center/subwoofer speaker out jack, you can change the center/subwoofer speaker out jack to fucntion as a rear speaker out jack via the audio software. Line In Line Out (Front Speaker Out) Mic In Rear Speaker Out Center/Subwoofer Speaker Out Side Speaker Out Please follow the steps to install the function. (Following pictures are in Windows XP) Note that if you wish to connect a microphone, you MUST connect it to the default Mic In jack for the microphone to work correctly. HD Audio With multiple built-in high quality digital-to-analog converters (DACs) that support audio output at up to 192 kHz/24-bit quality and multi-streaming applications, HD Audio is able to handle multiple audio streams (in and out) simultaneously. Multi-channel audio experiences have become a reality so you can, for instance, listen to MP3 music, have an Internet chat, make a telephone call over the Internet, and etc. all at the same time. Stereo Speakers Connection and Settings: We recommend that you use the speaker with amplifier to acquire the best sound effect if the stereo output is applied. STEP 1 : After installation of the audio driver, you should find an Audio Manager icon in your system tray (you can also find the icon in Control Panel). Double-click the icon to open the Audio Control Panel. STEP 2: In the Audio Control Panel, click the Audio I/O tab. In the upper left list, click 2CH Speaker. - 77 - Appendix
-
 1
1 -
2
-
3
-
4
-
5
-
6
-
7
-
8
-
9
-
10
-
11
-
12
-
13
-
14
-
15
-
16
-
17
-
18
-
19
-
20
-
21
-
22
-
23
-
24
-
25
-
26
-
27
-
28
-
29
-
30
-
31
-
32
-
33
-
34
-
35
-
36
-
37
-
38
-
39
-
40
-
41
-
42
-
43
-
44
-
45
-
46
-
47
-
48
-
49
-
50
-
51
-
52
-
53
-
54
-
55
-
56
-
57
-
58
-
59
-
60
-
61
-
62
-
63
-
64
-
65
-
66
-
67
-
68
-
69
-
70
-
71
-
 72
72 -
 73
73 -
 74
74 -
 75
75 -
 76
76 -
 77
77 -
 78
78 -
 79
79 -
 80
80 -
 81
81 -
 82
82 -
83
-
84
-
85
-
86
-
87
-
88
 |
 |