Gigabyte GA-8N-SLI Quad Royal Manual - Page 14
Configuring a bootable RAID array with Microsoft Windows 2000
 |
View all Gigabyte GA-8N-SLI Quad Royal manuals
Add to My Manuals
Save this manual to your list of manuals |
Page 14 highlights
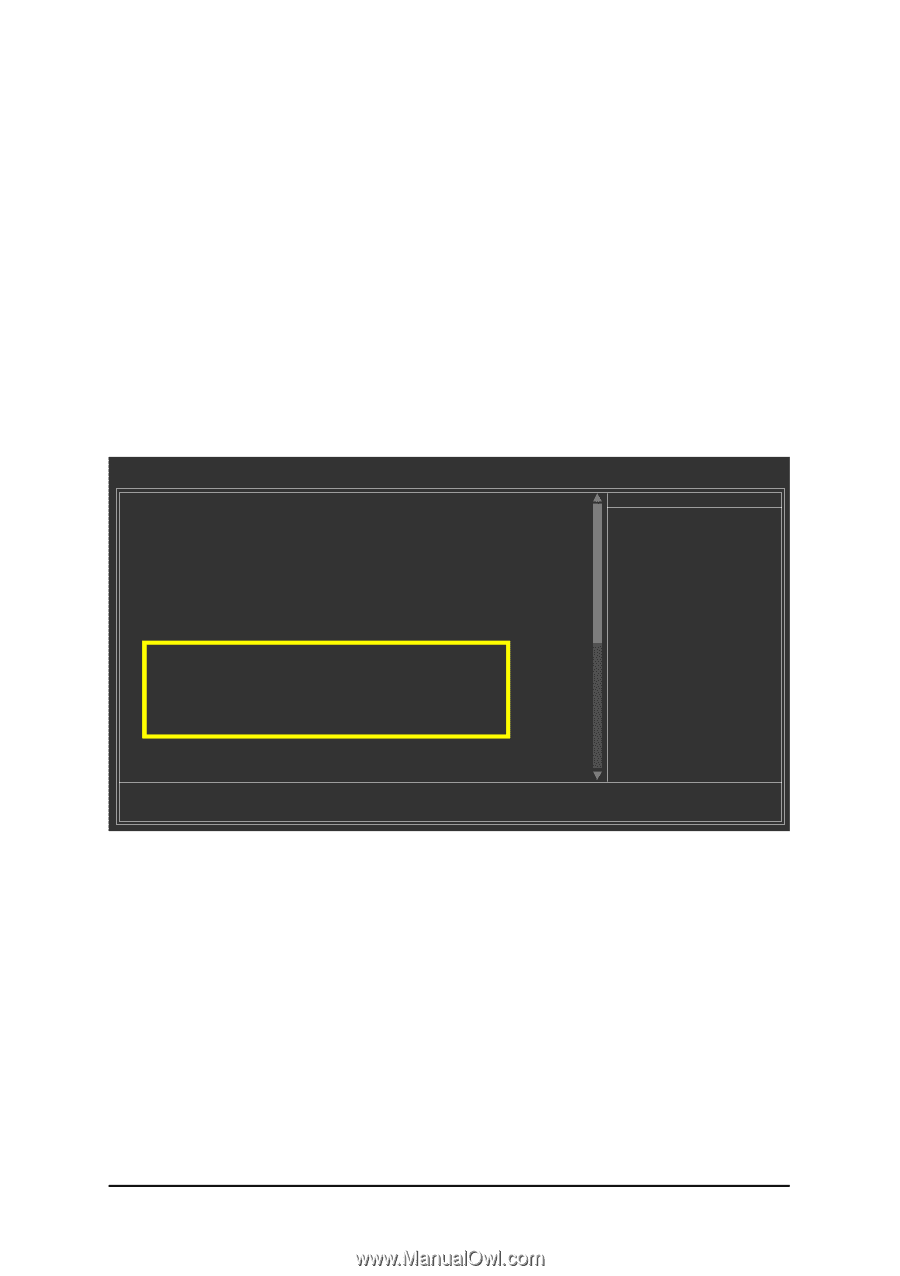
Ác (6) Configuring a bootable RAID array with Microsoft Windows 2000 Åé Problem: Users cannot install Windows 2000 with Service Pack 2 (or previous versions) to a bootable RAID volume. ¤¤ There are two solutions to resolve this issue. Solutions 1: ¤å Use the NVRAID tool (nForce Driver Version 5.xx) to convert the boot volume to a RAID array. Here are the detailed step-by-step instructions: Step 1: Install Windows 2000 onto a selected hard drive. Download and install Windows 2000 Service Pack 4 from Microsoft's website. Step 2: After system restarts, press Del to enter system BIOS Setup during POST (Power-On Self Test). Under the Integrated Peripherals menu (Figure 20) assure the SATA port connecting the SATA hard disk (the one containing the Windows 2000) is Enabled (Figure 20). Save settings and exit the BIOS setup. CMOS Setup Utility-Copyright (C) 1984-2005 Award Software Integrated Peripherals On-Chip IDE Channel0 On-Chip IDE Channel1 IDE DMA transfer access On-Chip MAC Lan On-Chip LAN BOOT ROM IDE/SATA RAID function IDE Primary Master RAID IDE Primary Slave RAID IDE Secndry Master RAID IDE Secndry Slave RAID Serial-ATA 1 SATA 1 Primary RAID SATA 1 Secondary RAID Serial-ATA 2 SATA 2 Primary RAID SATA 2 Secondary RAID IDE Prefetch Mode On-Chip USB USB Memory Type [Enabled] [Enabled] [Enabled] [Auto] [Disabled] [Enabled] [Disabled] [Disabled] [Disabled] [Disabled] [Enabled] [Enabled] [Enabled] [Enabled] [Enabled] [Enabled] [Enabled] [V1.1+V2.0] [SHADOW] Item Help Menu Level} higf: Move Enter: Select +/-/PU/PD: Value F5: Previous Values F10: Save ESC: Exit F7: Optimized Defaults F1: General Help Figure 20 (This BIOS setup screen is captured from GA-K8N Ultra-SLI, BIOS ver. F2a) SATA Hard Drive Configurations (nForce series) - 14 -
-
 1
1 -
2
-
3
-
4
-
5
-
6
-
7
-
8
-
 9
9 -
 10
10 -
 11
11 -
 12
12 -
 13
13 -
 14
14 -
 15
15 -
 16
16
 |
 |