Gigabyte GA-G41M-ES2L Manual - Page 35
BIOS Setup - overclock
 |
UPC - 818313007445
View all Gigabyte GA-G41M-ES2L manuals
Add to My Manuals
Save this manual to your list of manuals |
Page 35 highlights
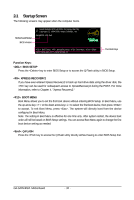
2-3 MB Intelligent Tweaker(M.I.T.) CMOS Setup Utility-Copyright (C) 1984-2009 Award Software MB Intelligent Tweaker(M.I.T.) Robust Graphics Booster CPU Clock Ratio (Note) x Fine CPU Clock Ratio (Note) CPU Frequency [Auto] [15X] +0.0 2.66 GHz(266x10) Item Help Menu Level ******** Clock Chip Control Standard Clock Control CPU Host Clock Control x CPU Host Frequency (Mhz) PCI Express Frequency (Mhz) >>>>> Advanced Clock Control [Disabled] 200 [Auto] ******** DRAM Performance Control ******** Performance Enhance [Standard] System Memory Multiplier (SPD) [Auto] Memory Frequency (Mhz) 667 667 DRAM Timing Selectable >>>>> Standard Timing Control x CAS Latency Time (SPD) 5 [Auto] Auto Move Enter: Select F5: Previous Values +/-/PU/PD: Value F10: Save F6: Fail-Safe Defaults ESC: Exit F1: General Help F7: Optimized Defaults CMOS Setup Utility-Copyright (C) 1984-2009 Award Software MB Intelligent Tweaker(M.I.T.) x tRCD 5 x tRP 5 x tRAS 15 >>>>> Advanced Timing Control Advanced Timing Control Auto Auto Auto [Press Enter] Item Help Menu Level ******** Mother Board Voltage Control ******** Voltage Types Normal Current >>> CPU CPU Vcore 1.375V [Auto] CPU Termination 1.200V [Auto] CPU Reference 0.805V [Auto] >>> DRAM DRAM Voltage 1.800V [Auto] Move Enter: Select F5: Previous Values +/-/PU/PD: Value F10: Save F6: Fail-Safe Defaults ESC: Exit F1: General Help F7: Optimized Defaults Whether the system will work stably with the overclock/overvoltage settings you made is dependent on your overall system configurations. Incorrectly doing overclock/overvoltage may result in damage to CPU, chipset, or memory and reduce the useful life of these components. This page is for advanced users only and we recommend you not to alter the default settings to prevent system instability or other unexpected results. (Inadequately altering the settings may result in system's failure to boot. If this occurs, clear the CMOS values and reset the board to default values.) (Note) This item appears only if you install a CPU that supports this feature. - 35 - BIOS Setup
-
 1
1 -
2
-
3
-
4
-
5
-
6
-
7
-
8
-
9
-
10
-
11
-
12
-
13
-
14
-
15
-
16
-
17
-
18
-
19
-
20
-
21
-
22
-
23
-
24
-
25
-
26
-
27
-
28
-
29
-
 30
30 -
 31
31 -
 32
32 -
 33
33 -
 34
34 -
 35
35 -
 36
36 -
 37
37 -
 38
38 -
 39
39 -
 40
40 -
41
-
42
-
43
-
44
-
45
-
46
-
47
-
48
-
49
-
50
-
51
-
52
-
53
-
54
-
55
-
56
-
57
-
58
-
59
-
60
-
61
-
62
-
63
-
64
-
65
-
66
-
67
-
68
-
69
-
70
-
71
-
72
-
73
-
74
-
75
-
76
-
77
-
78
-
79
-
80
-
81
-
82
-
83
-
84
-
85
-
86
-
87
-
88
 |
 |
