Gigabyte GA-K8N Pro Sil3512 SATARAID O.S. Installation Manual - Page 8
Making a SATA controller driver disk
 |
View all Gigabyte GA-K8N Pro manuals
Add to My Manuals
Save this manual to your list of manuals |
Page 8 highlights
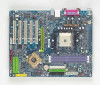
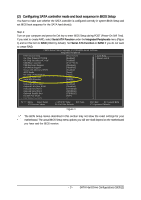
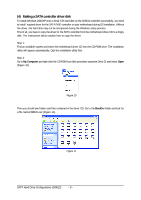
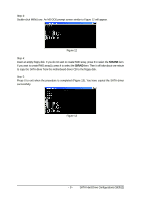
Ác (4) Making a SATA controller driver disk Åé To install Windows 2000/XP onto a Serial ATA hard disk on the SiI3512 controller successfully, you need to install required driver for the SATA RAID controller on your motherboard during OS installation. Without ¤¤ the driver, the hard disk may not be recognized during the Windows setup process. First of all, you have to copy the driver for the SATA controller from the motherboard driver CD to a floppy ¤å disk. The instructions below explain how to copy the driver. Step 1: Find an available system and insert the motherboard driver CD into the CD-ROM drive. The installation utility will appear automatically. Quit the installation utility first. Step 2: Go to My Computer and right-click the CD-ROM icon (this procedure assumes Drive D) and select Open (Figure 10). Figure 10 Then you should see folders and files contained in the driver CD. Go to the BootDrv folder and look for a file named MENU.exe (Figure 11). Figure 11 SATA Hard Drive Configurations (Sil3512) - 8 -
-
 1
1 -
2
-
 3
3 -
 4
4 -
 5
5 -
 6
6 -
 7
7 -
 8
8 -
 9
9 -
 10
10 -
 11
11 -
 12
12
 |
 |