Gigabyte GA-Q87M-D2H User Manual - Page 12
Internal Connectors, Line In Jack Blue, Line Out Jack Green, Mic In Jack Pink
 |
View all Gigabyte GA-Q87M-D2H manuals
Add to My Manuals
Save this manual to your list of manuals |
Page 12 highlights
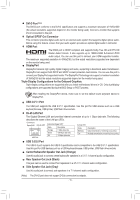
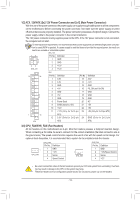
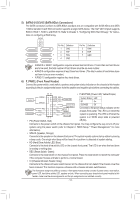
Line In Jack (Blue) The default line in jack. Use this audio jack for line in devices such as an optical drive, walkman, etc. Line Out Jack (Green) The default line out jack. Use this audio jack for a headphone or 2-channel speaker. This jack can be used to connect front speakers in a 4/5.1/7.1-channel audio configuration. Mic In Jack (Pink) The default Mic in jack. Microphones must be connected to this jack. The audio jacks can be reconfigured to perform different functions via the audio software (supported functions for each jack may vary based on hardware specification). Only microphones still MUST be connected to the default Mic in jack. •• When removing the cable connected to a back panel connector, first remove the cable from your device and then remove it from the motherboard. •• When removing the cable, pull it straight out from the connector. Do not rock it side to side to prevent an electrical short inside the cable connector. 1-7 Internal Connectors 1 3 2 15 4 6 9 5 7 8 12 13 11 10 14 1) ATX_12V 2) ATX 3) CPU_FAN 4) SYS_FAN 5) SATA3 0/1/2/3/4/5 6) F_PANEL 7) F_AUDIO 8) SPDIF_O 9) CLR_CMOS 10) F_USB30 11) F_USB1/F_USB2 12) COMA/COMB 13) LPT 14) DEBUG 15) BAT Read the following guidelines before connecting external devices: •• First make sure your devices are compliant with the connectors you wish to connect. •• Before installing the devices, be sure to turn off the devices and your computer. Unplug the power cord from the power outlet to prevent damage to the devices. •• After installing the device and before turning on the computer, make sure the device cable has been securely attached to the connector on the motherboard. - 12 -
-
 1
1 -
2
-
3
-
4
-
5
-
6
-
 7
7 -
 8
8 -
 9
9 -
 10
10 -
 11
11 -
 12
12 -
 13
13 -
 14
14 -
 15
15 -
 16
16 -
 17
17 -
18
-
19
-
20
-
21
-
22
-
23
-
24
-
25
-
26
-
27
-
28
-
29
-
30
-
31
-
32
-
33
-
34
-
35
-
36
 |
 |
